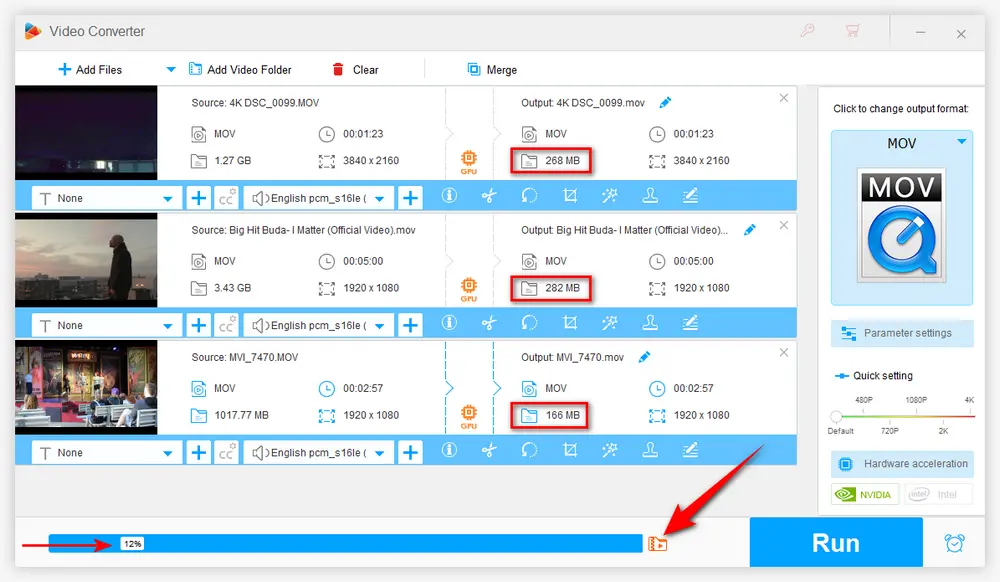
Nowadays, many modern digital cameras, DVs or drones take UHD footage in QuickTime Movie format the very large file size. That's where QuickTime video compression comes into play. Next, we'll explore various techniques to compress QuickTime videos on Windows using a reliable and efficient video compressor: https://www.videoconverterfactory.com/download/hd-video-converter-pro.exehttps://www.videoconverterfactory.com/download/hd-video-converter-pro.exe
You may have ever experienced that quite a lot of QuickTime videos are downloaded, recorded, or produced in a large file size, which are inconvenient in some cases, such as transferring, uploading, storing, etc.
Apparently, a topic that cannot be avoided is how to resize QuickTime videos and make them smaller, which is helpful to:
Given this, we'll explore a beginner-friendly application, making the QuickTime video compression task extremely simple.
Without any obscure jargon and intricate operations, WonderFox HD Video Converter Factory Pro provides you with 6 flexible methods, making it easier than ever to make a QuickTime video smaller. Get this handy QuickTime movie compressor now!
General people are hampered by lack of video editing skills and improper operation. They are always concerned with the outcome, not the process, and that includes me, of course, lol!
I realized it's no big deal until I found this WonderFox HD Video Converter Factory Pro, an intuitive and self-explanatory program for video editing novices. Not only does it compress QuickTime movie files, but also excels in video recording, downloading, and converting. Here's how it makes a QuickTime video smaller in 6 methods.
💡 Based on the quantity and size of your QuickTime videos, it may take a while to load all them all.
💡 This application isn't just limited to conversion and compression tasks. It also offers additional modules such as "Downloader", "Recorder", "GIF Maker", and "Toolbox", which offer extra functionality if you're interested in exploring further.

💡 HEVC (aka H.265) and VP9 are two advanced video compression standards and successors to the widely used H.264 and VP8, which offer up to 50% better data compression at the same level of video quality. Roughly speaking, it's considered as the lossless conversion when you convert video to HEVC or VP9.
💡 If the compatibility is not a issue for you, AV1 video codec offers even higher compression efficiency over others, but it may need more encoding time at the current stage.

💡 In essence, the higher the video bit rate, the higher the quality of video. Either way can reduce QuickTime file size at the expense of sacrificing the video quality.

💡 It can batch compress your QuickTime videos in the conversion list, saving your time and effort.
⚠️ Note: This method adopts lossy compression, equivalent to lowering the bit rates. The smaller the file size, the worse the video quality. You have to keep the balance between the quality and file size.

💡 You have to know that resolution doesn't solely determine the video quality. But generally, a video with a higher resolution has better quality. Why? Because cameras usually record videos at a higher bit rate when the resolution is larger.

If your QuickTime video was shot at a high frame rate, say 60fps, 120fps or higher, you can also compress its size by reducing the frame rate:
💡 Frame rate is the number of frames that are displayed per second in a video. A higher frame rate makes the video look smoother, especially in fast-moving scenes. But it also means a larger file size. By reducing the frame rate, you're decreasing the number of frames in the video, and thus reduce the file size.
⚠️ However, be aware that reducing the frame rate too much may make video look a bit choppy.

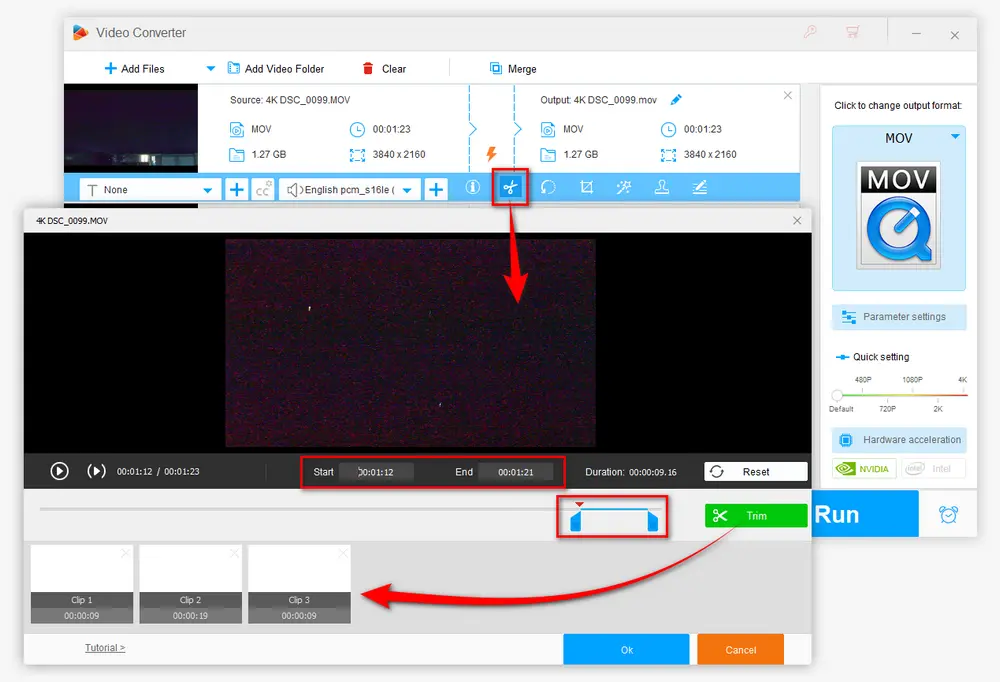
Sometimes, the simplest way to compress a QuickTime video is to cut out the parts you don't need.
💡 Tips: You're not limited to just trimming one part. You can split QuickTime file into multiple parts if you want. And if you need to, later on, you can even merge multiple video clips into one. This is especially useful if you have a long video with some redundant or unimportant sections. By trimming it down, you can not only reduce the file size but also make the video more focused and engaging.

💡 Hardware acceleration (Intel QSV and Nvidia NVENC) is available for H264 and H265/HEVC encoding.
💡 The latest version of graphics card driver is required to utilize GPU acceleration.
💡 Learn more here: QSV Encoder| NVENC Encoder


Pretty simple, isn't it? It may overturn your conventional view. No complicated operations and dazzling interface, only a few mouse-clicks and the QuickTime video compression will be perfectly done.
Don't hesitate to free downloadfree download and give it a try. I can imagine a joyful "WOW" coming out of your mouth.
And also, if you have any better and simpler way to compress QuickTime videos, please let me know.

WonderFox DVD Ripper Pro
1. Rip DVD to 600+ presets with GPU acceleration.
2. Remove all sorts of DRM from DVD.
3. Compress an 8GB DVD to 1-2 GB digital video file.
4. 5-minutes to fast digitize DVD in MPEG-2 MPG.
5. Make a 1:1 intact digital copy (ISO or VIDEO_TS).
6. Multiple audio tracks, hard/soft and forced subs.
7. Support homemade/commercial DVD & ISO & Video_TS folder.
Privacy Policy | Copyright © 2009-2025 WonderFox Soft, Inc. All Rights Reserved