These days, whether self-shot or downloaded videos, are of ultra-high clarity and quality (e.g., 4K/8K resolutions, 120/240 fps). But at the same time, it also means that the video size becomes very large, which brings more challenges, such as storage limits, sharing hassles, streaming buffering, etc.
Whatever the reason, if you still have no idea how to do that, you've come to the right place!
WonderFox HD Video Converter Factory Pro is a versatile tool specifically designed for video and audio processing. It offers six effective methods to condense video file size. 🛠️
Here are a few reasons why it’s often recommended:
Get this handy video condenser below and dive into how to use it.
💡 Based on the number and size of the files, it may take a while to load all the videos.
💡 This application isn't just limited to conversion and compression tasks. It also offers additional modules such as "Downloader", "Recorder", "GIF Maker", and "Toolbox", which offer extra functionality if you're interested in exploring further.


💡 Tips: HEVC (aka H.265) and VP9 are two advanced video compression standards and successors to the widely used H.264 and VP8, which offer up to 50% better data compression at the same level of video quality. Roughly speaking, it's considered as the lossless conversion when you convert video to HEVC or VP9.
💡 Additionally, AV1 codec offers even better compression efficiency compared to HEVC and VP9. However, AV1 support may not be as widespread in most devices and media players at present.


⚠️ Note: This method adopts lossy compression, the smaller the file size, the lower the video quality. You have to keep the balance between the quality and file size.


💡 In principle, this method is equivalent to adjusting "Compression Setting Bar", which both achieve file size compression at the expense of sacrificing video quality. In essence, the higher the video bit rate, the higher the quality of video.


💡 You have to know that resolution doesn't solely determine the video quality. But generally, a video with a higher resolution has better quality. Why? Because cameras usually record videos at a higher bit rate when the resolution is larger.


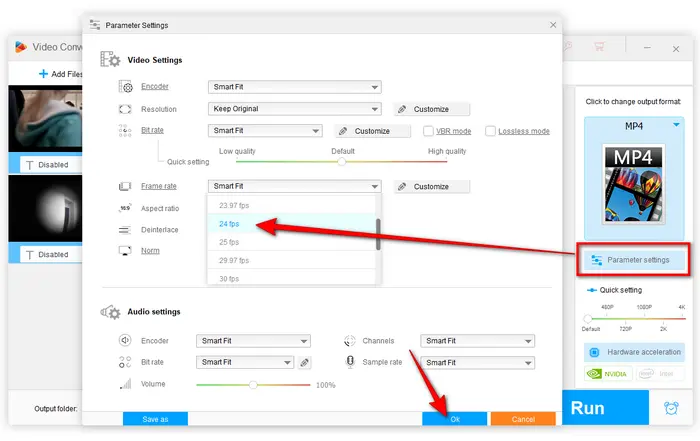
If your video was shot at a high frame rate, say 60fps, 120fps or higher, you can also condense its size by reducing the frame rate:
💡 Frame rate is the number of frames that are displayed per second in a video. A higher frame rate makes the video look smoother, especially in fast-moving scenes. But it also means a larger file size. By reducing the frame rate, you're decreasing the number of frames in the video, and thus condenses the file size.
⚠️ However, be aware that reducing the frame rate too much may make video look a bit choppy.


Sometimes, the simplest way to condense a video file is to cut out the parts you don't need.
💡 Tips: You're not limited to just trimming one part. You can split video into multiple parts if you want. And if you need to, later on, you can even merge multiple video clips into one. This is especially useful if you have a long video with some redundant or unimportant sections. By trimming it down, you can not only reduce the file size but also make the video more focused and engaging.


After everything is all set, choose an output path on the bottom. Lastly, hit "Run" button to start to condense video files.
Whether you want to condense an MP4 file, a MOV file, or any other video format, this program has got you covered. You can also use it to condense videos for sharing on various platforms like email, WhatsApp, Discord, and more.
Also Read: Video Compression Software | Compress Video for Email | Compress Video for YouTube


For a visual demonstration of the video condensing process, you may find the following video helpful:
You see, WonderFox HD Video Converter Factory Pro provides a comprehensive set of tools for condensing video file sizes. With its six practical methods, you can tailor the compression process to your specific needs, whether it's for saving storage space, sharing videos more easily, or any other reason. So, start exploring these methods today and take control of your video files! 🌟
Terms and Conditions | Privacy Policy | License Agreement | Copyright © 2009-2025 WonderFox Soft, Inc. All Rights Reserved