Whether you want to create a how-to video for software or record essential parts of an online meeting for later review on a laptop, having handy screen recording software at your disposal will make the tasks much easier. Fortunately, there is a wide range of recording applications for your laptop, covering options from built-in tools to 3rd-party software, simple to complicated. To make it easier for you to make a decision, we’ve rounded up four handy recording utilities for Windows laptops and Mac, along with detailed guides on how to screen record on a laptop.
Without further ado, let’s get started with the solutions to how to screen record with audio on a Windows laptop.
Wonder how to screen record with sound on a Windows laptop? In the following part, we’ll present you with two easy methods, including bundled software for Windows 10/11 and a functional third-party program for Windows 11/10/8/8.1/7…
Xbox Game Bar is included in all Windows 10/11 PCs. You can also get it for free from Microsoft Store. This pre-installed application is primarily designed to help gamers to capture game videos, broadcast and share their clips online, take screenshots, and offer many other widgets to help take control of their gaming activities. Not only can you record game videos, but you can choose to record activities from other applications. However, you are limited to recording one application for up to 4 hours at a time and can’t record your desktop or Windows File Explorer.
It’s not a difficult application to get to grips with. Here is how it works:
Step 1. Press the keyboard shortcuts Windows key + G to open the Game Bar overlay. If the Xbox Game Bar overlay doesn’t appear, go to Windows Settings > Gaming> Xbox Game Bar and turn on the switch to enable the Xbox Game Bar feature. Press the shortcuts again.


Step 2. The Capture widget will appear on the left by default and gives quick access to capture controls. You can see this on the Capture widget. Hit the recording button (with a dot on it) or press the Windows key + Alt+ R to start recording.
Step 3. Then a Capture Status overlay with a timer and two recording control buttons will appear. The mic symbol button allows you to mute or enable your external microphone while capturing.
Step 4. Hit the stop button on the bar to stop the recording. Alternatively, you can use the Windows key + Alt + R to end it. Go to Widget Menu > Gallery to preview the recorded video.


Again, Xbox Game Bar is only available on Windows 10/11 laptops so you’ll need a third-party tool if you want to screen record on a Windows 7 or Windows 8/8.1 laptop. Here we recommend WonderFox HD Video Converter Factory Pro which works well with Windows 11/10/8.1/8/7 and even lower.
This featured-packed screen recorder for Windows laptops offers a set of editing features that the Xbox Game Bar lacks. No tech knowledge is required. With it, users at all levels can record their laptop’s screen and sounds from both internal and external simultaneously without hassle.
DownloadDownload it first and follow the guide below to learn how to screen record on a laptop Windows using this robust recorder.
Launch the program on your laptop first. You’ll see five modules on the startup interface: Converter, Downloader, Recorder, GIF Maker, and Toolbox. Head to the Recorder module.
Tips: As you can see, besides screen recording, this all-in-one software also supports converting, editing, compressing, downloading, GIF making, etc., with no restrictions on the size or length of your files.


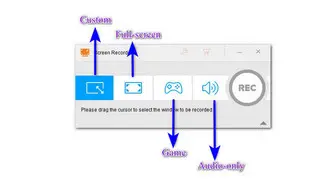
On the top of the Recording window, select a recording mode based on your actual needs.
# Full Screen Mode enables you to capture your entire screen.
# Custom Mode allows you to select a specific part of the screen.
# Game mode enables you to record gameplay highlights without lagging.
# Audio-only mode lets you capture sounds from the system and microphone simultaneously.


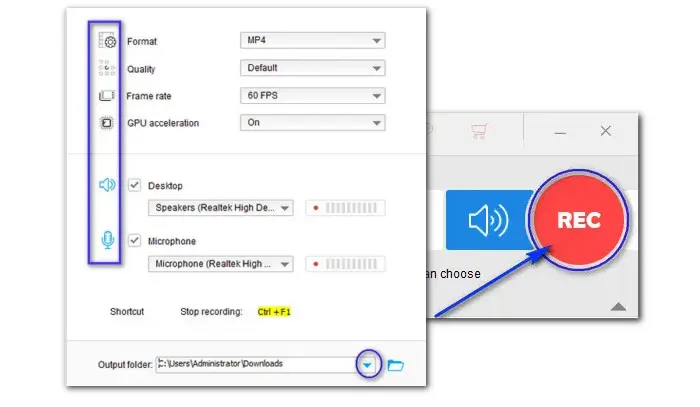
For recording screen with audio, you need to choose a video format (MP4/AVI/MOV/MKV) and select the needed quality and frame rates from the drop-down list. Then choose an audio source.
For recording audio only, choose an audio format (MP3/AAC/AC3/ WAV) first. Then tick off the Desktop option and it will function as an internal audio recorder. If you want to do a voice-over for Google Slides or other presentations, simply toggle on the Microphone option.
Note that GPU acceleration only works on PCs with a certain Nvidia graphics card or an Intel CPU.


Before starting, you can click on the bottom inverted triangle button to set a new folder for the recording file so that you can easily locate and use them later.
At last, hit the red REC to start recording and press keyboard shortcuts Ctrl + F1 to stop. If you want to edit the recorded files, you can import the files into the Converter module where you can cut, merge, compress, and convert the file as you like.
Disclaimer: This video recorder is intended for personal use only. We do not encourage the recording of videos from websites and live TV shows that may include copyrighted content.
The brand doesn’t matter when capturing videos with the above-mentioned two screen recording utilities as long as you’re using a Windows-based laptop or desktop. We’ve compiled some posts covering most laptop brands, let’s have a look:
How to Screen Record on HP Laptop: Step-by-Step Guides
[3 Easy Ways] How to Screen Record on Asus Laptop?
How to Screen Record on Lenovo Laptop with Sound?
How to Screen Record on Acer Laptop with Sound?
How to Screen Record on Surface Pro with Sound?
How to Record Audio on HP Laptop (Mic & System)?
How to Screen Record on Dell Laptop with Audio Easily?
Similarly, we’re going to share with you two screen capturing apps for Mac. One is the built-in QuickTime Player, the other is paid recording software named Snagit. Read on to the following two parts where we demonstrate them in detail.
QuickTime Player is bundled software that comes with all Macs. In addition to serving as a media player, QuickTime Player also features a recording function, allowing you to record the activities happening on your Mac screen and capture external audio from the mic. The only downside is the inability to screen record with internal audio. To fix it, most people opt for a more competent 3rd-party recording tool, for example, Snagit (which we’ll discuss in the second part).
First, let’s see how to record on MacOS 13 laptop with sound using QuickTime Player:
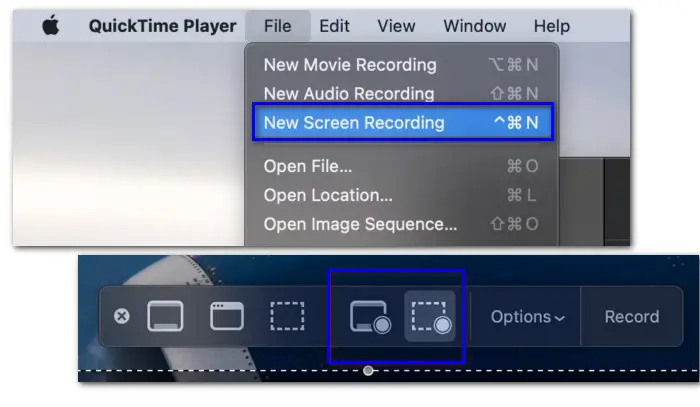
Step 1. Open QuickTime Player. Go to File > New Screen Recording.
Step 2. A recording control bar will appear at the bottom of your screen with options to record the screen as well as take a screenshot. You can choose to either record the entire screen or a specific portion.
Step 3. Hit the Options tab to enable the microphone, create a new output folder for recorded files, set a timer, and more.
Step 4. Click on the Record button to start. Press the stop button in the menu bar or press Command + Control + Esc to stop recording.


Note: An alternative method to record your Mac screen is to use Screenshot Utility. It uses the same screen-capturing tools as QuickTime Player, but Screenshot Utility is only available on Macs running macOS Mojave or newer versions.
Although QuickTime Player is a good choice for users who don’t want to download external apps or sign up. But some reported that the recording quality created by QuickTime Player doesn’t meet their expectations. Then you can try a great alternative to QuickTime Player—Snagit.
Snagit offers a one-time fee plan, along with a full-version free trial for 15 days. You can use it to screen record a video on a laptop or capture a screenshot. It enables you to capture the entire desktop or only a selection of your screen and save the recording as an MP4 file. It also provides you with options to record your webcam, system audio, and mic audio.
Here is how to record a video on laptop Mac using Snagit:
Step 1. Open Snagit and select the Video capture mode.
Step 2. When you’re ready, hit the big red Capture button.
Step 3. Then choose either the floating Fullscreen tab or draw to select the part of the screen you wish to record.
Step 4. Next, you can toggle the Webcam recording on or off to switch between the video from your webcam and the video on the desktop. Finally, hit the Record button to start recording your screen on a Mac laptop. If you are finished, click to stop.


That’s all details about how to screen record on laptop using the four screen recorders for Windows laptops and Mac. All in all, the best way to know for sure is simply to try it out. Hope you can find the right one here. Thanks for reading.
1. How to record your screen on Windows 10?
Windows 10 users can use the built-in recording feature bundled with the Xbox Game Bar overlay to record screen. Simply press Windows + G to bring up the tool. However, it doesn’t support recording the Desktop and the File Explorer. But you can try other screen recorders like WonderFox HD Video Converter Factory Pro, OBS, etc.
2. Does my laptop have a built-in screen video recorder?
It depends. Laptop running Windows 10 or Windows 11, comes preinstalled with a free screen recorder called Xbox Game Bar. But Windows 8 and previous versions don’t have a screen recorder.
3. How do I Record full screen on my laptop?
WonderFox HD Video Converter Factory Pro features a dedicated Full-screen mode, letting you capture the whole screen of your laptop easily.
Terms and Conditions | Privacy Policy | License Agreement | Copyright © 2009-2025 WonderFox Soft, Inc.All Rights Reserved