Different from microphone and tab audio, system audio refers to all the audio originating from any of your computer’s programs, including notifications, songs, background music in the playing video, game audio, and more. To record system audio on Windows 11, a powerful PC sound recorder is necessary. Below, you will get the two best recorder apps and learn how to make a recording of system audio Windows 11 effortlessly and efficiently. Read on.
Next, we will share three ways to record sound from computer Windows 11: WonderFox HD Video Converter Factory Pro (full-featured), Audacity (open-source), and Sound Recorder (pre-installed). Navigate to your desired part for the details.
WonderFox HD Video Converter Factory Pro is the most recommended way to record system sound Windows 11. It provides a screen recorder that can capture everything on your computer, including the system sound and microphone. The screen recorder is easy for all users with a simple interface – select the recording mode, format, audio source, and start/stop recording directly on one page. Audio will be recorded and saved to MP3, AC3, AAC, or WAV files. It also offers a Converter program to help you convert, compress, and edit audio recordings.
If you are looking for an all-in-one audio recorder, converter, editor & downloader for Windows 11, WonderFox HD Video Converter Factory Pro is definitely the best choice. Free download it now!
Launch HD Video Converter Factory ProLaunch HD Video Converter Factory Pro after you install it on your Windows 11 PC. Then, follow the simple steps to record the system sound.
Select Recorder on the home interface.


Select the Audio-only mode by clicking the sound icon at the top of the Screen Recorder interface. Then, pick an audio recording format from MP3, AC3, AAC, and WAV or keep it as default.
Related Post: MP3 Recorder Windows 10 | WAV Recorder Windows 10


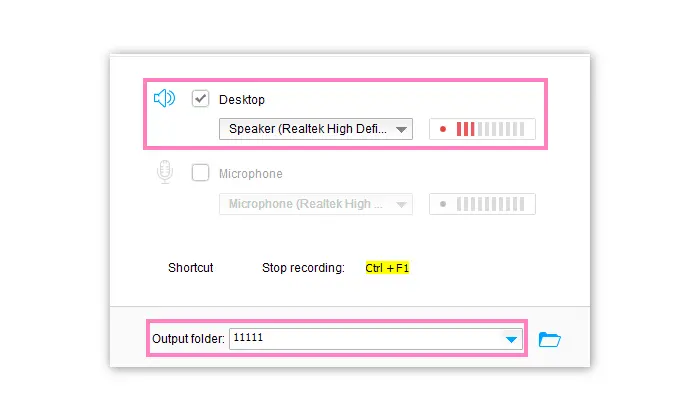
Tick the Desktop checkbox to record computer audio Windows 11. You can also change the device between Speaker and Realtek Digital Output. When you play audio on your computer, the volume beside will change.
* If you are not sure what device you’re using, open the Sound Control Panel to check it.
Also Read: Record Audio on PC without Microphone | Screen Record without Background Noise


Click the ▼ button at the bottom side of the interface and specify an output path for your audio recording. Finally, press the red REC icon to record system audio Windows 11. There is no file length limit, just recording as long as you have enough space for storage on your PC. When you finish, click the top button or press Ctrl + F1 to end the recording.


Audacity is a well-known audio application to record and edit audio files on Windows and other operating systems. The latest Audacity 3.3.3 version works well on Windows 11, so you can use it to record desktop audio. With some sound cards, the software can also capture streaming audio through the microphone or mixer. Besides recording, Audacity provides many other features to help you edit audio files, such as high sample rates, sound effects, and support for multiple plug-ins. Beginners can get started with the software quickly, yet the advanced features may take you much time to learn and utilize.
Before start, please install the software on your Windows 11 system. Visit Audacity’s official website: https://www.audacityteam.org/
Step 1. Set up a Recording
Run Audacity on your Windows 11 computer and click “Audio Setup” > “Host” > “Windows WASAPI”. Tap “Audio Setup” again and go to “Recording Device” to choose the system’s default speaker.


Step 2. Windows 11 Record System Audio in Audacity
After the recording configurations, click the red button from the top toolbar to start recording audio from your computer immediately. You can pause the recording by clicking the ‖ button. Once done, click the ■ button to end the recording. It will not save the recorded audio but only stop the recording.


Step 3. Save the Audio Recording
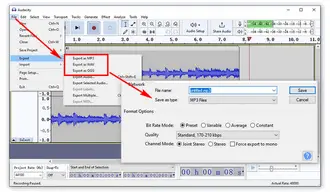
Go to “File” in the top menu bar > “Export” > “Export as MP3/OGG/WAV”. Rename the recording file and select an output folder to save it on your computer. Before that, you can also change the Bit Rate Mode, Quality, and Channel Mode based on your needs.
Related Resources: VBR vs CBR | MP3 320kbps | WAV Bitrate | Stereo to Mono


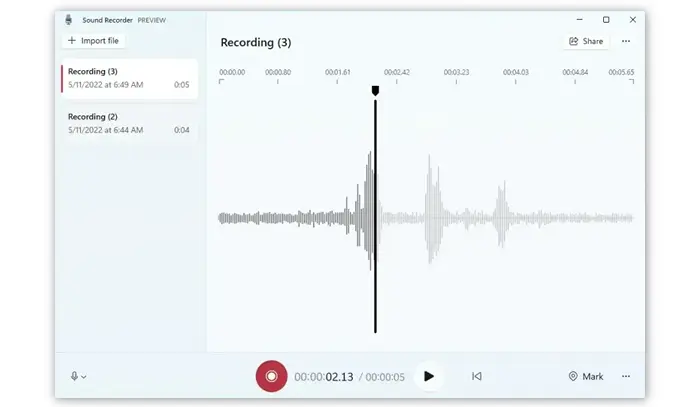
Windows 11 has a native Sound Recorder app that works well and is easy to use. The program is updated from the Voice Recorder app on Windows 10 and offers more recording options. It uses a new design language and supports recording audio files in multiple formats, including M4A, MP3, WAV, FLAC, and WMA. Moreover, it allows you to set the audio quality, change the recording device, mark key points in the recording, auto-save, play back, trim, rename and delete recordings, etc.


Step 1. Search for the Sound Recorder program on your Windows 11 computer. If it’s still the old version for some reason, you can open this link to update the app via the Microsoft Store.
Step 2. Launch the recorder app, go to the bottom left corner of the interface, and choose the system audio recording device from the drop-down options.
Step 3. Click the red “Record” button to start recording audio from your computer.
Step 4. Click the “Record” button again to stop the recording.
Step 5. Right-click on the recorded audio file and select “Open file location” to check the final file, which will be saved in the user profile > Documents > Sound recordings by default.
Tips. After recording, you can add markers to the audio file, alter the playback speed, and change the audio quality in the “Settings” (accessible from the three-dot menu at the bottom right corner) of the Sound Recorder app. The audio quality ranges from auto, medium, and high to the best.
It is easy to let Windows 11 record system audio with the built-in sound recorder app, but the function of this software is relatively simple. Hence, we recommend you use the third-party WonderFox Voice Recorder and Audacity, which can help you record system audio on Windows 11, 10, and other Windows versions without effort. Free download the software to have a try.
That’s all. Thanks for reading till the end of the post! Have a great day!
Terms and Conditions | Privacy Policy | License Agreement | Copyright © 2009-2025 WonderFox Soft, Inc.All Rights Reserved