![]() by Kevincy
by Kevincy
Updated on Dec 19, 2024
HEVC/H.265 is undoubtedly a very efficient video compression format nowadays, which has been adopted by more and more 4K high-definition shooting and recording devices as the default settings. However, many people complained that it produced various problems when loading the HEVC footage to Adobe Premiere Pro. Does PR support HEVC codec? How to smoothly import and edit HEVC videos in PR? The following article will give the answer.
To simply fix HEVC footage not working in PR, this user-friendly video transcoder is a great helper:
Definitely! Actually, as early as Adobe Premiere Pro CC 2015.1, it had provided native support for HEVC (H.265) video. And since Premiere Pro CC 2018 (12.0.1), it has supported QuickTime HEVC video. Now you can see it supports H.265 media with resolutions up to 8192x4320 on the official webpage:
https://helpx.adobe.com/premiere-pro/using/supported-file-formats.html
So why did you fail to load HEVC footage to PR? I have compiled 3 typical cases and corresponding solutions below, check it out!
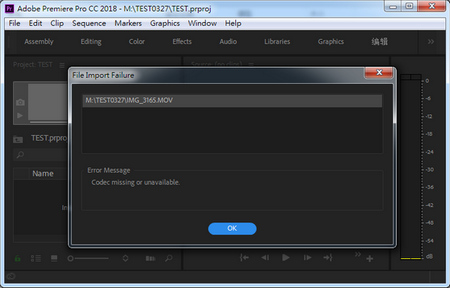 HEVC Premiere Pro Error Message
Importing 4K HEVC footage to Premiere Pro always causes different error messages, such as "Codec missing or unavailable", "We were unable to open the file on disk", "The importer reported a generic error", etc.
Solution: You may be prompted to install the H.265 codec for the first time when you load an HEVC video, "HEVC codec must be installed to use this feature. Click OK will install and enable this codec for immediate use". If it doesn't work, you can generally fix the problem by updating PR to the latest version. But it should be noted that HEVC codec is only available for licensed Creative Cloud members, trial version of PR does not recognize HEVC codec.
Also Read: Adobe Premiere MKV Import Issue | Change Aspect Ratio in Premiere Pro | Error Retrieving Frame in PR
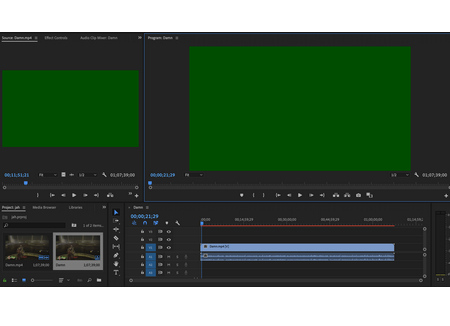 Premiere Pro HEVC Green Screen
Sometimes, it will show a green image in Source Monitor after loading an H.265 video in Premiere Pro, but the audio works, just as shown in the screenshot.
Solution:
1. Rename the video file extension to .mp4, .mov, .avi, .mpg, etc. This method has been confirmed by a large number of people, although it doesn't make any sense. You may give it a shot.
2. Clear Media Caches. Go to the Edit menu > Preferences > Media Cache > Remove Media Cache Files, then restart Premiere Pro.
3. Switch Renderer. Go to the File menu > Project Settings > General > Video Rendering and Playback > Renderer: Mercury Playback Engine Software Only.
4. Turn off hardware acceleration. Go to the Edit menu > Preferences > Media, uncheck "Enable hardware accelerated decoding (requires restart)." Then restart Premiere Pro.
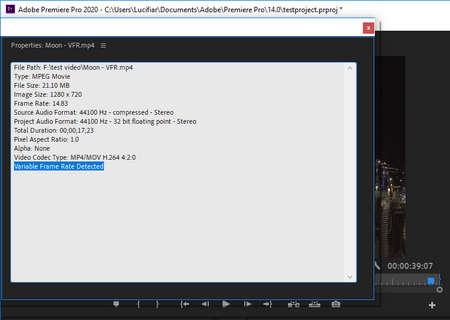 VFR H.265 Premiere Pro
Some HEVC footages were recorded in variable frame rate (VFR), which will fail to import to Premiere Pro or cause video and audio out of sync or Premiere Pro only importing audio issue.
Although Premiere Pro CC 2018 (12.0.1) and later versions offer the Preserve Audio Sync feature to relieve this situation, it inevitably cannot give consideration to all kinds of program versions, systems, hardware configuration, etc., and H.265 typically performs poorly on most computers and devices. Therefore, the ultimate solution is to convert VFR videos to constant frame rate (CFR). To simply fix this problem, I recommend WonderFox HD Video Converter Factory Pro. After 3 straightforward steps, you'll see the juicy result.
Now, free downloadfree download this utility, and see how it works to fix Premiere Pro HEVC codec issue.

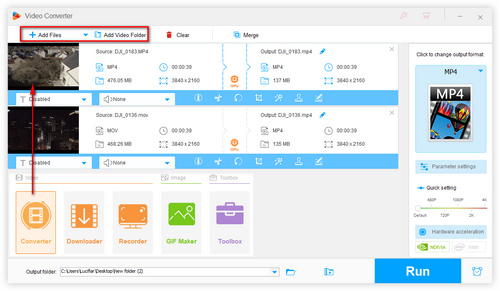
Before start, please free downloadfree download the software.
Open HD Video Converter Factory Pro and you'll see 5 main features: Converter, Downloader, Recorder, GIF Maker and Toolbox. Open Converter and import HEVC VFR video files by clicking on the Add Files/Add Video Folder button, or directly drag and drop them into the program.
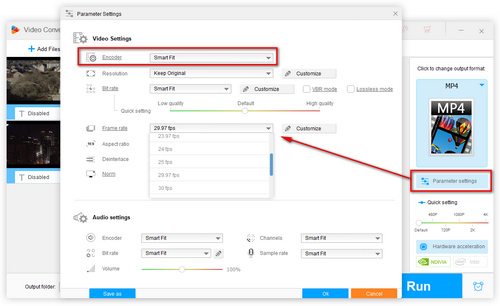
Open and expand the Output Format list on the right side, then select any profile from 600+ preset formats and devices. Make sure it's supported by Adobe Premiere Pro. MP4 format is a great choice for its better compatibility. Next, press Parameter settings below to open the Settings window, you are able to change the video encoder, customize or select a common video frame rate right there. Then click OK to save changs and go back to the main interface.
Tips: you're also allowed to convert CBR to VBR, upscale/downscale video resolution, customize video bitrate, change aspect ratio, etc.
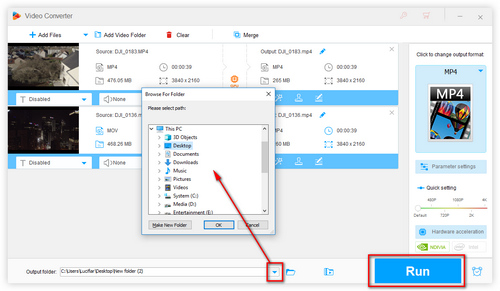
Press the inverted triangle icon at the bottom to assign an output folder to save the converted video file. Lastly, hit the Run button to start to transcode video at GPU-accelerated speed. After done, the output video can be imported into Premiere Pro without any problem.
After going through the similar steps, it can also solve 'There was an error decompressing audio or video' error when you import MP3 into Premiere Pro.
1. Regularly update both your operating system and Premiere Pro to ensure optimal compatibility with HEVC files.
2. Before transcoding or making significant changes, back up your original HEVC files to prevent data loss.
3. HEVC decoding is resource-intensive. Ensure your system meets the recommended specifications for handling high-resolution HEVC footage. If your system supports it, enable hardware-accelerated decoding to improve playback performance. Go to Edit > Preferences > Media, and check "Enable hardware accelerated decoding". Restart Premiere Pro to apply the changes.
4. For smoother editing, especially on less powerful systems, consider creating proxy files. Proxies are lower-resolution versions of your footage that are less taxing on your system during the editing process. Once editing is complete, Premiere Pro will apply the changes to the original high-resolution files during export.
At last...
HEVC can be wrapped into various containers, and it is not a very performant format. Besides, you need a higher computer configuration to decode and handle it in Adobe Premiere Pro. If you don't have a high end computer and always run into indescribable problem in processing HEVC video, it's better to transcode it to H.264 video for worriless editing work. If this post is helpful to you, don't hesitate to share it with your friends. That's all!
Just download this awesome assistant for transcoding HEVC/H.265 Video to Premiere Pro well-compatible format.
A Flexible Toolkit to Help Edit HEVC Video in Premiere Pro Swimmingly

HD Video Converter Factory Pro
1. Self-explanatory GUI and foolproof operation.
2. Equipped with common encoders: HEVC, H.264, MPEG4, DivX, etc.
3. Convert VFR video to CFR, and other customized settings.
4. Practical editing features: cut, merge, rotate, watermark, etc.
5. Integrated with video downloader, screen recorder, GIF maker, etc...