Nowadays, many people use Adobe Premiere Pro to edit videos, but some people get stuck at the first step - file import. A common error is "Premiere Pro only importing audio no video" (some people may also encounter "Premiere Pro only importing video"). This kind of problem is usually caused by:
Not being able to import video into Premiere is frustrating but fixable. Let’s go into the detailed solutions below.
Tip: It is advisable that you update your Premiere Pro to the latest version and restart the program first, or reboot your system to check if the error is still there. If the problem persists, try the methods below.
Wrong video codec is the most likely reason for your “Premiere Pro imports only audio” error.
Video formats like MP4, MOV, MKV, etc. are just video containers to hold media data encoded with different audio and video codecs. When you import a video, if Premiere recognizes only the audio codec and not the video codec, only the audio is imported in Premiere Pro.
[References: How to Check Video Codec | Premiere Pro Supported Video Formats]
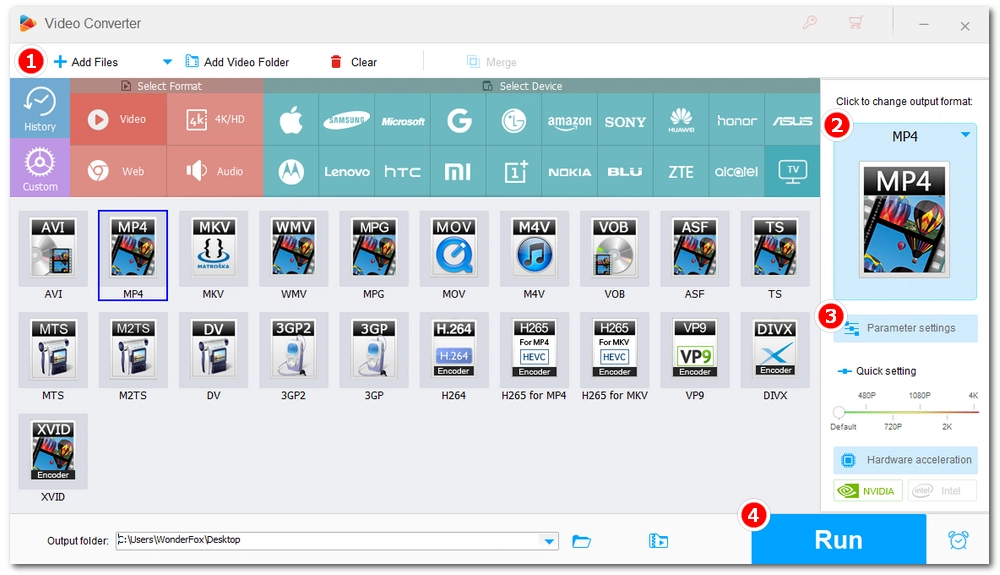
Changing the video to a Premiere-friendly format is the solution. All you need is a reliable video converter, such as WonderFox HD Video Converter Factory Pro, which can easily convert video codecs in a few clicks. Download the software and follow the steps below.
1. Launch the software and open the Converter. Next, click + Add Files or drag your video directly into the program.
2. Click the right-side format image to open the output format library. Choose a Premiere-compatible container format, such as MP4/H264.
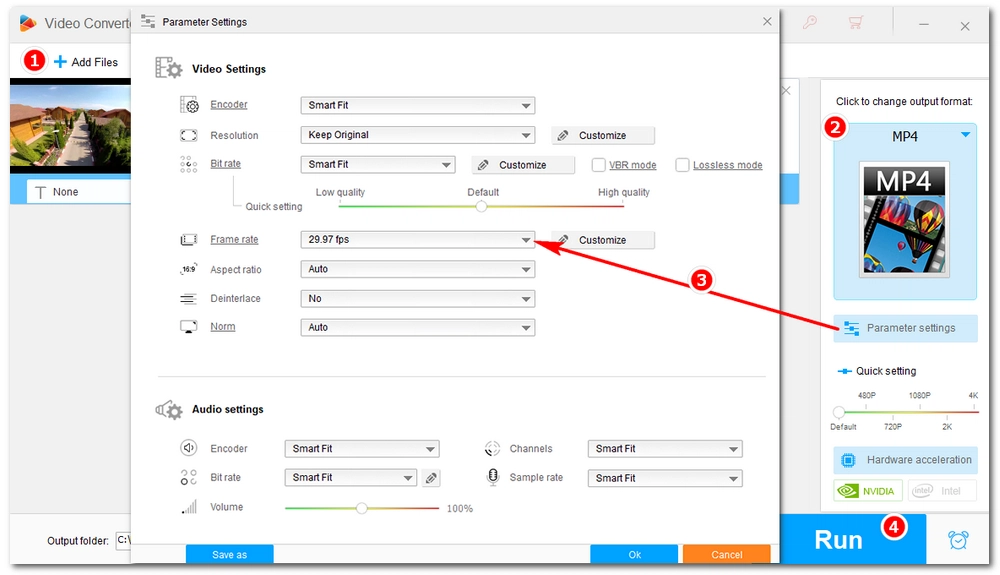
3. Open Parameter settings and change the video encoder to a supported codec, e.g. H264. Then click OK to save the changes.
4. Click the bottom triangle button or set an output folder or leave it as default. Finally, hit Run to start the conversion.
5. Import the converted file into Premiere Pro again and see if the problem goes away.

Sometimes the old or unused cache files can affect Premiere Pro’s functionality and lead to Premiere only importing audio errors. You can try to clear the media cache to improve the overall performance. Here is how:
1. Open your Premiere Pro and navigate to Edit > Preferences > Media Cache.
2. Select the Delete… button next to Remove Media Cache Files.
3. In the next dialog box, select Delete all media cache files from the system.
4. Click OK.
5. Restart Premiere Pro and see if it works.

If your video was recorded on a device like an iPhone, it was most likely recorded using Variable Frame Rate (VFR). However, most video editors, including Premiere Pro, do not handle VFR video well, and may cause the audio to be out of sync or only the audio to be imported into Premiere.
The best solution is to convert VFR to CFR (Constant Frame Rate) before importing. We will use the same software used in Fix 1 to handle this conversion. Download the tool to get started.
1. Run HD Video Converter Factory Pro and open the Converter.
2. Import your video into this program and choose a Premiere-supported output format.
3. Open Parameter settings and find Frame rate. Pick one option from the frame rate drop-down list. We suggest frame rates above 20fps for normal video consistency.
4. Click Run to start converting VFR to CFR.
5. Check if it troubleshoots the issue.

If your video is dropped successfully into the media bin but no video in the timeline, you can try the following two fixes.
Source patching and Track targeting are two features in Adobe Premiere Pro to determine how clips are placed onto the timeline. When editing, you must ensure that the appropriate video and audio tracks are enabled for seamless import. If the video track (V1) is not turned on, it will lead to Premiere Pro not importing video only audio. Conversely, if the audio track (A1) is disabled, only the video will be imported.
Now, double-click on the clip you want to import to load it into the Source monitor. Now you should see the V1 boxes on the left of the timeline. Turn on both V1 and A1 tracks (highlighted in blue) and see if it works.

Here is one last approach… Right-click your video and select New Sequence From Clip. If you see both audio and video tracks appear, copy and paste the full clip to your main timeline and work from there.
Why is Premiere Pro only importing audio? I think now you know the answer and solution. I hope the methods mentioned here help to solve your Premiere Pro only importing audio problem. But if none of the above solutions work, please contact Adobe Support for more help.
That’s all for now. Thanks for reading.

WonderFox DVD Ripper Pro
WonderFox DVD Ripper Pro is a professional DVD ripping program that can easily rip any DVD, be it homemade or commercial, to all popular formats including MP4, MKV, MP3, WAV, H264, H265, Android, iPhone, etc. without a hitch. It also lets you edit and compress DVD videos at high efficiency. Download it to enjoy fast and trouble-free DVD ripping experience.
Privacy Policy | Copyright © 2009-2025 WonderFox Soft, Inc.All Rights Reserved