Step 1. Launch Bandicam and move to the “Video” option.
Step 2. Click “Settings” to bring up the “Recording settings” window and select the “Sound” category.
Step 3. Ensure the “Record sound” option is checked, and then select “Default Output Device” under the “Primary Sound Device”.
Step 4. If you want to record the screen with voice, just set the microphone in the “Secondary Sound Device” option.

Step 1. Go to the system tray and right-click the sound-shaped icon.
Step 2. If you see “Not plugged in” with the "Speakers", then check if the audio cable is well connected to your computer.
Step 3. Click to enable the "Speakers" if it is "Disabled".
Step 4. Upon seeing “Ready” under the Speakers, click to set "Speakers (or Headphones)" as the default sound device.
Step 5. Right-click the sound-shaped icon and select “Open Volume Mixer”, and set the Device/Applications volume to 70%~90%.

If the issue still exists after checking the Bandicam and Windows sound settings, try to change the compatibility mode of Bandicam.
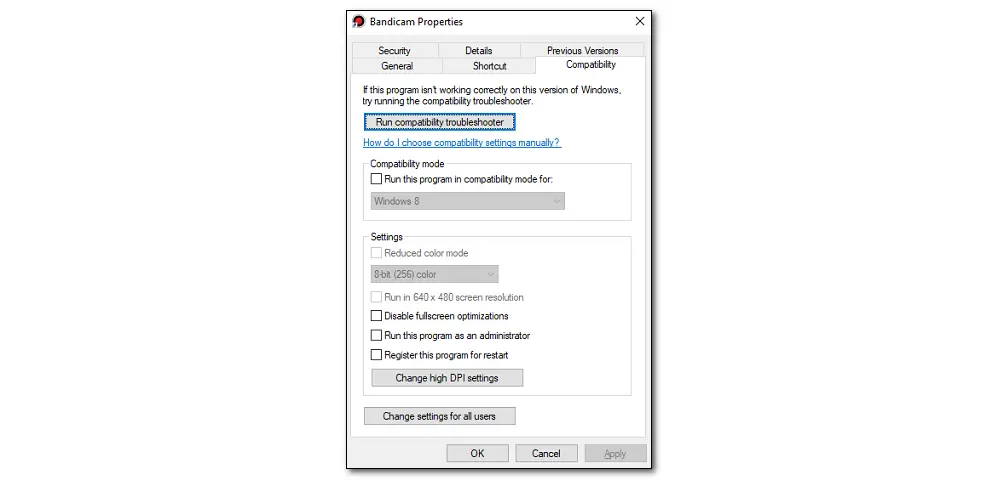
Step 1. Right-click the Bandicam icon on your desktop and select " Properties" from the drop-down options.
Step 2. Switch to the "Compatibility" tab and check the "Run this program in compatibility mode for" box. If it is checked, try to uncheck it. Then, click "Apply" > "OK" to save the change.
Step 3. Restart Bandicam and have a test to see if the issue is fixed.

The last solution is to uninstall and reinstall Bandicam if the above solutions still cannot solve the issue.
Just open the "Settings" window and select "Apps", find and click Bandicam, and click "Uninstall".
Then, go to the Bandicam website to download and install the latest app version.
If the above ways still can’t fix the Bandicam sound not recording problem, or if you want to record the screen with audio right now, you can also try another screen recorder to record your screen and audio directly.
WonderFox HD Video Converter Factory Pro is a reliable program that can help you record any desktop activity in high quality. Users can take it to record online meetings, gameplay, websites, etc. without hassle. It also enables you to record the system and microphone simultaneously.
Free downloadFree download it now and follow the steps below to see how to record audio with Bandicam alternative on your desktop.
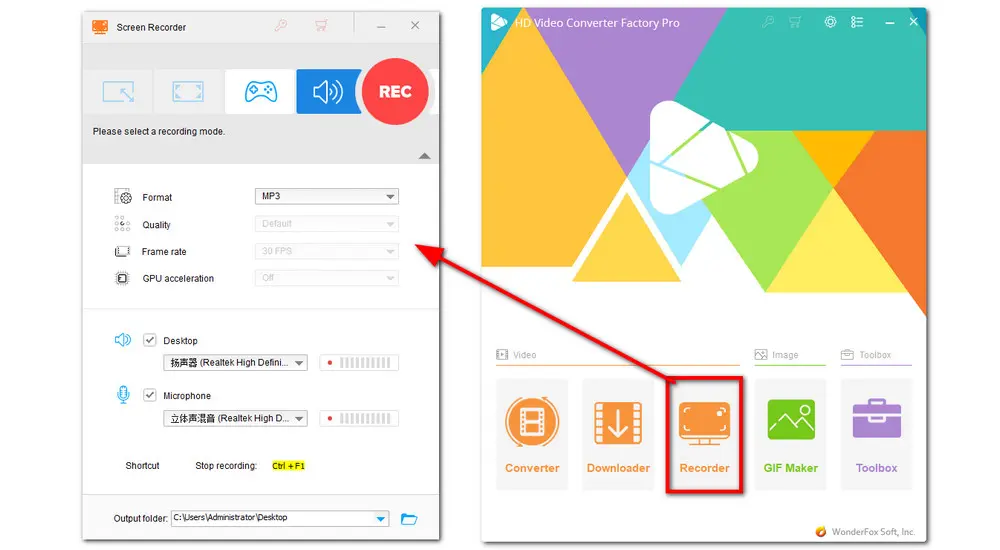
Step 1. Launch HD Video Converter Factory Pro on your PC after installation and click to open the “Recorder”.
Step 2. Select Recording Mode
1> If you want to record the screen with audio, select the "Custom Mode" or "Full-screen Mode", customize the recording settings, and then check the audio source you want to record.
2> If you want to record audio only, you just need to select the Audio-only mode, choose a recording format, and make sure the need audio source devices are enabled.
Step 3. Set an output folder by clicking the inverted triangle button at the bottom of the image. Click the red REC button to start recording and stop the recording by pressing “Ctrl + F1”.

Tips: You can then enter the “Converter” module from its initial interface to edit the recordings and do more.
Also See: Screen Recorder No Watermark | Screen Recorder No Time Limit | Screen Recorder Editors | 4K Screen Recorder
Now, take the tips to fix Bandicam not recording audio issue. Hope you can easily record audio with Bandicam successfully! If the Bandicam no sound problem still exists, you can also give third-party software like HD Video Converter Factory Pro a try! It can record audio from a desktop and microphone in high quality without hassle.

WonderFox DVD Ripper Pro
Remove DVD CSS, RCE, region code, etc. without hassle;
Convert DVD to MP4, MKV, AVI, etc. with high quality;
Copy DVD to ISO with 1:1 content;
Rip DVD audio to MP3, WAV, AAC, and more;
Edit and compress DVD movies with high efficiency...
* Please refer to the DVD copyright laws before ripping a cop-protected DVD.
Privacy Policy | Copyright © 2009-2025 WonderFox Soft, Inc.All Rights Reserved