Today, learning how to screen record with microphone can be useful when you need to explain a new product to customers, give a lecture to students, comment on a game to the audience, etc. The good news is, a decent screen and mic recorder will help you greatly.
Wondering how to screen record with your microphone voice? Don't worry. This post is going to share one of the best screen recording software with microphone and the simple steps to record screen and microphone in Windows 10/11. Just read and follow.
WonderFox HD Video Converter Factory Pro is an all-in-one application with multiple video and audio tools, one of which is a screen recorder that can record computer screen, games, system sound and microphone audio.
This is a very good screen recorder with mic, which can help you record screen and microphone audio together. It also supports system audio, and you can capture microphone and system audio at the same time while recording. If needed, you can even record only the sound as audio file.
💡 It can maintain high video and audio quality with its High-quality mode. In addition, you can adjust more settings such as format and frame rate as needed. After recording, you can further optimize the recording with the built-in video editor.
The software has a simple and intuitive user interface, and there are no confusing steps to interfere with your workflow. You can now free download free download the software and follow the tutorial to start your first recording.
* Please free download free download the recommended screen and mic recorder to your PC first.
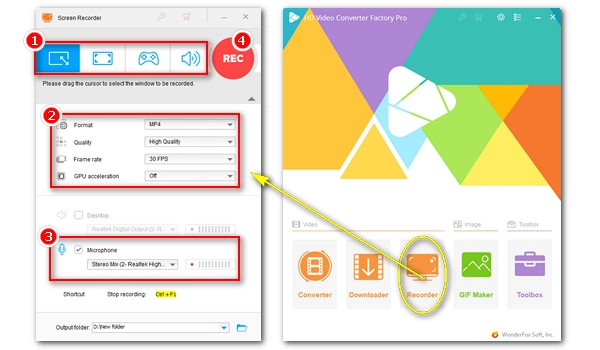
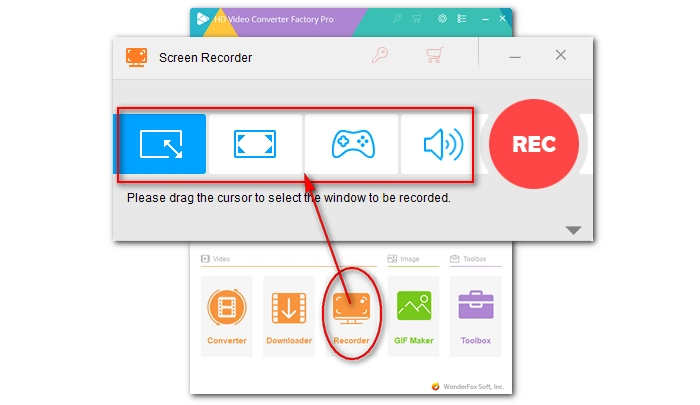
Launch WonderFox HD Video Converter Factory Pro on your PC and open the Recorder. Next, select a recording mode from the four options presented – Custom, Full Screen, Game, and Audio-only (from left to right).
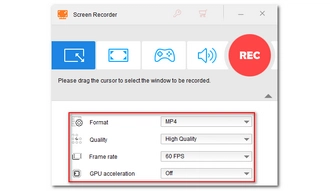
In the recording settings, choose a recording Format, Quality, and Frame rate based on your needs. If your computer supports hardware acceleration, you can also turn on GPU acceleration to enhance the recording performance.
🗨️ General settings for recording a high-quality video:

Now, go to the audio source and select the Microphone source if you want to record the screen with just the mic audio.
You can speak into the microphone and if you see the volume bar move, it means the program has correctly detected your microphone.
💡 At the bottom of the interface, you can also set an output folder or leave it as default.

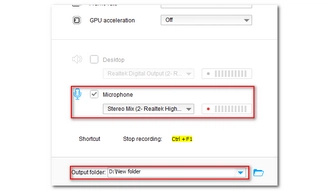
When everything is ready, click REC to start the recording after a five-second countdown. After the recording is complete, press hotkeys "Ctrl + F1" to stop the recording.
The recorded file will automatically pop up in the output folder, and you can view the recordings in a media player or within the Converter module.
Hot Search: Crop a Screen Recording | Record Part of Screen | Record Zoom Meeting | Record Sound from Computer


For iPhone, iPad, or iPod running iOS 11 or later, it’s easy to do screen recording with microphone using the built-in screen recorder. First, you need to add the feature to the Control Center. On your iOS device, just go to Settings > Control Center > Customize Controls, and then select Screen Recording. Next, long-press the Screen Recording button. Tap on the Microphone Audio option on the new menu to turn the mic on for your screen recording. Finally, just select Start Recording to record your screen and microphone at the same time.
The recommended WonderFox HD Video Converter Factory Pro can also help you record both the system and mic sound when you record the screen simultaneously. The steps are the same with screen recording with mic, only that you need to check the "Desktop" audio source as well. Download Download this versatile software and try it now!
Screen recording with microphone is a very important skill in this digital world today. Luckily, with a proper screen recording app with microphone, like the one introduced here, you can record screen and microphone simultaneously with no effort. I hope you like this method.
That’s pretty much all I want to share about how to screen record with microphone audio in Windows 10/11. Thanks for reading. Have a nice day!
Terms and Conditions | Privacy Policy | License Agreement | Copyright © 2009-2025 WonderFox Soft, Inc.All Rights Reserved