How to Record Twitch Stream on Windows?
Try WonderFox HD Video Converter Factory Pro!
Twitch is a popular live video streaming platform where users can watch and create a variety of content, from gaming to creative categories such as art, music, food, sports, and more. If you’re looking for an easy way to record the streams of your favorite streamer on Twitch or just want to copy a clip of the stream for sharing with friends, you’ve landed on the right page. In this article, you’ll get to know 3 different ways to record Twitch streams on a Windows PC with ease. Check them out now!
Here we’ll recommend Windows users 3 Twitch stream recorders along with detailed tutorials to capture Twitch streams easily.
When it comes to the best all-purpose screen recorder for Windows, our first recommendation is WonderFox HD Video Converter Factory Pro. This Twitch stream recorder not only enables you to record streaming content from Twitch on PC intuitively but also allows you to record online meetings, gameplay highlights, voiceovers, and many others in high quality, including 1080p and 4K. You can capture video with audio from either your mic, or system, or both. After recording, you can continue to edit, compress, and convert the recordings based on your needs.
No time limit and no watermark! Click the button below to download the recorder and have a try.
After installation, start HD Video Converter Factory Pro and choose Recorder on its home screen.


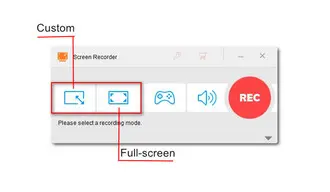
In the recorder window, you need first to set a recording mode based on your needs. You can hit the first Custom mode to choose to record a specific part of your screen or press the second Full-screen mode to capture the whole display.


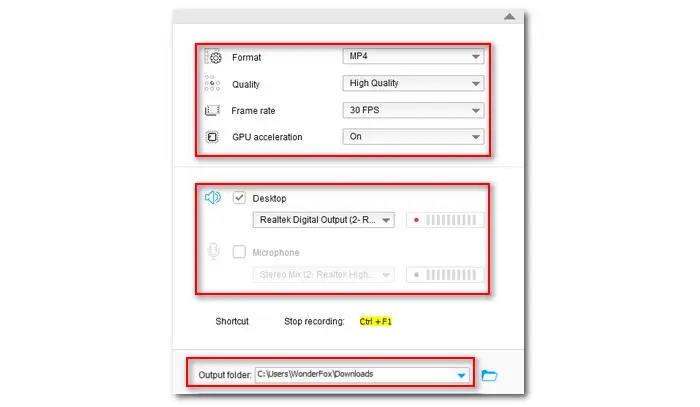
Move down to set the recording format, quality, frame rate, turn on/off GPU acceleration, and choose an audio source.
At the bottom, you can choose a new destination or leave it as default.


Finally, hit the red REC button to start recording and press keyboard shortcuts Ctrl + F1 to stop. You can choose to record the full-length stream on Twitch or just a small clip of it for sharing with friends.


PCs running Windows 10 or Windows 11 come pre-installed with a game recording feature that allows you to capture live-stream video with ease. This feature is integrated with the Xbox Game Bar and can be quickly activated by shortcuts Windows key + ALT + R.
This built-in recorder is simple and free, though, it has some caveats. You cannot use it to record the computer’s desktop or File Explorer. Besides, it can only capture one open app on your computer at a time. The recording process will be interrupted if you switch to other windows or minimize the window. Check the recording steps below:
Step 1. First, you need to go to the PC’s Settings window to enable the feature. Navigate to Gaming > Xbox Game Bar and toggle it on below.
Step 2. Now, use the shortcuts Windows + G to open up the Xbox Game Bar overlay.
Step 3. In the Capture widget menu, click the recording button or simply press Windows + Alt + R on your keyboard to record your game clip.
Step 4. Once the stream is over, press Windows + Alt + R to end the recording. Then view the recorded gameplay sessions in the Captures.


Related: Fix Game Bar Not Working on Windows 11 | Fix Windows Xbox Game Bar Not Recording Full Screen | How to Clip Last 30 Seconds on PC
It is nothing new that Open Broadcaster Software (OBS) is always discussed when it comes to the best open-source video recorder. This free program can be used for both video streaming and video recording. With it, you can save Twitch streams on various platforms including Windows, Mac, and Linux.
There are multiple recording modes available for your choice. You can customize the recording area as you wish. Besides, it enables you to add several recording sources. Moreover, you have options to strike a balance between export quality and computer performance. Next, let’s see how to record a Twitch stream on PC with OBS:
Step 1. Go to the OBS website to download and install the latest version.
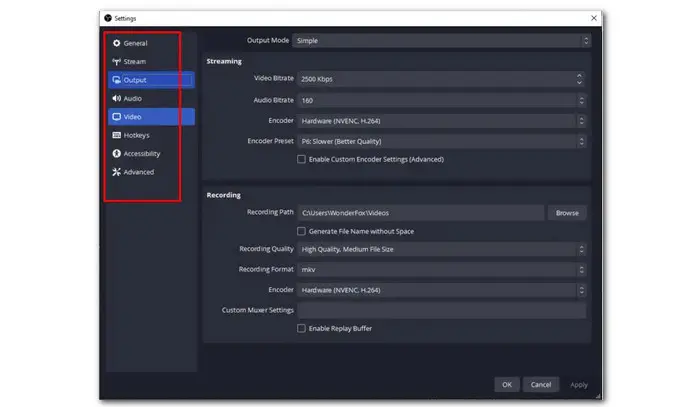
Step 2. Launch OBS. Before starting, you can enter the Settings on the Control panel to preset audio and video configurations.


Step 3. Then back to the main menu, go to the Sources box, and click on the + icon to select a recording mode.
Step 4. To capture a specific window and its contents, choose Windows Capture. It enables you to record the selected window only if there are multiple windows.
Step 5. In the pop-up Properties window, choose the needed window to record and click OK.
Step 6. When you are ready, click on the Start Recording button in the Controls box to begin recording the streaming video on Twitch and save it to your PC.


1. Can I screen record on Twitch?
Yes. With the above screen recorders, you can record whatever on your Twitch like Highlights, VODs, or stream content.
BTW, the recommended WonderFox HD Video Converter Factory Pro also has a powerful downloader. With this functional toolkit, you can not only record but also download Twitch videos like Clips, Highlights, and hours-long VODs on PC effortlessly.
2. How to save your streams on Twitch so viewers can watch them later?
If you’re a streamer, you can make full use of Twitch’s Video on Demand feature to save your streams on Twitch so your fans can re-watch them easily. Then how to save streams on Twitch as VODs? Follow the instructions here:
▪ Visit Twitch’s official website in your browser and log in to your account.
▪ Then click on your avatar in the upper-right corner and select Creator Dashboard from the drop-down menu.
▪ On the left-hand panel, click Settings followed by Stream.
▪ Move down and check the Store Past Broadcasts option in the VOD Settings section to tell Twitch to save streams.
▪ Also, you can toggle on Always Publish VODs if you want your VODs to go public as soon as your stream ends; otherwise, you’ll have to manually publish each video.
In this article, we talked about 3 reliable ways to record Twitch stream on PC. Among them, WonderFox HD Video Converter Factory Pro is highly recommended because of its ease of use, functionality, and stable performance. Whether you’re a beginner or an experienced user, this comprehensive toolkit won’t let you down! Try it now!
Disclaimer: WonderFox does not endorse or encourage recording any copyrighted materials without the copyright holder’s permission. This article is for instructional purposes only.
Terms and Conditions | Privacy Policy | License Agreement | Copyright © 2009-2025 WonderFox Soft, Inc.All Rights Reserved