OBS is great software designed for recording and streaming. Although it is free and accessible for everyone, novices might find it a bit intimidating to use at first. If you are searching for a tutorial on how to capture desktop audio with OBS on Windows, you’re in luck. This article will not only offer you a detailed how-to guide but also a competitive alternative that is user-friendlier for beginners. Quickly install it here: https://www.videoconverterfactory.com/download/hd-video-converter-pro.exehttps://www.videoconverterfactory.com/download/hd-video-converter-pro.exe
Note that this open-source software doesn’t support recording audio only. You’ll end up with an MKV/MP4/MOV video file and need an extra step to extract the audio track from the recorded file.
Follow the steps below to see how to get OBS to record desktop audio on Windows.
Step 1. Get OBS here. A pop-up window named Auto-configuration wizard will appear during installation.
Step 2. For recording purposes only, you just need to tick off “Optimize just for recording, I will not be streaming”. Then it will optimize the settings automatically to make them suitable for recording. This feature does save non-tech-savvy users from the daunting customizable configurations.

Step 3. Once installed, launch OBS. To get a high-quality recording, you can continue to tweak the settings before recording. Click on Settings at the bottom-right of the window. Then go to the Audio part.
Step 4. Here you can set the desired sample rate and audio channels. Also, you can change the audio device input manually.

Step 5. Save the changes and back to the main interface. Then hit the plus icon in the Sources pane at the bottom. Choose to record the sound from the entire desktop or a certain application.
You’ll need to add a video source as well since OBS doesn’t support recording audio only currently. For example, choose Game capture to record game audio.

Step 6. Once all settings are done, hit the Start Recording button in the Controls pane.
Step 7. Click on the Stop Recording button to finish recording the desktop audio.

As I mentioned before, OBS allows you to pre-configure recording settings to get a smooth output. But it lacks a dedicated audio recording function and doesn’t have any editing options for post-production. Therefore, to separate the audio track from the resulting video file, you have to use a third-party editor for OBS. For those who prefer to record desktop audio in a faster and easier way, OBS might let them down.
Don't worry. In the following part, we’ll share with you a functional recording program that not only features an audio-only recording mode but also includes a suite of editing tools. Read on to learn more details.
HD Video Converter Factory Pro offers an all-in-one solution for desktop audio recording and editing. It can also edit the recordings by trimming, cutting, splitting, merging, compressing, and more. Try this multifunctional recording software!
WonderFox HD Video Converter Factory Pro is an all-in-one screen recorder and video editor. Unlike OBS, this watermark-free recording tool has no learning curve at all for those new to video recording and editing.
From software tutorials and online meetings to streaming music and gaming clips, you can record anything on your computer screen. It also allows you to record a specific area of the screen or the entire screen. What’s more, you’re provided with multiple formats options for audio recording when capturing desktop audio. The built-in editor allows you to trim, cut, merge, and compress your recordings. More editing features for video are also available.
Download this functional tool here and follow the guide to learn how to record desktop audio with OBS alternative:
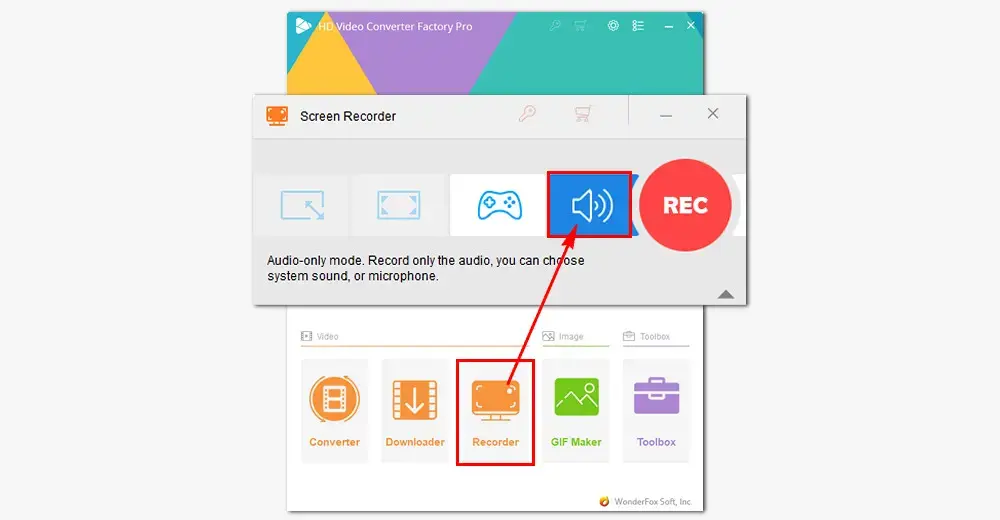
Step 1. Run HD Video Converter Factory Pro and select Recorder from its startup interface. Then hit the speaker icon to enable the Audio-only recording mode.

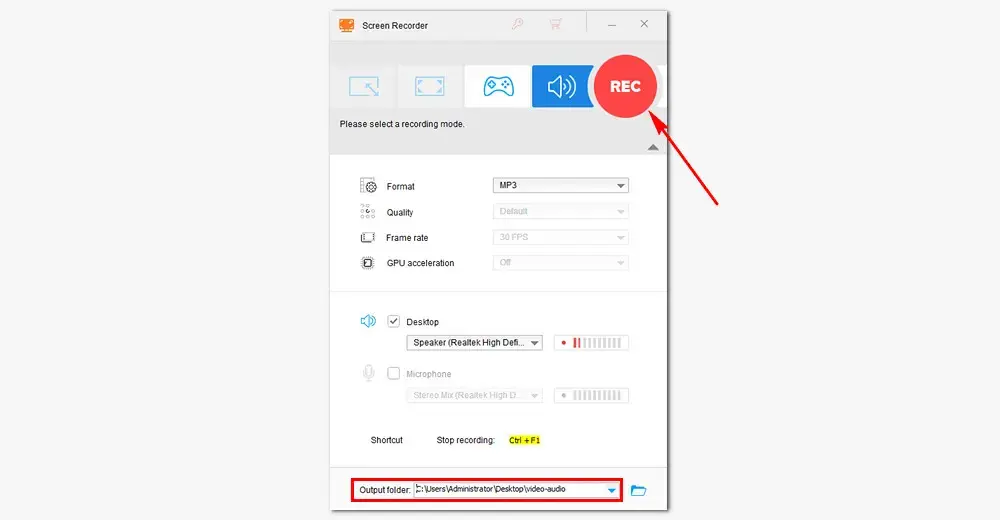
Step 2. Move down to select an audio recording format (MP3/AC3/AAC/WAV) from the Format drop-down list.
Step 3. Then tick off Desktop to record system audio. If you want to capture your voice, you can toggle the Microphone on. Tick off both of them to record the system and microphone simultaneously.

Step 4. Finally, set an output folder by hitting the triangle button. Click on the REC button to start recording your desktop audio after a five-second countdown. Use the hotkey Ctrl + F1 to stop the recording.

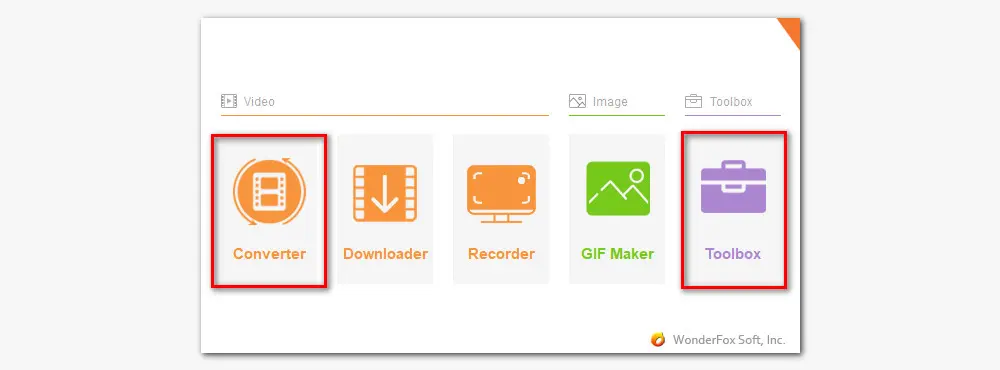
Step 5. After recording, you can import the recorded audio files to the Converter or the Toolbox to trim and merge, edit audio tags, compress audio files, and make ringtones.
You are also allowed to convert the file to other audio formats, add the recorded voice-over to a video, etc.

That's all about how to record desktop audio with OBS. We also offer an easier way to do audio recording. BTW, the recommended WonderFox HD Video Converter Factory Pro can do more than recording. This is a comprehensive toolkit that contains a range of powerful tools including Converter, Recoder, Downloader, GIF Maker, and more.

WonderFox DVD Ripper Pro
1. Convert DVD to MP4, MKV, and other digital videos;
2. Rip audio files from DVD to MP3, WAV, FLAC, etc.
3. Bypass any kind of DVD copy protection;
4. 1:1 quick copy to ISO image and DVD folder;
5. Cut, rotate, add subtitles, add effects, and more...
* This software is designed for personal fair use only.
Privacy Policy | Copyright © 2009-2025 WonderFox Soft, Inc.All Rights Reserved