ShadowPlay, an add-on built-in with the NVIDIA GeForce Experience app, provides an easy and free way for NVIDIA Graphics Card users to record, share, and broadcast gameplay videos. However, ShadowPlay is still far from perfect. Many users have complained about ShadowPlay not recording audio or ShadowPlay only records black screen. The causes could be various. Next, we’ll go through different ways to solve the mentioned issues. Alternatively, you can use the best alternative to ShadowPlay on Windows for game recording. Quickly install it here:https://www.videoconverterfactory.com/download/hd-video-converter-pro.exehttps://www.videoconverterfactory.com/download/hd-video-converter-pro.exe
Common Methods to Fix ShadowPlay Not Recording Audio
Method 1. Raise System Sound Volume
Method 2. Set up Audio Device for ShadowPlay Properly
Method 3. Turn on Privacy Control on ShadowPlay
Method 4. Update or Reinstall NVIDIA GeForce Experience
Best ShadowPlay Alternative: No Lag & No Limit & No Watermark
This is a minor error that many people have overlooked when they face the “ShadowPlay not recording in-game sound” issue. This is pretty easy to fix. Follow the steps below.
Step 1. Right-click on the speaker icon located on the taskbar at the bottom-right corner of your screen.
Step 2. Then choose Open Volume mixer. Then you can see the volumes of the different applications in the pop-up window.
Step 3. Make sure the System Sounds is not muted. You can drag the bars’ sliders up and down to change their volume. Close the window and try recording again.

If ShadowPlay fails to detect the right input/out device, this can also cause issues like “ShadowPlay not recording game audio” or “ShadowPlay mic not working”. To solve it, follow the instructions below.
Step 1. Press keyboard hotkeys Alt + Z to bring up the NVIDIA ShadowPlay layout.
Step 2. Then hit the gear-shaped Setting icon and enter the Audio section.
Step 3. Here you can choose the right microphone device and turn up both the System and Microphone volume. Now, you should be able to record the sounds from mic and in-game.

If the ShadowPlay not recording in-game audio error still exists after trying the previous methods, try to apply another solution as below.
Step 1. Right-click on the Speaker icon from the bottom-right corner of your screen and select Open Sound Settings.
Step 2. Hit the App volume and device preferences option. Here you can see the Output/Input devices that are being used by all the apps.
Step 3. Just change the default output device to the one you are using.

Now, you may use the ShadowPlay to record and check if the issues get fixed. If not, move on to the next step.
You may also have trouble recording video and audio if the Privacy Control is off. It affects the sharing as well. Here is how to enable it.
Step 1. Use Alt + Z to launch ShadowPlay and navigate to the Settings menu.
Step 2. Scroll down the menu and choose Privacy control.
Step 3. Tap on the slider to turn on Privacy control.

If the above methods all fail to fix the ShadowPlay not recording error, then update or reinstall your NVIDIA GeForce Experience.
#Follow the steps below to update.
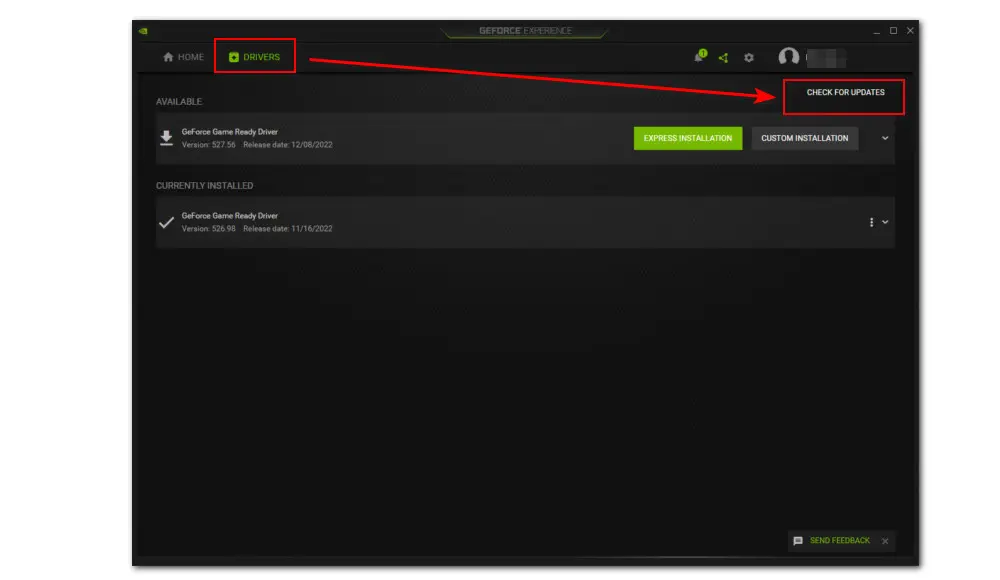
Step 1. Search the Nvidia GeForce Experience app from the Start menu to launch. Then hit the Drivers tab at the upper-left of the interface.
Step 2. Click on the CHECK FOR UPDATES button. Any available driver updates will be displayed here.
Step 3. Then choose EXPRESS INSTALLATION or CUSTOM INSTALLATION to download an available update.

#Follow the steps below to uninstall and reinstall.
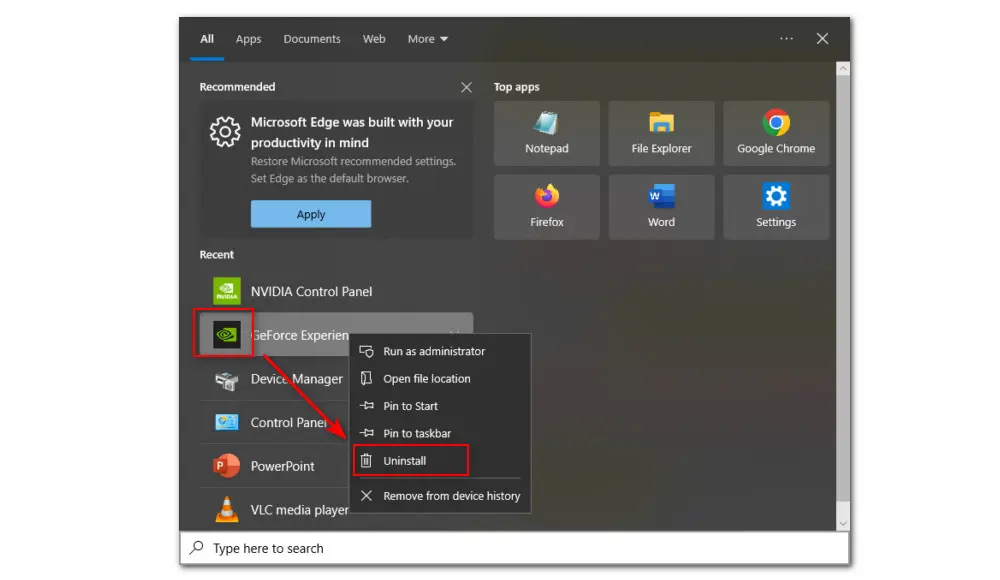
Step 1. Find the Nvidia GeForce Experience app from your Windows Start menu. Right-click on the app to Uninstall.
Step 2. After that, visit its official website to download and reinstall it on your computer.
Step 3. Then launch the app to record gameplay video and see if it works now.

If none of these solutions fix the ShadowPlay not recording sound issue, try an alternative to capture audio with no hassle. Among a variety of screen recorders for Windows, we highly recommend WonderFox HD Video Converter Factory Pro.
Featured with multiple recording modes, this watermark-free screen recording tool can record whatever happens on your desktop screen. With it, you can record mic sounds and in-game audio simultaneously, or separately with simple clicks.
What’s more, it has a wide range of practical features including editing, converting, downloading, compressing, and more.
It is the best option when you are facing any problem like ShadowPlay not recording audio. Now, follow the simple steps to start recording audio on Windows 11/10/8.1/8/7...
Step 1. Download and install HD Video Converter Factory Pro first. Then launch the program and open the Recorder. Choose the fourth Audio-only recording mode.
Step 2. Select a recording format (MP3/WAV/AAC/AC3). To record the in-game sounds and your audio at the same time, you need to enable both Desktop and Microphone options.
Meanwhile, you can click the bottom triangle button to specify a new output path.
Step 3. Click the REC button to start recording after a five-second countdown.
Step 4. To stop recording, simply press hotkeys Ctrl + F1. The recorded audio file will be saved in the folder specified before.

That’s all the fixes I want to share with you for solving ShadowPlay not recording audio issue. Sincerely hope this post can be helpful. Thanks for reading till the end.

WonderFox DVD Ripper Pro
1. Convert DVD to MP4, MKV, and other digital videos;
2. Rip audio files from DVD to MP3, WAV, FLAC, etc.
3. Bypass any kind of DVD copy protection;
4. 1:1 quick copy to ISO image and DVD folder;
5. Cut, rotate, add subtitles, add effects, and more...
* This software is designed for personal fair use only.
Privacy Policy | Copyright © 2009-2025 WonderFox Soft, Inc.All Rights Reserved