It is worth noting that Google Slides doesn’t provide users with a recording button. Therefore, the question that you’re searching for should be “How to record audio for Google Slides?” instead of “How to record audio on Google Slides?” Once you figure out the essence of this question, you’ll realize that what you need is a suitable audio recording tool for Google Slides.
Now let's go through the easy steps to record audio for Google Slides with WonderFox HD Video Converter Factory Pro.
Featured with both recording and editing capabilities, WonderFox HD Video Converter Factory Pro offers you a one-stop solution to record and edit audio and video files without hassles.
This recording software provides a pre-defined Audio-only recording mode to help quickly capture your voice and system sounds simultaneously, or separately. You can record audio to MP3, WAV, AC3, and AAC directly.
The interface is self-explanatory, and every feature is easy to master. Next, I will show you how to record audio on Google slides using this decent audio recorder.
Hit the Download button below to download and install this audio recorder on your Windows PC.
Then open it and go into the Recorder module.

Hit the rightmost speaker icon to enable the audio recording feature.
As you can see, there are four recording modes. You can use the other three modes to customize the recording area, capture gameplay, and record Google Slides with voice for later sharing.

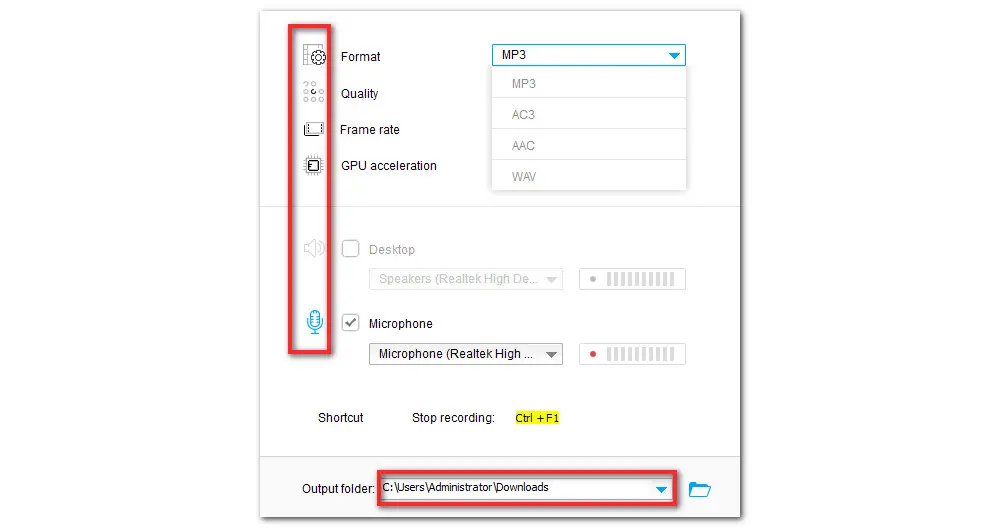
There are four output audio formats available: MP3, AC3, AAC, and WAV. But only MP3 and WAV are playable on Google Slides.
To record your voice only, simply tick off Microphone. You can also toggle on Desktop to capture live music and then embed the clips to make your slides more engaging.
BTW, you can click the bottom inverted triangle button to set a new output folder for your recording.

Then press the REC icon to start recording audio on Google Slides after a five-second countdown. Click on the stop button or press Ctrl + F1 to finish the recording.

Pro-tips: If you want to edit the recorded audio files, you can import the files into the “Converter” module where you can cut, merge, compress, and convert the audio as you like.
Now that you’ve nailed creating audio for Google Slides, the last thing you need to do is to add the audio recordings to Google Slides. Follow the steps below:
Step 1. To add the audio to Google Slides, upload the recordings to Google Drive;
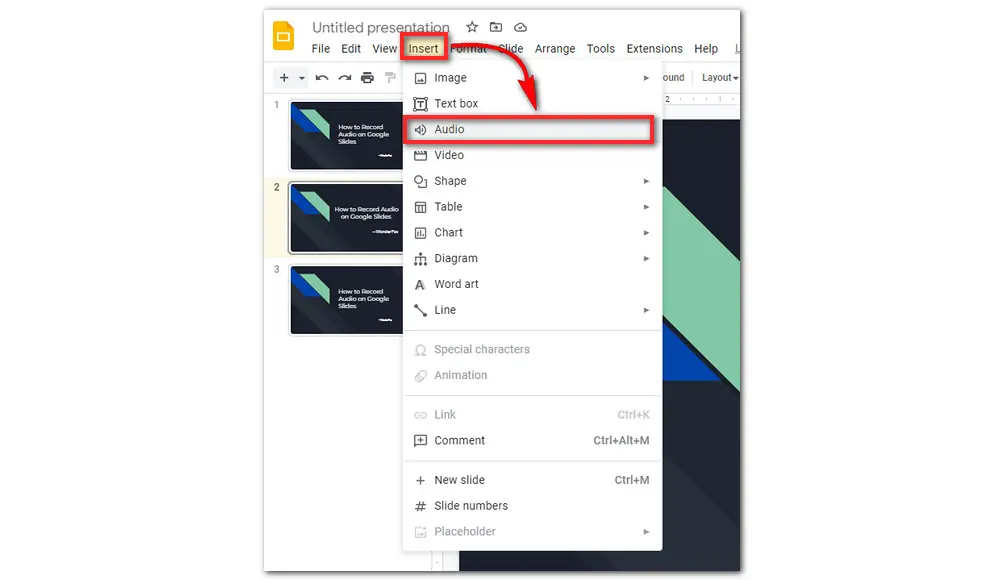
Step 2. Then open your presentation and locate the slide in which you hope to add the audio file. Hit Insert on the top menu bar. Then scroll down and select Audio. Then the Insert Audio window will pop up.

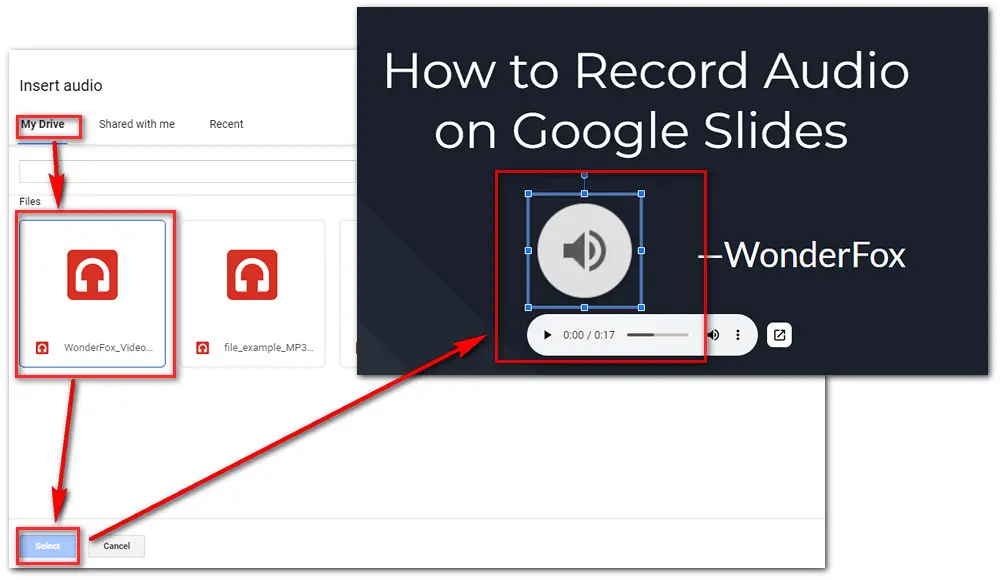
Step 3. Here you can see three options: My Drive, Shared with me, and Recent. Navigate to My Drive where you can search for the recorded audio file. Once find your file, click Select. Your audio is now embedded in your slide!
Step 4. Right-click on the audio icon on the slide, and then go to Format. You can do some playback adjustments.

That’s all about how to record on Google Slides. Sincerely hope this post can be helpful. Thanks for reading.

WonderFox DVD Ripper Pro
WonderFox DVD Ripper Pro is a professional DVD ripping program that can easily rip any DVD, be it homemade or commercial, to all popular formats including MP4, MKV, MP3, WAV, H264, H265, Android, iPhone, etc. without a hitch. It also lets you edit and compress DVD videos at high efficiency. Download it to enjoy a fast and trouble-free DVD-ripping experience.
Privacy Policy | Copyright © 2009-2025 WonderFox Soft, Inc.All Rights Reserved