Recording live music has never been easier - or more popular - than it is today. With the rise of YouTube and other online streaming platforms, people are more inclined to capture live music for personal backup on the computer. So in this article, we'll explore 3 different methods for recording live music on PC, fairly clean, safe, convenient, and easy to use.
Not that tech-savvy? Try this live music recorder software for easy audio recording, downloading, editing, and converting: https://www.videoconverterfactory.com/download/hd-video-converter-pro.exehttps://www.videoconverterfactory.com/download/hd-video-converter-pro.exe
There are many software programs that you can use to record live music on your computer. However, not all these programs are created equal. If you need a straightforward and intelligible solution, I strongly recommend WonderFox HD Video Converter Factory Pro, an all-in-one utility primarily aimed at those who have little or no prior video and audio processing experience, which offers a one-stop way to record live music, edit output recording, and convert it to any common audio format. The intuitive interface makes it quite easy to handle without a hitch.
Free downloadFree download the handy live music recorder software and get ready to start recording live music.
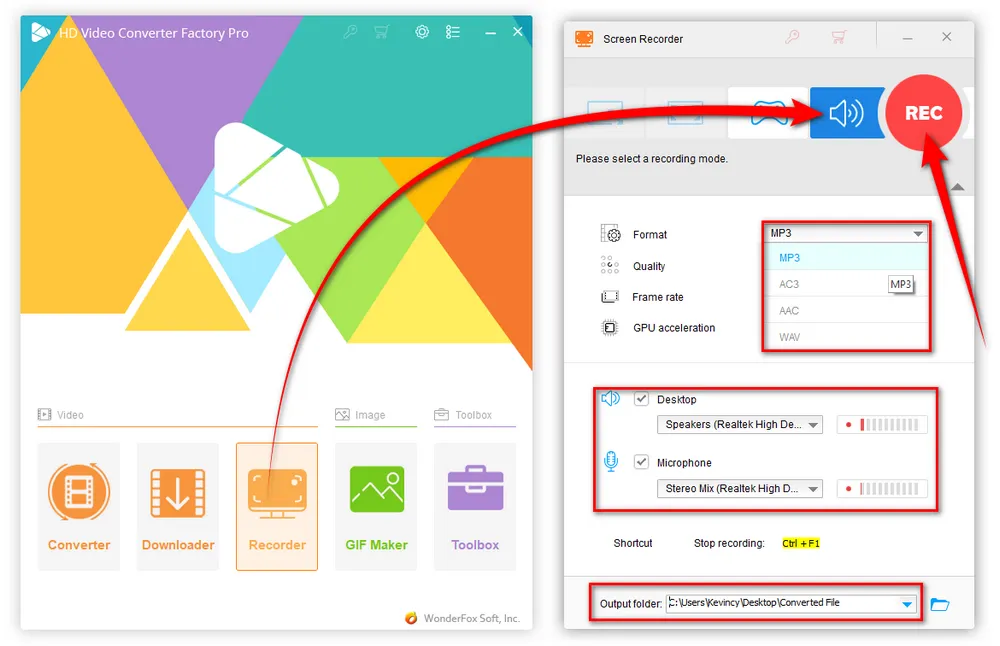
Step 1. Launch HD Video Converter Factory Pro and open "Recorder". Press the "Loudspeaker" icon to switch over to "Audio-Only" mode.
Step 2. Select one option from the "Format" drop-down list to record live music in MP3, AC3, AAC, or WAV format directly.
Step 3. You're allowed to start live sound recording through either system sound or microphone, or both.
Step 4. Choose a destination folder for saving the live music recording on the bottom of the current window.
Step 5. Hit the red "REC" button. After a five-seconds countdown, it will start recording live music promptly. It works well for recording live music for YouTube, Twitch, Vimeo, SoundCloud, and more.
Step 6. To stop it, just press the hotkeys "Ctrl + F1". Then the recording will be saved to the output folder.

Optional. You're also able to make some basic editing on the live music recording file by opening "Converter" module from the home screen. Here, you're free to trim, split, merge the recording, and even make a ringtone as you wish. Meanwhile, you can export it to any audio format as you wish. The built-in 500+ configured presets will meet all your needs.
By the way, if it is a past or finished live music recording that has been uploaded to YouTube, SoundCloud and other streaming websites, the built-in "Downloader" can help download and convert URL to MP3, WAV, FLAC, etc. with ease.

As a free, open source, cross-platform audio editor and recorder, Audacity is supposed to be on the list if you have a deep requirement. The application comes with a variety of features for live music recording and post-processing. But obviously, it's a bit esoteric for a green hand. If you're new to Audacity, follow the instructions below to capture live music on computer.
Step 1. Download and install Audacity from Official Website or Microsoft Store.
Step 2. Run Audacity. Navigate to the "Audio Host" section, select "Windows WASAPI", then respectively choose your input source in the drop-down list of "Recording Devices" and "Playback Device".
Step 3. Click on the red "Record" button to starting the live music recording. To stop it, just click on the grey "Stop" button.

Step 4. When the recording is finished, you can either edit the recording in the workplace, such as split or merge tracks, isolate vocals, normalize audio file, audio, add effects, etc., or directly to export it to an audio file.
Step 5. Go to "File" menu > "Export", and choose one option to export the recording in desired format.
Step 6. Rename the file and adjust the quality. Finally, press "Export" button to export the live music recording on PC.

You can also turn to some online voice recorders for convenient live music recording without additional software installed. Here are three websites I frequently use that let you record and trim live music at no cost.
Online Voice Recorder & Audio Cutter: https://voice-recorder-online.com/
123APPS Voice Recorder: https://online-voice-recorder.com/
Rev Online Voice Recorder: https://www.rev.com/onlinevoicerecorder
Next, I'll take "Online Voice Recorder & Audio Cutter" as an example to show you how to record live music online.
Step 1. Visit https://voice-recorder-online.com/.
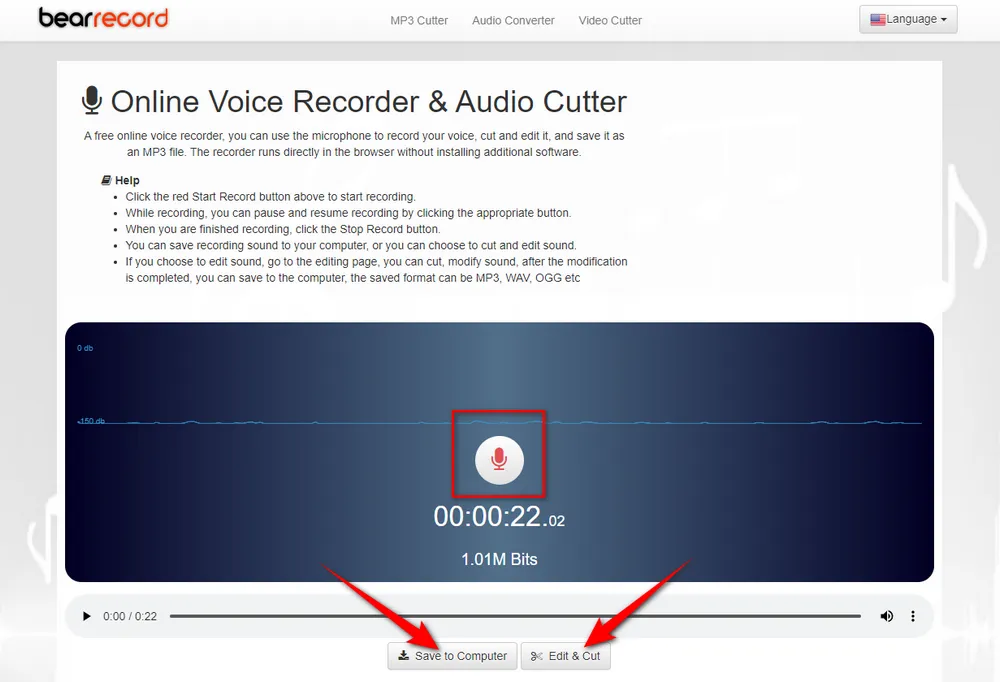
Step 2. Click on the red "Start Record" button to start recording.
Step 3. You can press the left button to pause and resume recording.
Step 4. To stop it, just click on the right-hand "Stop Record" button.
Step 5. Hit "Save to Computer" button to download the live music recording to computer.
Optional. Click on "Edit & Cut" button to edit and modify the recording, such as cut, crop, high-pitched, mute, fade in/out, etc.

HD Video Converter Factory Pro, a great Swiss army knife of A/V processing, works as a novice-oriented video/audio recorder, downloader, editor, compressor, converter, GIF maker, ringtone maker. Get the all-in-one app here!
That's all I want to share with you how to record live music on computer, which only focuses on online streaming audio recording. If you want to go to concerts or music festivals for live music recording and bring the experience home with you, you have to get a decent digital recorder with necessary equipment, which is beyond the scope of this article. Enjoy the online live music recording! Cheers!

WonderFox DVD Ripper Pro
1. Rip DVD to 500+ presets with GPU acceleration.
2. Remove all sorts of DRM from DVD.
3. Compress an 8GB DVD to 1-2 GB digital video file.
4. 5-minutes to fast digitize DVD in MPEG-2 MPG.
5. Make a 1:1 intact digital copy (ISO or VIDEO_TS).
6. Multiple audio tracks, hard/soft and forced subs.
7. Support homemade/commercial DVD & ISO & Video_TS folder.
Privacy Policy | Copyright © 2009-2025 WonderFox Soft, Inc. All Rights Reserved