Want to resize video frame size in Premiere Pro? Follow this article, and you will find that it’s easy to change the video size (width and height), frame size, resolution, and aspect ratio using Adobe Premiere. Now, keep reading for more details!
Tips. If you find Premiere Pro is a little complicated for you to resize video, try this dedicated video resizer here!
https://www.videoconverterfactory.com/download/hd-video-converter-pro.exehttps://www.videoconverterfactory.com/download/hd-video-converter-pro.exe
You may want to resize the video to correct the video aspect ratio to avoid stretching or distortion when exporting.
Moreover, if you have footage with a different resolution than the project, resizing the video can help match the video dimensions to the project settings
When working with two or more pieces of footage that have different resolutions, resizing can also set resolutions to be consistent for better viewing.
Additionally, if you need to upload the edited video to YouTube or other platforms, resizing can ensure your video specifications are compatible with those platforms.
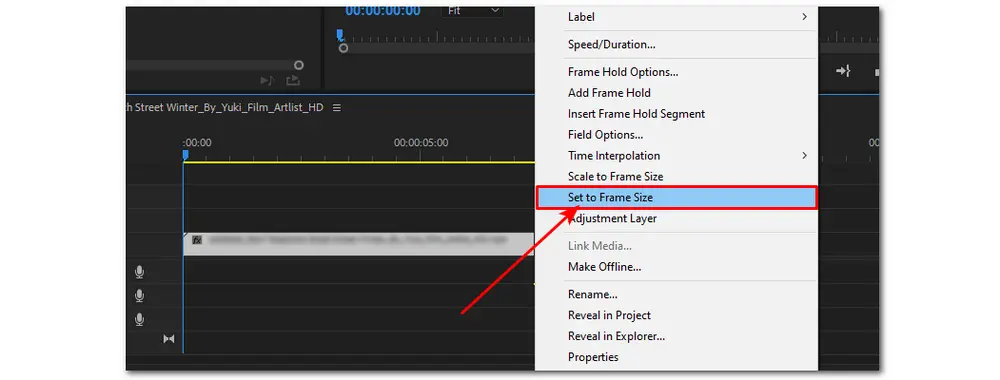
The general way to resize a video in Premiere Pro is the "Set to Frame Size" option. The steps are:
Step 1. Add your video to Premiere Pro and drag it to the timeline.
Step 2. Right-click on the clip and select “Set to Frame Size”. The resolution of your footage will fit the existing sequence.

Moreover, when you create a new sequence in Premiere Pro, you can set the project frame size to make your video match the project's resolution in the timeline while not changing the file's original resolution. The steps are:
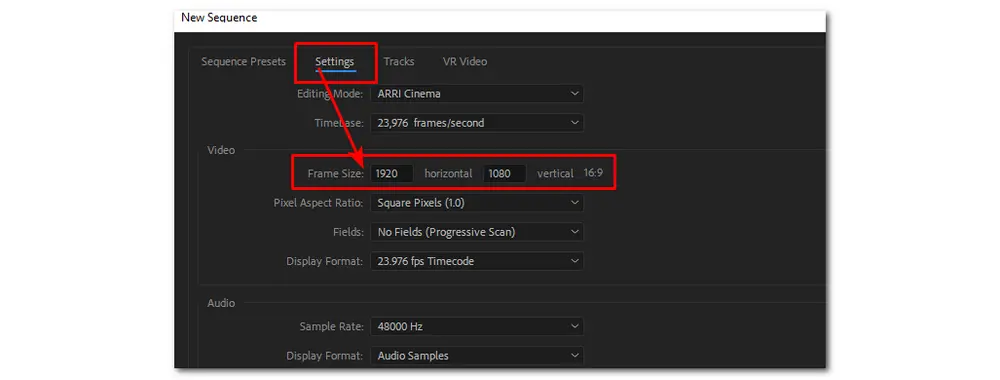
Step 1. Right-click on the project you created and select "New Sequence From Clip"
Step 2. Switch to the "Settings" section. Now, you can adjust the frame size of the video (to "1920x1080" as an example).
Then, when you import a 4K or other video and apply the "Set to Frame Size" option, you will get the clip's frame size down to 1920x1080 while retaining the original file resolution.

Besides "Set to Frame Size", you may also see another option "Scale To Frame Size". If you use "Scale to Frame Size" to resize the video, it will resize the original clip resolution, that means, if you scale the frame size to 1080p, it will downsize your 4K or other videos to 1080p when exporting. Here are the steps:
Step 1. Right-click on the video clip in the timeline that you want to resize.
Step 2. Select “Scale to Frame Size”. Now, you can see the clip scaled to the sequence settings.

Difference between the two methods of Premiere Pro resize video:
“Set to Frame Size” means you select each clip individually and adjust it to match the existing frame sequence automatically in Premiere. This method gets the correct size in most cases.
“Scale to Frame Size” will convert the clip to the exact resolution of your sequence frame size. It can help you fast shrink a large video. The scale size is 100, which you need to adjust to 200 to make your video fit perfectly.
* Want a simpler way to resize videos? Refer to the posts:
Top 11 Free Video Resizer for PC – Resize Video without Watermark
“Auto Reframe” is a better way to go than manual scale settings, which would take up a lot of your time working with a large number of video clips. This new feature uses machine learning technology to identify and track movement in a video and optimizes it for social media platforms and other devices. For instance, you can use it to resize/scale sequences for square, 16:9, and more sizes. Here, we will show you how to change video size in Premiere Pro for YouTube. Follow the steps if you’re interested.
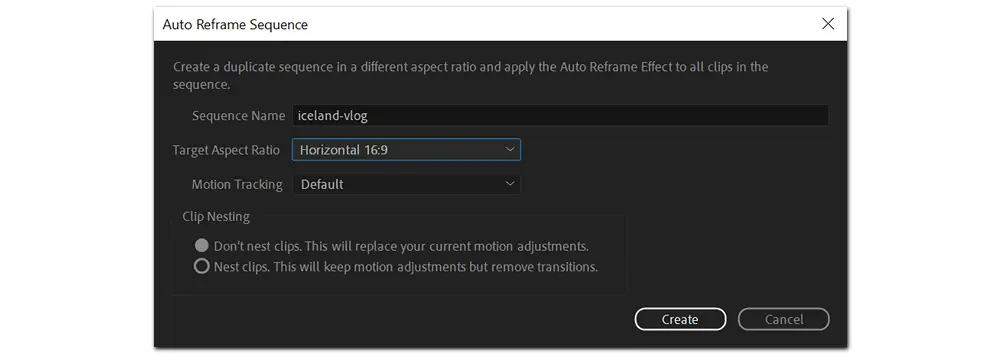
Step 1. Right-click on the entire sequence and select “Auto Reframe Sequence”.
Step 2. Go to “Sequence” in the toolbar and click “Auto Reframe Sequence” from the drop-down menu.
Step 3. In the dialogue box, choose the “16:9” aspect ratio for YouTube. Of course, you can select “Square 1:1” for Instagram or enter a custom aspect ratio for other social media.

That is how to resize a video in Premiere Pro. The settings seem to be simple. However, as a professional video editor, Adobe Premiere offers many features with a complex user interface. If you know little about creating videos, you’ll get a learning curve with the software. In this situation, a simple video resizer can be your better choice. Next, I will introduce a handy yet efficient video resizer (also cheaper than Premiere Pro) and illustrate how to make the video size smaller. Install Install the recommended software to be prepared.
HD Video Converter Factory Pro is the easiest solution to change video resolution, aspect ratio, frame rate, and bitrate, reduce video file size, and cut, crop, rotate, watermark, add effects, and merge video clips. It can achieve more for you. Give it a try!
If you want to resize the video frame size, you can also try WonderFox HD Video Converter Factory Pro, instead of Premiere Pro. HD Video Converter Factory Pro is a professional video converter that helps you convert video/audio files and change video size without effort. It provides flexible options to adjust video resolution, bitrate, aspect ratio, cropping, etc. The interface is simple and self-explanatory; even beginners can handle it without hassles. Now, download download the software and see how to resize your video easily on a PC.
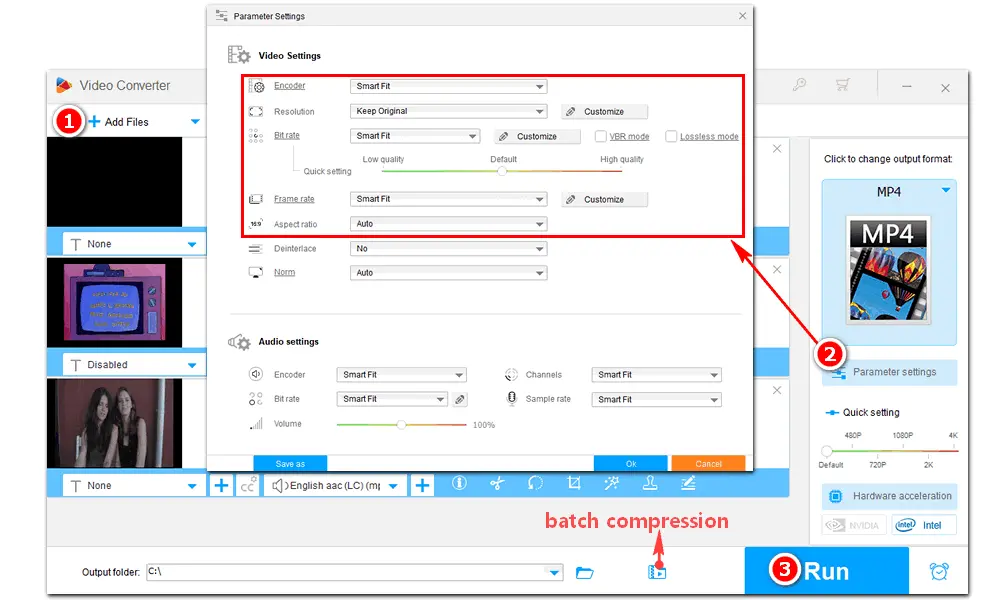
Launch HD Video Converter Factory Pro and open the Converter. Click Add Files to import the video you want to resize. You can add multiple files to process in batch mode.
First, choose an output format from the profile list. Here, I select MP4 under Video.
Then, go to Parameter settings to resize your video by doing any of the following:
• Change the resolution (such as 1080P to 720P, 4K to 1080P, etc.)
• Lower the bitrate (2000 kbps to 1200 kbps)
• Alter the frame rate (30fps to 24fps, 60fps to 30fps, etc.)
• Change the aspect ratio from 4:3 to 16:9 or other scale sizes
• Use the batch compression feature
Another way to make the video smaller is to cut/crop off unwanted segments. Learn how to >>
Click the inverted triangle button at the bottom to set an output path. Finally, press Run to start conversion and export the final files to your computer.

The above shares How to Resize Video in Premiere Pro in 2025? | 2 Ways and its alternative HD Video Converter Factory Pro. If you find Adobe Premiere hard to operate or it fails to resize your video, try the alternative handy video resizer. Anyway, I hope this article is helpful to you. Thanks for reading till the end! Have a nice day!
To change the video aspect ratio in Premiere Pro, you can follow the steps below.
Step 1. Create a new project and select "File" > "New" > "Sequence".
Step 2. Go to the 'Settings' tab to change the "Editing Mode" to "Custom".
Step 3. Adjust the aspect ratio in Premiere for the new project and hit "OK".
To resize all clips in Premiere Pro, here is an "Auto Reframe Sequence" option that can work with a large number of video clips. Just go to Part2>> to see the detailed steps.

WonderFox HD Video Converter Factory Pro
1. Batch convert videos to MP4 and 500+ formats;
2. Trim/crop videos and customize video settings;
3. Download movies and music from 1000+ sites;
4. Record your screen in HD (with mic and system audio);
5. Extract audio tracks and subtitles from videos;
6. Make GIFs, create ringtones, and plenty more.
Privacy Policy | Copyright © 2009-2025 WonderFox Soft, Inc.All Rights Reserved