Being a practical yet open-source audio editor and recorder, Audacity gained popularity among most users. If you have some audio files and want to cut or split them with Audacity, this post shares a detailed guide in the following content. Now, let's see how to cut audio in Audacity.
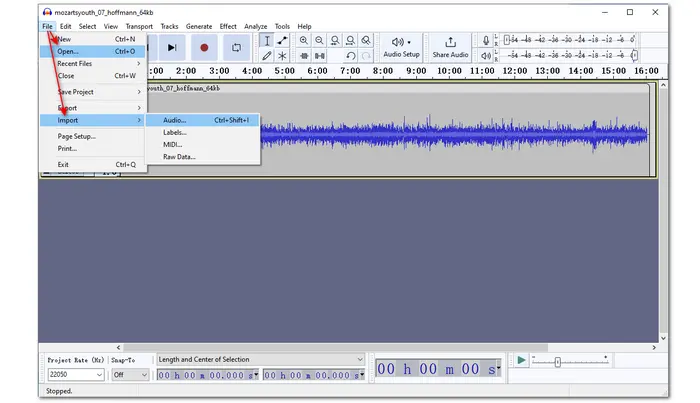
Launch Audacity on your PC after the installation. To import an audio file, you can press “File” at the top menu bar and then select “Open” or use the hotkey “Ctrl + O” to import the audio file from the local folder. (“File” > “Import” > “Audio” can also enable you to add an audio file to Audacity.)

Place your cursor at the "Selection Tool" and click it or press "F1", then move your cursor to the audio wave and select the wanted audio clip. Go to “Edit” at the top menu bar and choose “Remove Special” > “Trim Audio” to remove unselected parts. To move the trimmed audio to the beginning, place your cursor at the file name and drag the file to the beginning of the time.


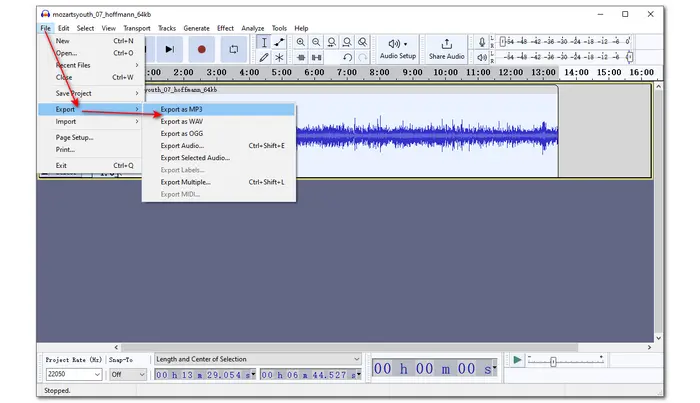
To save the trimmed audio clip, you need to re-click the “File” button and select “Export Audio”. Choose an output format (MP3, WAV, or OGG) and then you can rename the file and customize the trimmed audio’s Bit Rate Mode, Quality, and Channel Mode. Click "Save” and choose whether to edit the metadata or not. Press OK, and then the trimmed audio file will be saved to the folder you set.

As stated before, Audacity may be unstable sometimes. Moreover, it is limited in functions and formats, so you may not be able to do your desired editing or import your audio files. In that case, this post provides an Audacity alternative tool for you to cut audio files.
WonderFox Free HD Video Converter Factory is one of the best audio-cutting tools that can cut audio quickly and easily. It offers the most straightforward audio-cutting process for all-level users. With wide format support, it can import all popular audio files and cut them without format incompatibility issues. You can also use this tool to extract audio from video and then cut or merge the audio files. Aside from those functions, it offers more features like compressing, adjusting, downloading, etc.
Now, downloaddownload this free audio cutting tool here and follow the steps below to cut audio files with it.
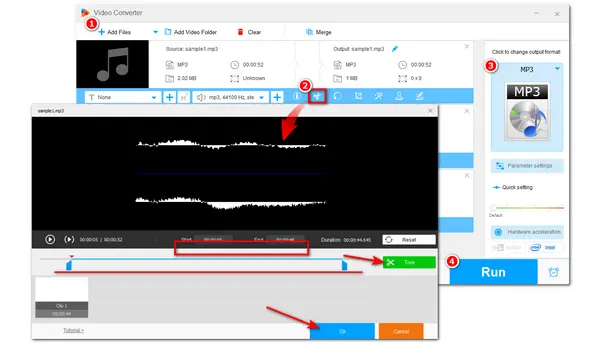
Install Free HD Video Converter Factory on your desktop and launch it. Choose the “Converter” module and then click the “+ Add Files” button to import the audio files you want to cut. You can also import audio files by dragging and dropping.


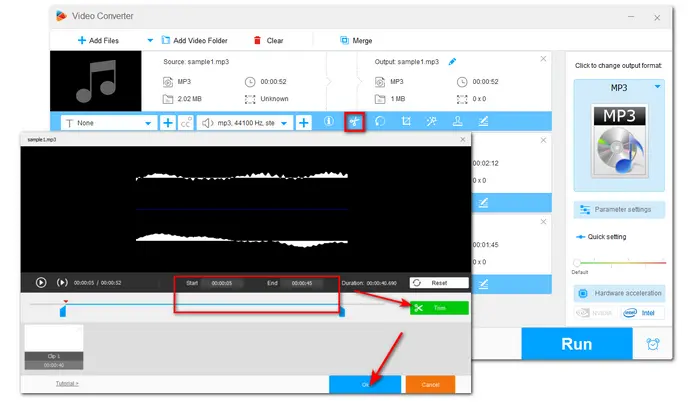
Press the scissors-shaped icon below the imported audio file. On the new video trimming window, drag the sliders on the start and end sides to select the wanted part. You can also type in the exact start and end times to make the trimmed clip more accurate. Then click the green “Trim” button to create Clip 1. You can also repeat the cutting process to split audio into multiple tracks. After that, hit OK to save the changes.

Press the format image on the right side of the interface to expand the output format library. Head to the Audio category and select an audio format. (MP3 is recommended for the best compatibility.)
Tips. You can customize the audio bit rate and other parameters in the “Parameter settings” window.

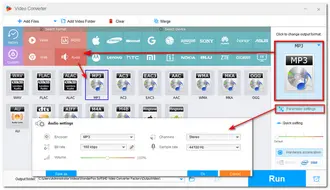
Click the arrow-down button at the bottom of the interface to choose an output folder for the exported files. Finally, press “Run” to start exporting the final files.


Also Read: Merge Audio and Video Files Together | Record Audio from DVD | Replace Audio Track in Video
In addition to cutting audio with desktop audio cutters, some online tools can also let you cut audio without a hassle. Without installation and are compatible with most operating systems, Online audio cutters are very convenient to use. This post introduces several handy online audio cutters, and you can use them to cut audio.
But online tools also have their drawbacks. Almost all online cutters limit the file size you input and some even contain annoying ads.
1. https://audiotrimmer.com/
This online audio trimmer supports many popular audio formats and is mobile-friendly. But there are many ads on its interface, and the maximum file size is 100 MB.
2. https://mp3cut.net/
This is a handy online audio trimmer that supports over 300+ formats and also allows you to create ringtones, apply audio effects, etc. It has a large input file size, but you can only process 35 files per day.
3. https://clideo.com/cut-audio
If you don’t want to be bothered by annoying ads, you can then give Clideo a try. It is a handy online audio trimmer that supports all audio formats and enables you to apply a fade-in/out effect to audio files. You can also use it to change audio formats.
With the given detailed tutorial in this post, you can now cut audio in Audacity without problem. If you can’t use Audacity well, we suggest you to download and use Free HD Video Converter Factory to start cutting audio and do more with your files. Online tools are also handy to use. Just feel free to choose one.
Step 1. Open the audio file you want to cut in Audacity. Click the "Selection Tool", and place a marker on the start and end points.
Step 2. Navigate to the "Edit" option and select "Clip Boundaries" > "Split" to start.
Step 3. Use the "Delete" key on your keyboard to remove the part to another location or delete it.
If you want to cut a part of the audio file in Audacity, just highlight the section you want to keep and press "CTRL + T" to trim the audio.
Terms and Conditions | Privacy Policy | License Agreement | Copyright © 2009-2025 WonderFox Soft, Inc.All Rights Reserved