Audio cutting or cropping might sound technical, but it's something many of us want to do. Let's be real, here are some common scenarios:
- Creating that perfect ringtone that hits just the right part of the song
- Making audio clips for presentations or social media posts
- Extracting specific quotes from interviews or lectures
- Removing the "Um" and "Ah" from your podcast recordings or audiobooks
- Cutting out unwanted sections from voice memos
- Shortening audio files to get around the file size limitation for uploading
Whatever the purpose, trust me, it's easier than you might think! This guide aims to help you effortlessly cut audio files on any platform: Windows, Mac, mobile devices, and online. Now let's explore the options.
How to Cut Audio Files on Windows?
OK, Windows users, this one's for you. You have a couple of great free options. Here's how to get the job done.
a. Using Free HD Video Converter Factory
WonderFox Free HD Video Converter Factory is not as simple as its name implies, it is actually a 100% free video and audio processor well-suited to those who have no or little audio editing experience.
Whether you're looking to crop unwanted sections, create ringtones, or extract specific parts of a track, this software offers an intuitive interface to meet your needs. Here's a simple guide:
Step 1: Add Your Audio File
- DownloadDownload and Install Free HD Video Converter Factory on your PC.
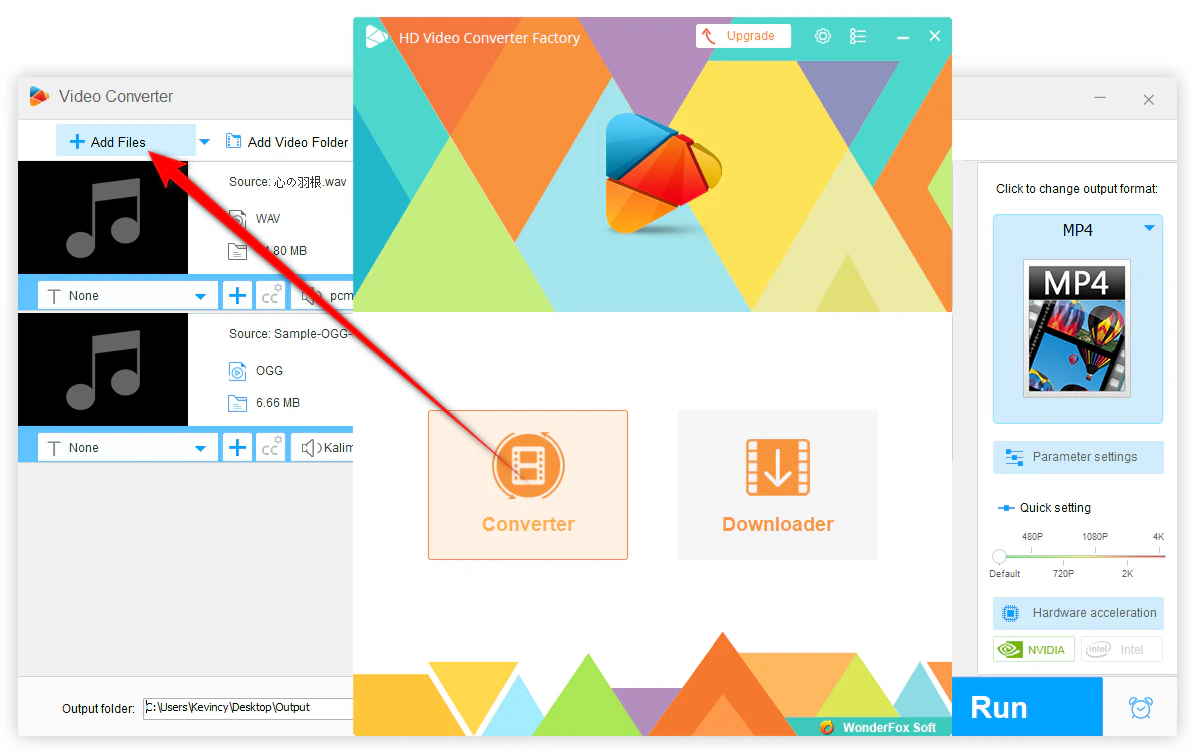
- Open the application. Navigate to the "Converter" section.
- Click on "Add Files" to select the audio file you wish to edit.
- Alternatively, drag and drop the file into the workspace.
Step 2: Cut the Audio
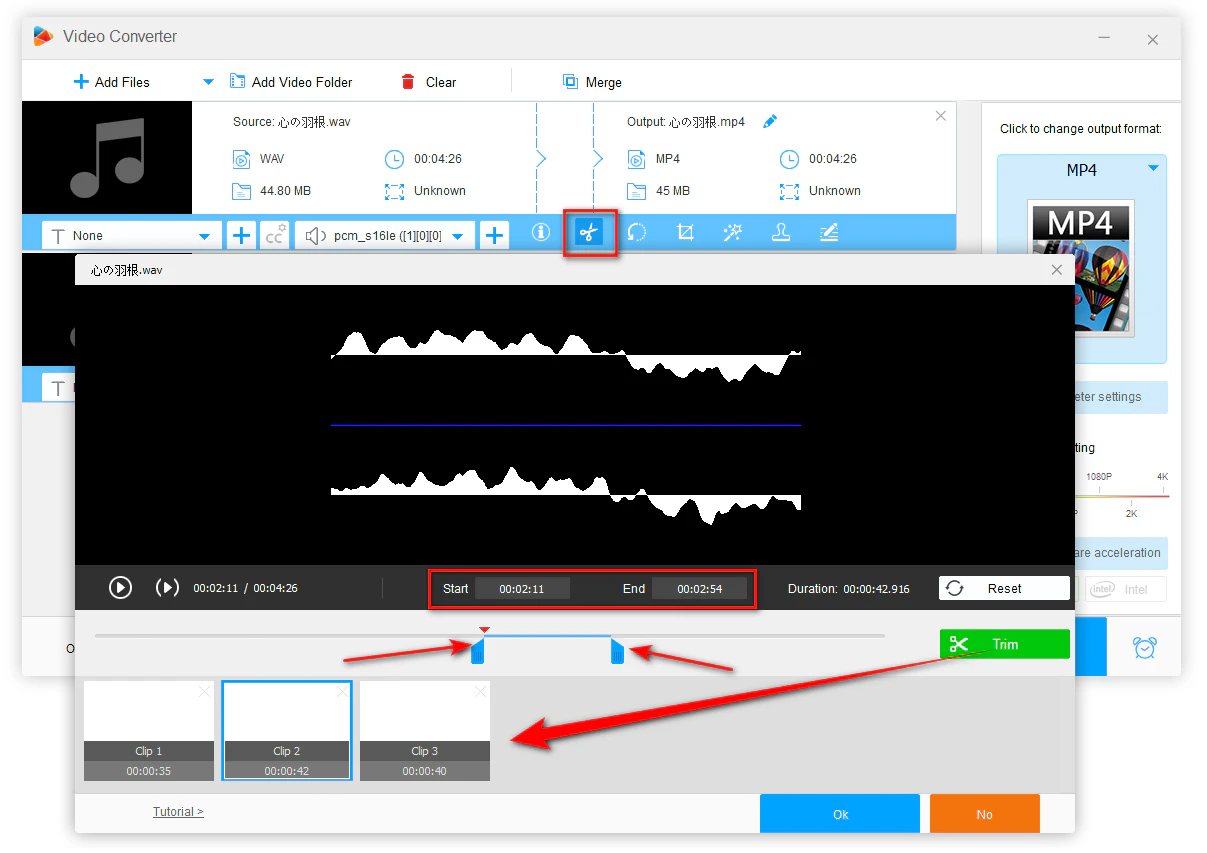
- Click on the "Scissors-Shaped" icon on the editing toolbar to open a new window.
- Use the sliders to set the start and end points of the segment you want to retain.
- For precise editing, input the exact start and end times manually.
- Click "Trim" to confirm your selection.
- If you wish to create multiple segments, repeat the process as needed.
- Once satisfied, click "OK" to return to the main interface.
Step 3: Choose an Output Format
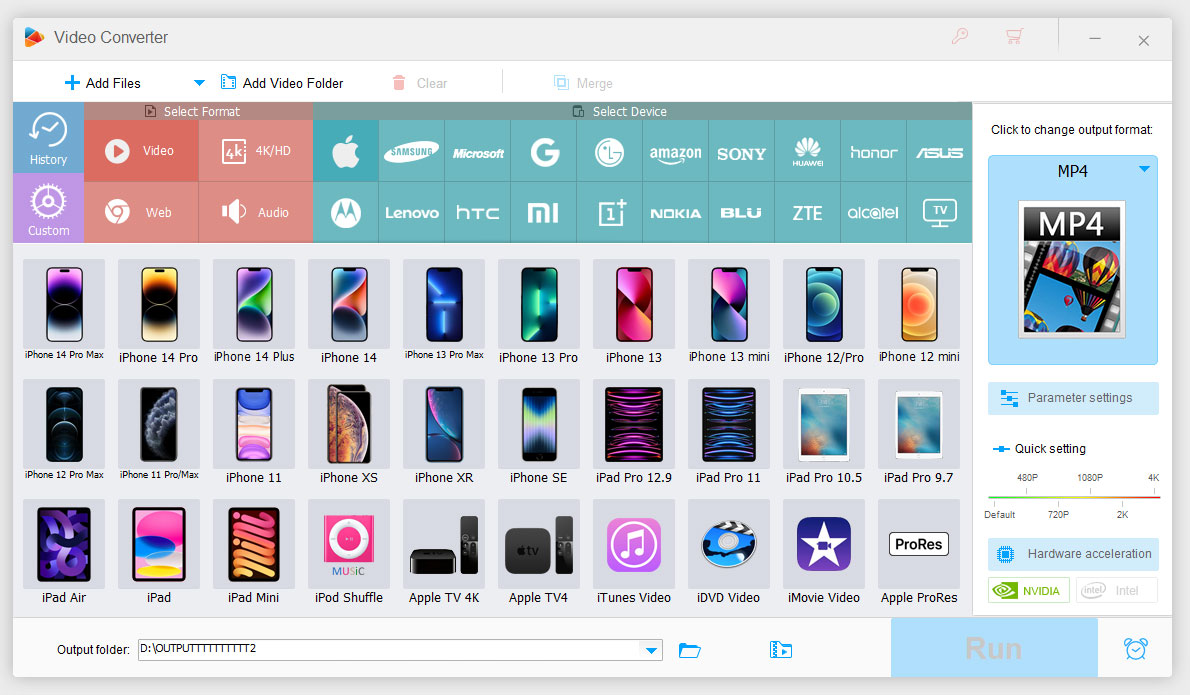
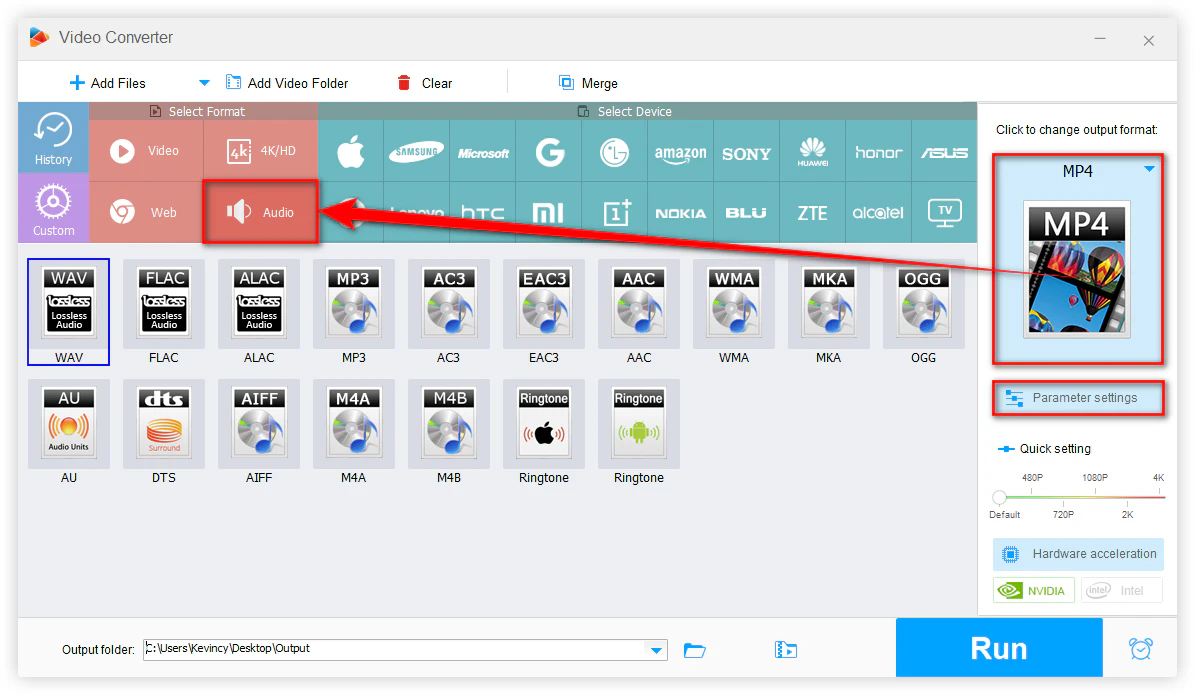
- Click on the Format image on the right side to unfold the full list of 600+ presets.
- Navigate to the "Audio" category and select your desired output format (e.g., MP3, WAV).
- Optional: If needed, you're free to click "Parameter settings" to customize the audio bit rate, encoder, sample rate, channel, and volume.
Step 4: Export the Cut Audio
- Specify an output folder at the bottom by clicking on the "inverted triangle" icon.
- The final step is, to hit the "Run" button to start the audio cutting process.
- Once completed, you'll have the audio clip ready for use.
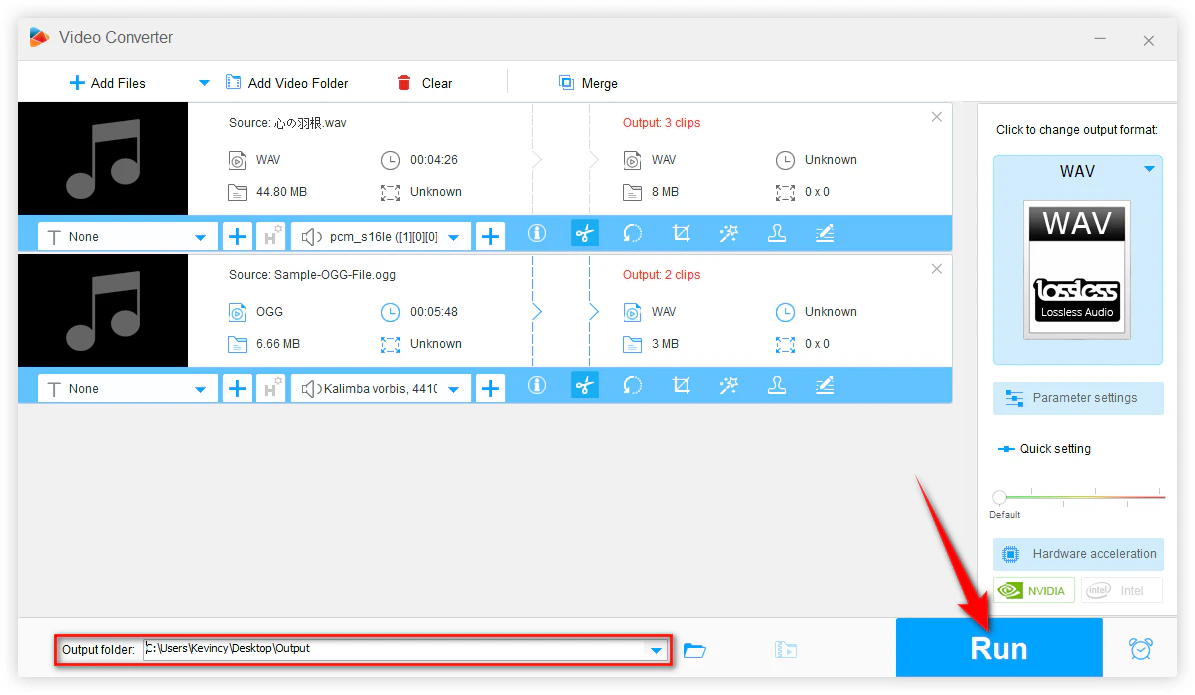
Tips: One handy feature of the software is the ability to import multiple audio files, even in different formats, and cut each one individually. It will queue each file in your list to process the cuts in sequence, making it easy to handle multiple audio clips without needing to repeat the entire process from scratch.
b. Using LosslessCut
LosslessCut is another excellent option. It's a free, open-source tool designed for quick and lossless cutting of video and audio files. It allows you to cut segments from your audio files without re-encoding, which means there's no loss in quality. Here's a step-by-step guide on how to use LosslessCut to cut audio files:
Step 1: Import Audio File
- Visit the release page on LosslessCut's GitHub repository.
- Download "LosslessCut-win-x64.7z", extract the package file, and run "LosslessCut.exe".
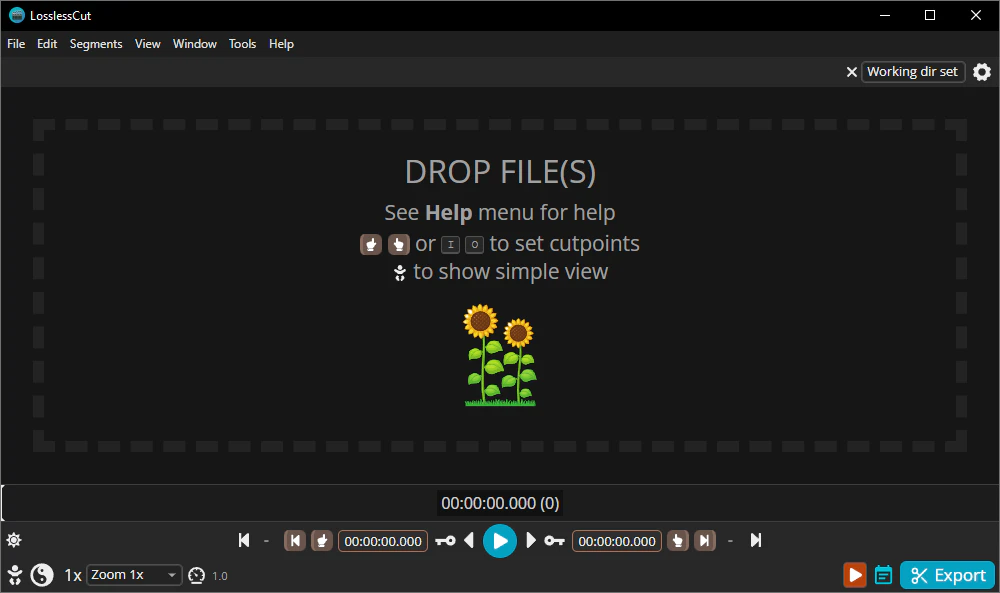
- Drag and drop your audio file into the LosslessCut window.
- Alternatively, go to "File" > "Open" and select your file.
Step 2: Mark the Start and End Points
- Navigate to where you want the audio to start.
- Click on the "Set Cut Start" button (looks like a left-hand index finger), or press the I key.
- Navigate to where you want the audio to end.
- Click on the "Set Cut End" button (looks like a right-hand index finger), or press the O key.
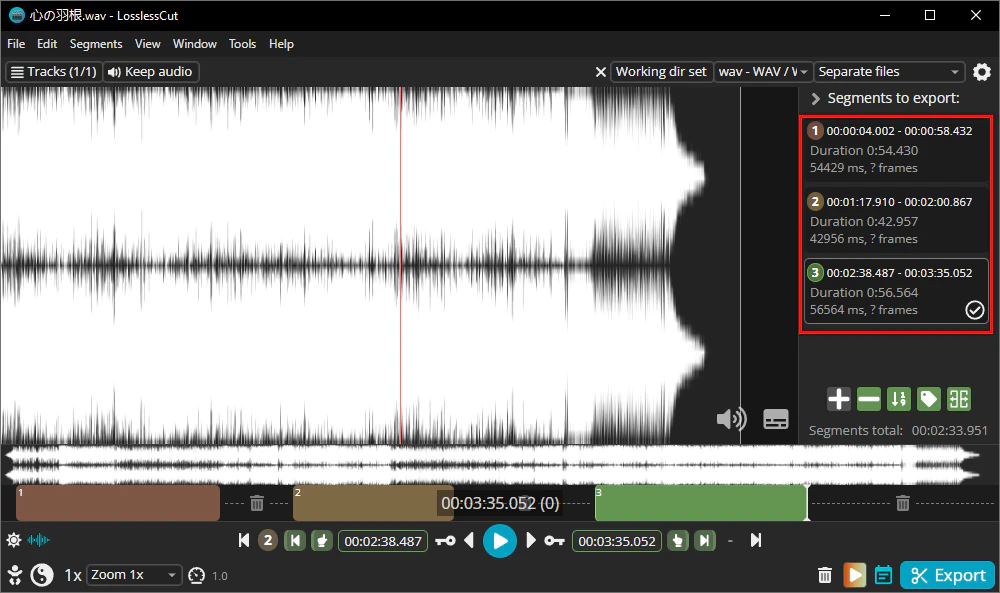
- The selected segment will be highlighted on the timeline.
- Play the segment to ensure it's accurately selected.
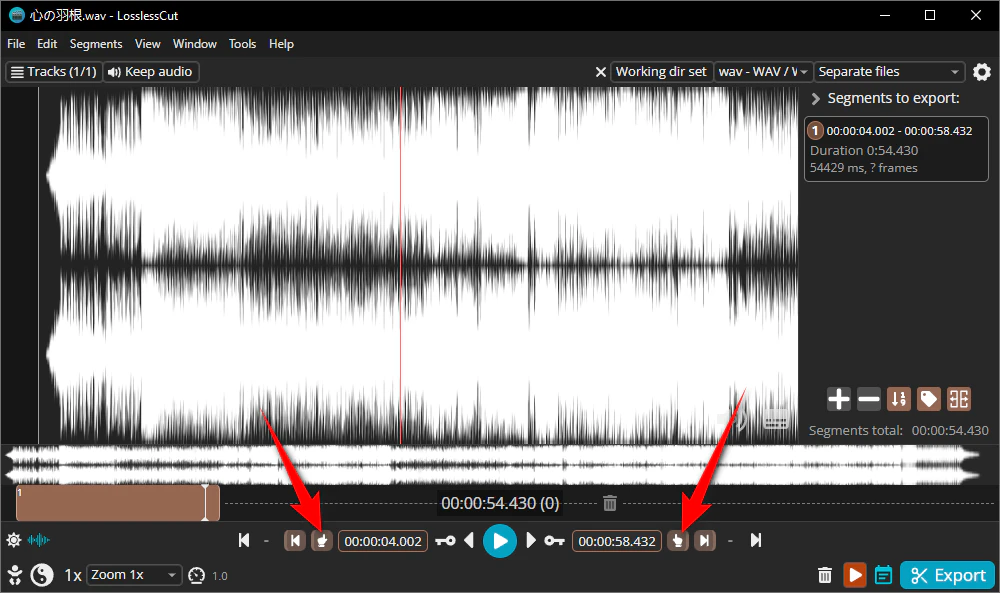
Tips: Use the play, pause, and stop buttons at the bottom to control playback. Click anywhere on the timeline to jump to that point in the audio. Use the zoom menu to get a more detailed view of the waveform for precise editing.
Step 3: Add Multiple Segments (Optional)
- If you need to cut multiple segments, just repeat Step 2 for each segment on the timeline.
- After setting each start and end point, click the "+" button to add the segment to the cut list.
Step 4: Export the Cut Segments
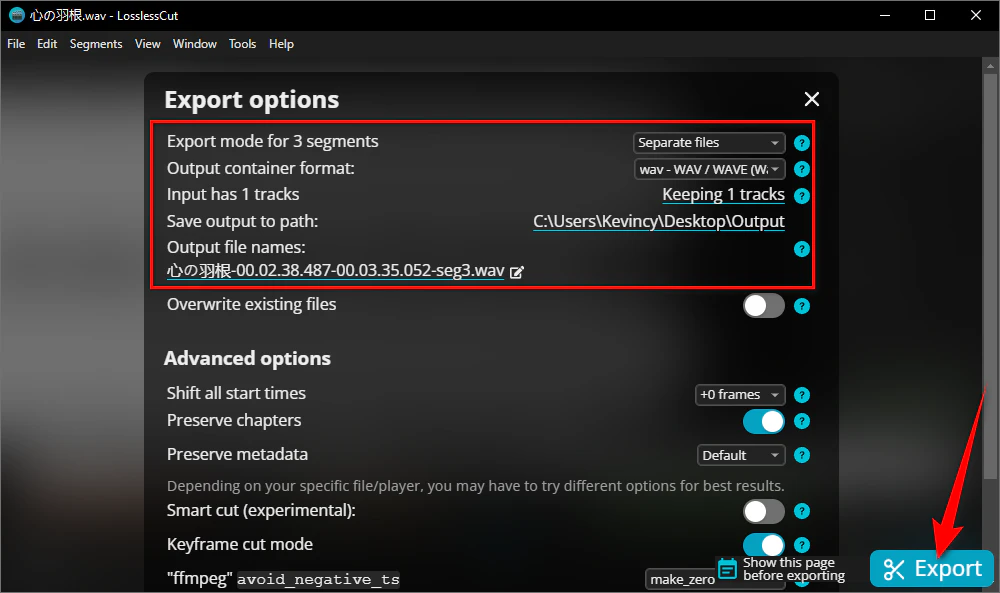
- Highlight the icon "Show export options screen before exporting" next to the "Export" button.
- Click on the "Export" button (scissors icon).
- In the export dialog, you can choose whether to export segments as separate files or merge them, select an output audio format, rename the files, choose an output location, and more.
- When configured, click "Export" to begin the cutting process. A progress bar will indicate the export status.
- Once completed, a confirmation message will appear.
How to Crop Audio Files on Mac?
Mac users, don't feel left out! You've got some awesome built-in tools that make cropping audio files a breeze.
a. Using GarageBand
GarageBand is a versatile digital audio workstation (DAW) developed by Apple, Inc., and it is available for macOS and iOS devices. It allows users to create music, and podcasts, and edit audio files with ease. One common task is cropping audio files to remove unwanted sections. Here's the how-to guide.
Step 1: Create a New Project
- Open GarageBand on your Mac.
- If you don't have it installed, download it for free from the Mac App Store.
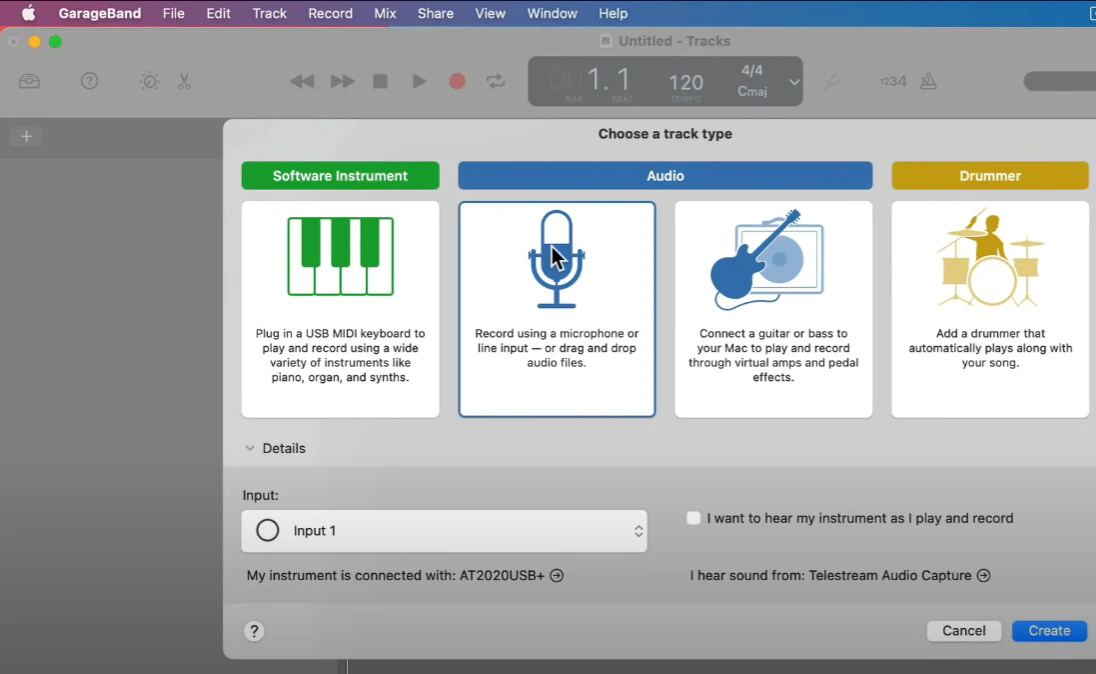
- Select "Empty Project" to create a new project.
- Choose the Microphone icon if you're not actually going to record anything new.
- Then click "Create".
Step 2: Import Your Audio File
- Locate your audio file in Finder.
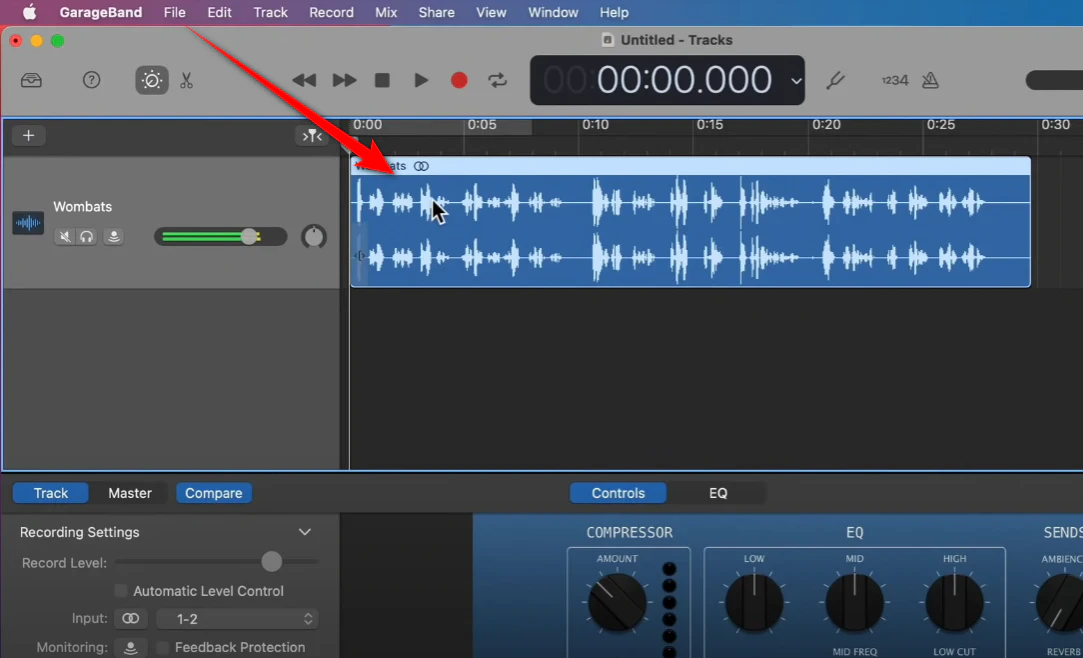
- Drag and drop the file directly onto the track area in GarageBand.
- Alternatively, click on File > Import > Audio File, then navigate to your file.
- Locate your audio file in Finder.
- Use the zoom slider in the upper-right corner to get a detailed view of the waveform.
- Zooming in allows for more precise editing.
Step 3: Crop the Beginning and End
- Click on the audio track to ensure it's selected.
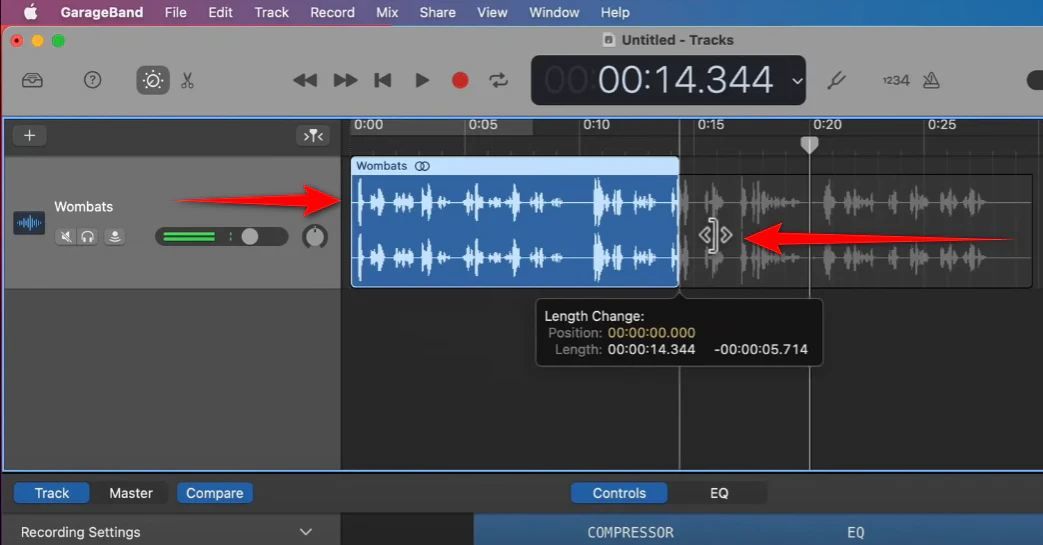
- Hover your cursor over the start and end of the audio region until it turns into a bracket with arrows.
- Click and drag inward to crop unwanted sections from the beginning and end.
Step 4: Split the Audio for Middle Sections
- Move the playhead (the vertical red line) to where you want to make a cut.
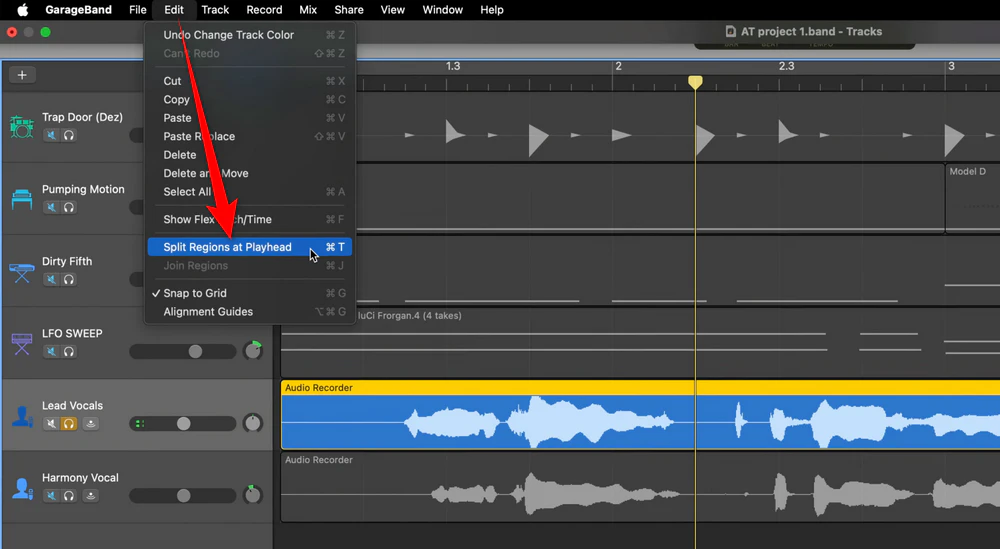
- With the track selected, go to "Edit" > "Split Regions at Playhead" or press "Command + T" to split the audio at that point.
- Repeat this to create a separate region around the section you want to remove.
- Click on the unwanted audio region to select it.
- Press the Delete key on your keyboard to remove it.
- If deleting a section creates a gap, click, and drag the subsequent audio regions to close the gap.
- If required, apply fade-ins or fade-outs between audio regions for smoother transitions.
Step 5: Export the Cropped Audio
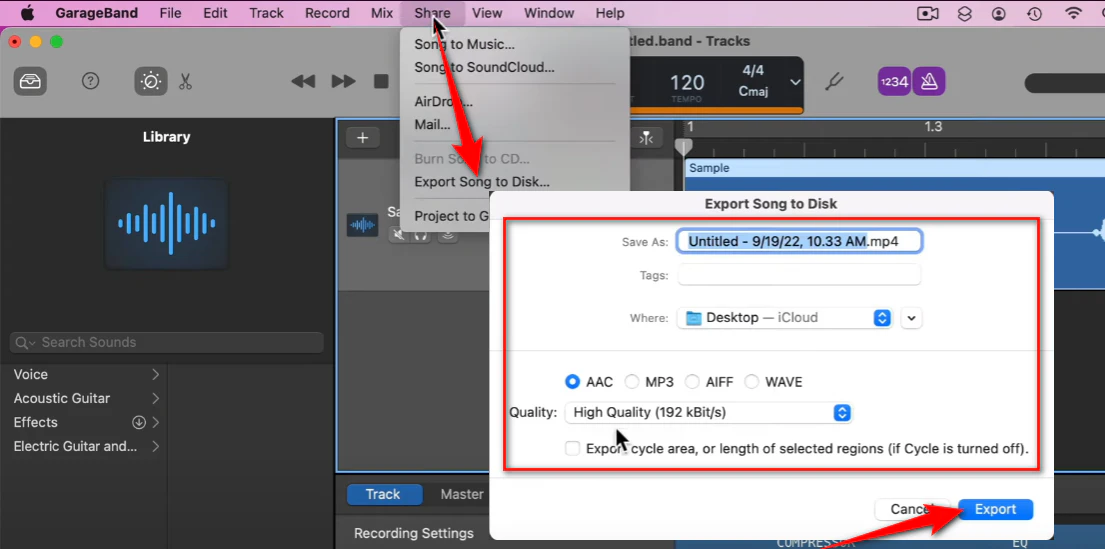
- When you're satisfied with your edits, click on "Share" in the top menu bar.
- Select "Export Song to Disk".
- Choose your desired file format (e.g., MP3, AAC, AIFF, WAV).
- Set the quality settings as needed.
- Name your file, choose a save location, and click "Export".
b. Using QuickTime Player
Believe it or not, while QuickTime Player is primarily known as a media player, it can do some basic audio editing too. Follow the steps to crop (trim) audio files using QuickTime Player on a Mac.
Step 1: Open Your Audio File
- Open QuickTime Player on your Mac.
- Click on "File" in the top menu bar.
- Select "Open File..." from the dropdown menu.
- Navigate to the audio file you want to crop and click Open.
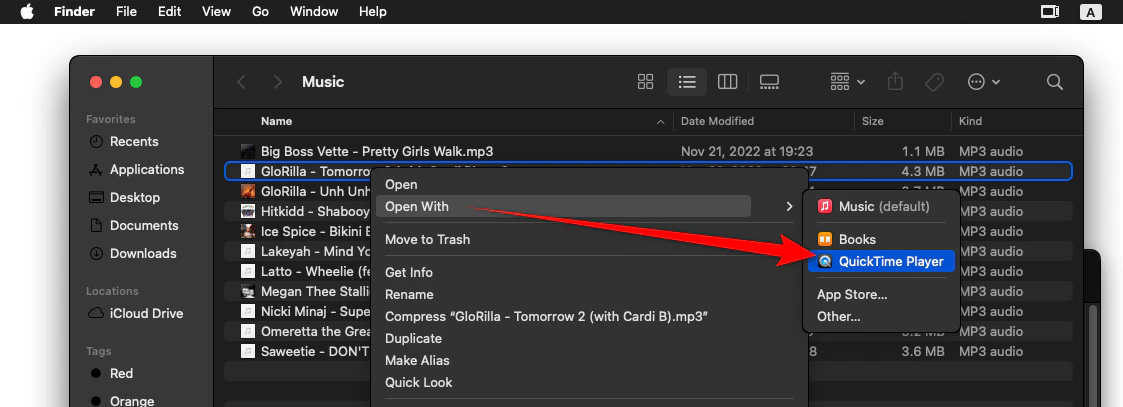
- Alternatively, right-click on your audio file and choose "Open with QuickTime Player".
- QuickTime Player supports common audio formats like MP3, M4A, and WAV.
Step 2: Enter Trim Mode
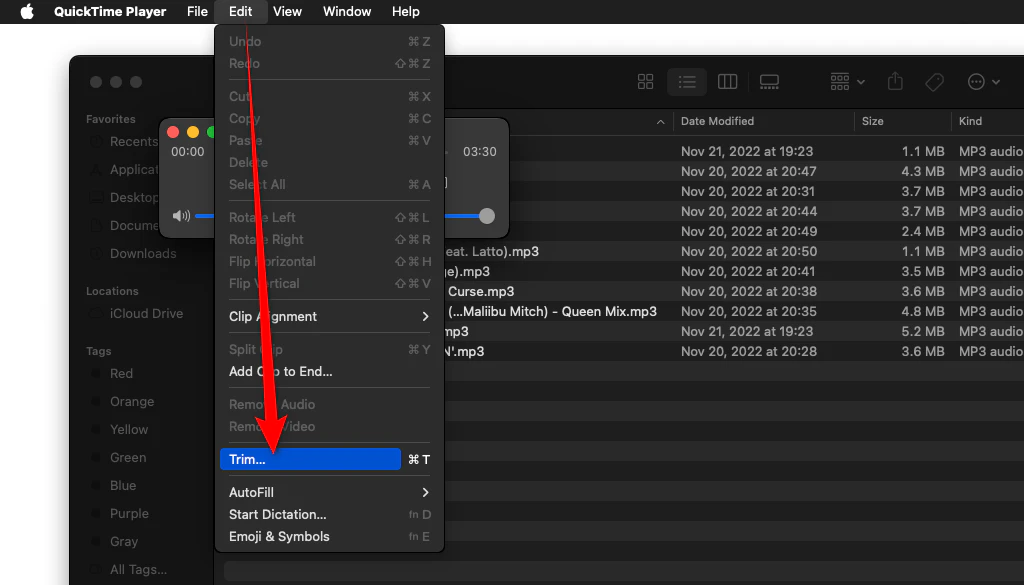
- With your audio file open, click on "Edit" in the top menu bar.
- Select "Trim..." from the dropdown menu, or press "Command + T".
- A yellow trimming bar will appear at the bottom of the window, displaying the waveform of your audio.
Step 3: Choose the Desired Portion
- The yellow bar has two handles at each end.
- Click and drag the handles to select the portion of the audio you want to keep.
- The area inside the yellow bar is what will remain after trimming.
- The greyed-out areas will be removed.
- Click the Play button to listen to the selected portion.
- Once satisfied, click on the "Trim" button on the right side of the trimming bar.
- The audio file will now display only the cut section.

Step 4: Save the Cropped Audio File
- Click on File in the top menu bar.
- Choose "Save" to overwrite the original file, or select "Export As..." to create a new file.
- If you choose "Export As...", enter a new file name and select a destination folder.
- Click "Save" to finalize.
Cropping audio files with QuickTime Player is a quick and easy process, ideal for simple editing tasks like removing unwanted sections from the beginning or end of a file.

How to Crop Music Online?
If you'd rather avoid downloads, several online tools can help you crop music files quickly and easily. Here are two reliable options.
a. MP3Cut
MP3Cut is an online audio cutter that allows you to trim audio files directly in your browser. It supports over 300 file formats, including MP3, WAV, and FLAC. You can also extract audio from video files and create ringtones using its Audio Extractor tool.
- Go to MP3Cut's website.
- Click on the "Open file" button.
- Select the audio file from your device. You can also drag and drop the file into the browser window.
- Use the blue sliders on the timeline to set the start and end points of the segment you want to keep.
- You can play the selected portion to ensure it's accurate by clicking the "Play" button.
- Apply Fade In/Out effects to your audio if needed.
- Click on the format icon to select a preferred output format.
- Click the "Save" button to start the processing.
- Once processing is complete, click on "Save" to save the cropped music to your device.

b. AudioTrimmer
AudioTrimmer is a simple and user-friendly tool for trimming audio files online. It supports various formats like MP3, WAV, and OGG. The website is mobile-friendly, so you can edit your audio files on the go.
- Navigate to AudioTrimmer's website.
- Click on "Choose File" to select the audio file from your device.
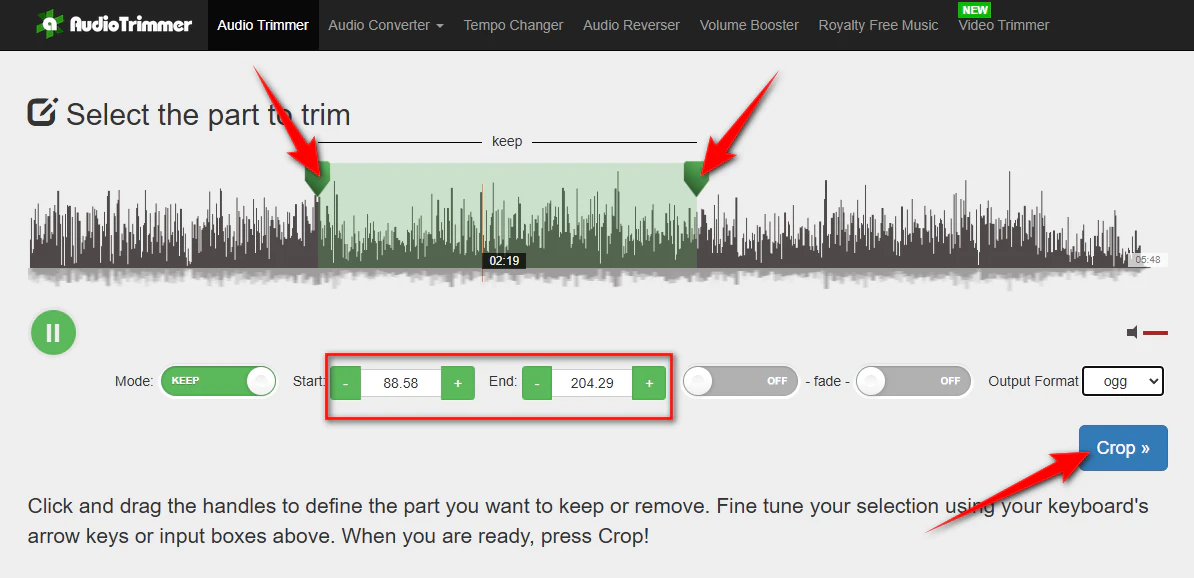
- Use the green sliders to mark the beginning and end of the segment you want to keep.
- Press the "Play" button to preview the selected portion.
- Tick the boxes for "Fade in" or "Fade out" if you wish to include these effects.
- Choose your preferred format from the options provided.
- Click on the "Crop" button to process your selection.
- After done, click "Download" to save the cropped audio file to your device.
However, online tools come with a few limitations. File sizes are sometimes restricted, and you need a stable internet connection. Also, consider privacy – avoid uploading sensitive audio if possible.
How to Shorten Audio Files on Mobile?
Sometimes, you're on the go and need to edit audio right from your phone. No worries! We've got solutions for both Android and iOS users.
For iOS Devices (iPhone and iPad)
a. Using Voice Memos (for Voice Recordings)
The Voice Memos app, pre-installed on most iOS devices, allows you to shorten the audio made within the app. Here's how:
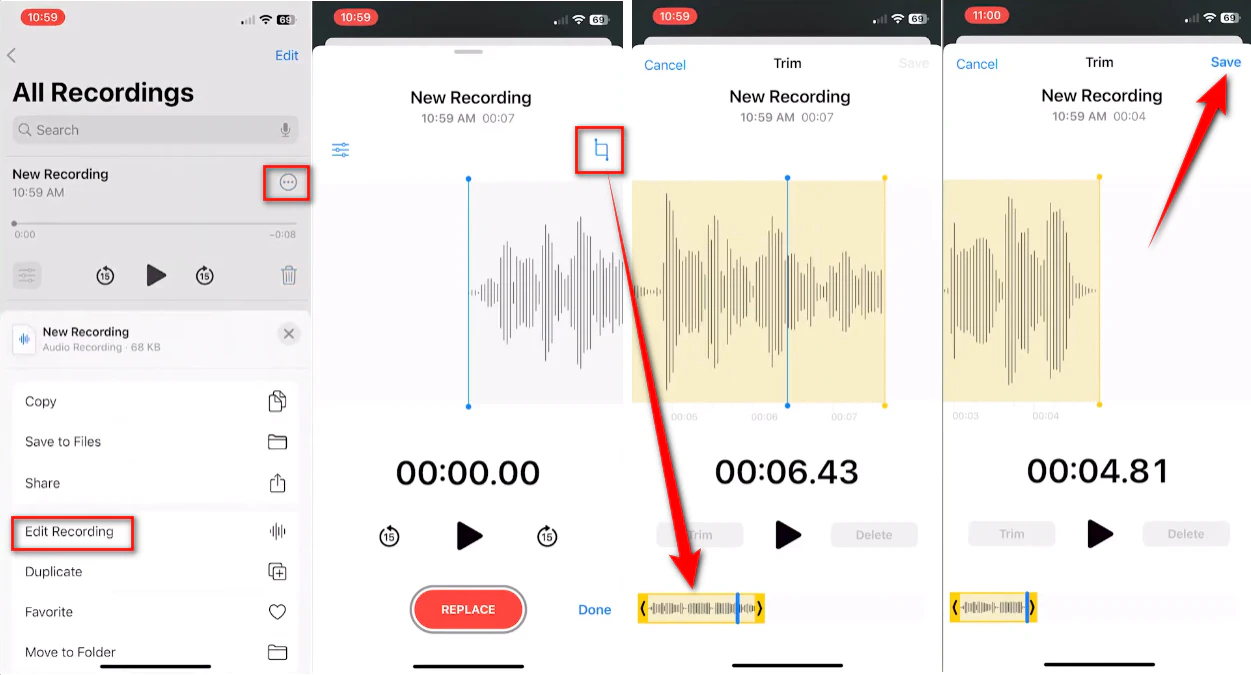
- Open the Voice Memos app.
- Select the recording you want to shorten from the list.
- Tap on the three-dot menu icon (...) and choose "Edit Recording".
- Tap the trim icon (a square with lines and dots) at the top right.
- Adjust the yellow trim handles to select the portion of the audio you want to keep.
- Tap "Trim" to cut away the unwanted sections.
- Tap "Save" to keep your changes. Then Tap "Done" to exit the editing mode.
b. Using Third-Party Apps
There are many user-friendly applications available to help you shorten, crop, or cut audio files with ease, and Mp3 Cutter - M4a, Music Cutter app is a great option.
- Open the App Store on your iPhone or iPad.
- Search for "Mp3 Cutter - M4a, Music Cutter" and download the app developed by TOH CO., LTD.
- Open the app after installation.
- Tap on the option to select music from your device.
- Browse and choose the audio file you wish to shorten.
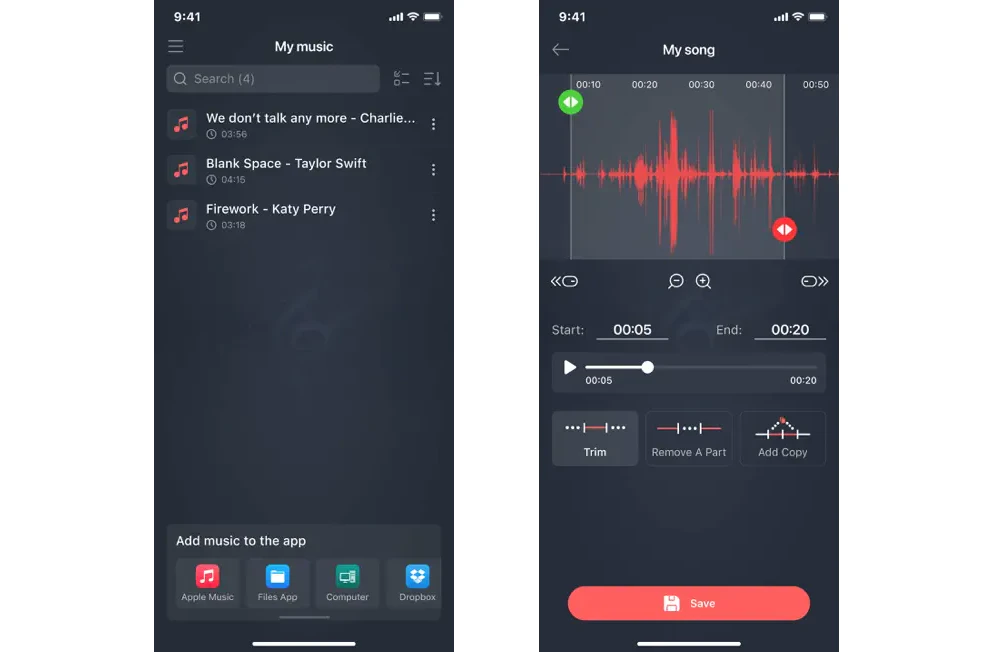
- Once the audio is loaded, you'll see a waveform representation.
- Use the sliders or input specific start and end times to select the portion of the audio you want to keep.
- You can preview the selected segment to ensure accuracy.
- After selecting the desired segment, tap on the "Save" button.
For Android Devices
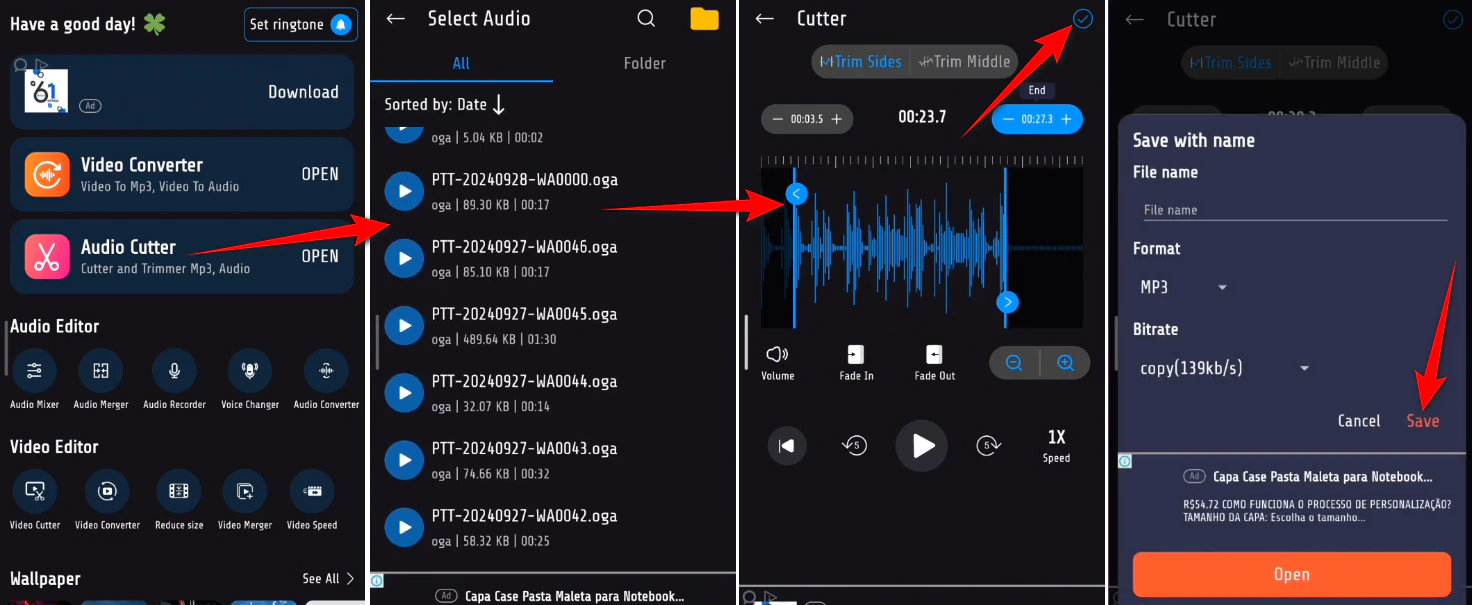
You also have many options on your Android device, but MP3 Cutter and Ringtone Maker is the recommended app for creating custom ringtones, and notifications, or simply shortening audio clips.
- Visit the Google Play Store on your Android device.
- Search for "MP3 Cutter and Ringtone Maker" by InShot Inc.
- Tap "Install" to download and install the app.
- Open the app and tap on "Audio Cutter".
- Grant the permission and tap on the specific audio file you wish to edit.
- Use the two sliders beneath the waveform to set the start and end points of the segment you want to retain.
- For precise editing, you can manually input the exact start and end times.
- Optionally, apply fade-in and fade-out effects by tapping the respective icons.
- Preview the segment and tap the confirm icon (a circle with a checkmark) in the top-right corner.
- Assign a name to the edited file.
- Choose the desired format (e.g., MP3, WAV) and quality settings.
- Tap "Save" to store the cut audio on your device.
For both iOS and Android
The easiest way to crop audio on any mobile device is to use online tools through your browser. These work perfectly on both Android and iOS:
- Open your preferred browser (Chrome, Safari, whatever floats your boat).
- Head to sites like MP3Cut or AudioTrimmer as we mentioned above.
- Tap "Upload" or "Choose File" to select your audio.
- Use the waveform or sliders to select your section.
- Hit save and download your cropped file.
- You can access your cropped files directly in your downloads folder.
FAQs
Q1: Can I cut audio in Windows Media Player?
A: Either Windows Media Player Legacy (WMP 12 and old versions) or Windows 11 Media Player is great for playing audio, but it doesn't have built-in cutting features. It is worth mentioning that WMP 12 can make audio cutting come true with the help of a third-party plugin - the WMP Trimmer Plugin.
Q2: How can I crop music in VLC Media Player?
A: VLC has basic recording functionality but doesn't truly "crop" audio. You can get an audio portion of a file by playing and recording manually. But it's not ideal for precise cropping. The process is a bit clunky, and you're better off using dedicated audio editing tools for better results.
Q3: Can I shorten the audio in Audacity?
A: Sure. Audacity is a powerful, free audio editor that allows you to cut, crop, and apply various edits. You can import your audio and select your desired section in Audacity, press Ctrl+T to split the audio, and then delete the unwanted parts. It's super precise and gives you full control over the edit points. However, there's a bit of a learning curve.
Q4: What's the best way to crop music for a ringtone?
A: It depends on what system or platform you are using. All the methods described in this article can be used to edit music for ringtones.
Q5: Is there a way to cut audio without losing quality?
A: Use tools that support lossless cutting. LosslessCut is perfect for this because it cuts the audio file at exact points without re-encoding the audio, preserving the original quality.
