Time-lapse is a photography technique in which the frequency of the captured frames is lower than that we watch. Thus the video appears to be moving faster than they are in reality. Timelapse compresses scenes from hours to minutes or just a few seconds, and we can easily obtain information from the time-lapsing video. If you want to make a timelapse digital video on your computer, firstly, you need to record a video with a time-lapse screen recorder. And then turn it into a timelapse using a video editor.
The following introduces five time-lapse video recorders for this task. Read on for more details.
Supported OS: Windows
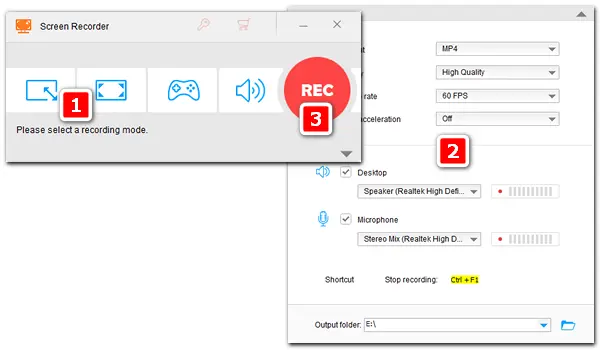
WonderFox HD Video Converter Factory Pro is a versatile video program for Windows that can convert video/audio files, record PC screens, download videos, and edit videos with simple clicks. The built-in screen recorder supports full/partial screen recording, game recording, internal/external audio capture, various output formats, high output video quality, etc. There’s no time limit, watermark, or frame drops.
After recording, the software lets you optimize the video by changing the video format, codec, resolution, bitrate, duration, size, etc. Moreover, it allows you to add filters, logos, text, subtitles, and music to make your video more attractive.
Get the versatile timelapse screen recorder PC here: https://www.videoconverterfactory.com/download/hd-video-converter-pro.exehd-video-converter-pro.exe


How to Record a Time Lapse Video on Windows 10/11:
Step 1. Run WonderFox HD Video Converter Factory Pro after you install it and click “Recorder” on the home interface.
Step 2. There are four recording modes: custom, full-screen, game, and audio-only. Select the mode and area you want to record. Then press “OK”.
Step 3. Select an output video format, quality, and frame rate. Check an audio source (“Desktop”, “Microphone”, or both). And specify an output path at the bottom of the interface.
Step 4. Press “REC” to start recording and “Ctrl + F1” to stop recording.
Supported OS: Windows & Mac
Debut Video Capture is the best timelapse recorder software for both Windows and Mac with a specialized time lapse video recording feature. It can record the entire screen, a single window or any selected area, video from a webcam or network IP camera in AVI, MWV, FLV, MPG, MP4, or MOV format. Apart from recording videos, it can record audio from your microphone and speakers. It allows you to record video alone, capture video and audio simultaneously, or add a webcam overlay to the screen. Also, it will spotlight the cursor when you move your mouse.
It provides a Green Screen feature which lets you replace the background with image, video, or solid color. What’s more, you can add text, logo, or watermark, change color settings and effects, and adjust the video resolution, size, frame rate, etc., for your video capture. After recording and editing your video, you can upload it directly to YouTube, Vimeo, or Flicker.
Get Debut Video Capture and Screen Recorder Software here: https://www.nchsoftware.com/capture/index.html
Note: The free version of Debut video capture software is available for non-commercial use only. You can buy a license for the Debut Professional software.


Features:
How to Record a Time Lapse Video:
Step 1. Launch Debut Video Capture. Go to the “Screen” > “Select Recording Window” to choose the window you want to record.
Step 2. Click the “Video Options” button and tick the box before “Enable Time-lapse”.
Step 3. Change the number after “Capture One Frame Every” to set the frequency of the video recording.
Step 4. Tap the red spot icon at the bottom of the software to start recording. Click the button to stop recording when you’re done.
Supported OS: Windows
CamStudio is a free desktop recorder and video streaming software working on Microsoft Windows. It can record all on-screen video and audio activities into industry-standard AVI videos and optionally turn them into streaming flash videos (SWF files) using the in-built SWF Producer. With the software, you can record a movie stream, create a demonstration, and track the progress of a program that executes for a long time with ease.
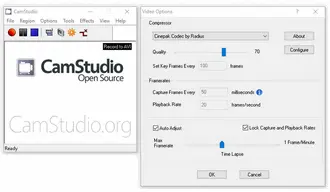
Like other Timelapse recorders, CamStudio provides flexible video, audio, and cursor options, including video compression, quality, keyframes, frame rate for capture and playback, time lapse, audio format, bitrate, cursor highlight, etc. It also supports keyboard shortcuts for recording. All levels of users can handle the software without problems.
Download CamStudio on your Windows computer: https://camstudio.org/


Features:
How to Screen Record Time Lapse Windows:
Step 1. Launch CamStudio and click “Region” to set a recording area. You can choose Region, Fixed Region, Window, or Full Screen.
Step 2. Click “Options” to adjust the related settings.
Step 3. Go to “File” and select the “Record” option to start recording.
Step 4. When you finish, click “Stop” to end the recording.
Supported OS: Windows & Mac
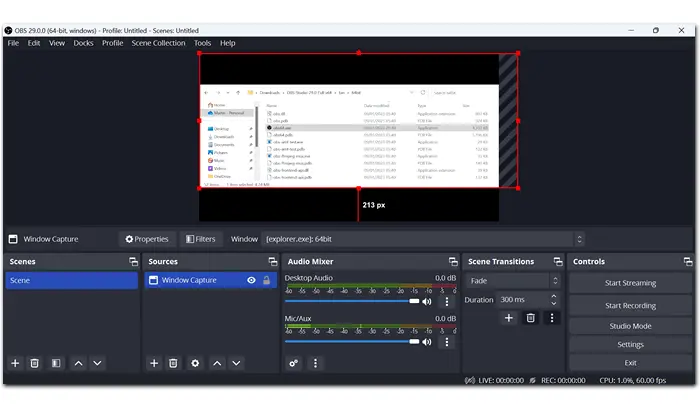
Another timelapse recorder for Windows and macOS computers is OBS. This cross-platform video recording and live streaming software allows you to capture any video and audio on your screen in real-time, including a specific device, window, browser, VLC video source, gameplay, image slide show, application sound, audio input and output, etc. It also lets you mix multiple sources, add filters, change colors, and transform the recording.
The default recording format in OBS Studio is MKV. You can change it to FLV, MP4, MOV, TS, or M3U8 in "Output Settings" or remux MKV recordings to MP4 using its Remux feature. And that, you can stream the recording to Twitch, YouTube, Facebook, or other video-sharing sites.
Download OBS Studio: https://obsproject.com/


Features:
How to Record a Time Lapse Video on Windows/Mac:
Step 1. Start OBS on your desktop. Click the “+” button under the “Sources” tab and select “Display Capture”.
Step 2. Go to “File” > “Settings” to adjust the output settings based on your need.
Step 3. Click the Start Recording button at the bottom right.
Step 4. Once done, click Stop Recording to stop it.
Tips. You can set the end time of your recording through “Tools” > “Output Timer” and change the default recording path in “Settings” > “Output”.
Supported OS: Windows & Mac
Bnadicam is a closed-source screen capture and video recording software for Windows. It can capture anything on your PC screen as a high-quality video in MP4 or AVI format. This app makes it possible to record various 2D/3D games with 4K UHD Video and capture up to 480 FPS Video. It also lets you record an external video device, like a webcam, Xbox, PlayStation, IPTV, etc. Meanwhile, it supports screenshot image files.
This software provides various recording options. You can record a video with the system audio and your voice at the same time, add webcam overlay, add a mouse click effect and animation, draw on your video in real time, and schedule your recording at a specific time. Though professional, Bandicam offers a simple interface, and everyone can get started without hassles. If you want to record a time-lapse video using the software, please follow the guide below.
Download Bandicam on Windows PC: https://www.bandicam.com/


Features:
How to Record Time Lapse Video:
Step 1. Open Bandicam and navigate to the “Video” tab, where you can add webcam overlay, logo, mouse click effect, and change the output format, video size, FPS, codec, and quality. Then click “OK”.
Step 2. At the top of the interface, tap on “Screen Recording Mode” and select a mode from the drop-down list.
Step 3. Hit the REC button to start recording. During the recording, you can click the camera icon to take a screenshot, and click the pencil icon to draw on the screen.
Tips. To change the save path, go to “General”, click the three dots, and select a new output folder. For scheduled recording, click “General” > “Settings” > “Add” to set a specific time to start recording.
This article shares the best five time-lapse screen recorders. WonderFox HD Video Converter Factory Pro, CamStudio, and Bandicam work on Windows computers, while Debut Video Capture Software and OBS Studio are available on multiple platforms. Pick your preferred software to record a video and make it time-lapsing!
Also read: 7 4K Screen Recorders for PC | 10 Screen Recorders No Time Limit | 10 Offline Screen Recordes for PC
It’s easy to timelapse a video on an iPhone:
Place your phone on a tripod, turn on the camera, and press the time-lapse icon. Then point out the subject you want to timelapse. Hold and tap the area you want to focus on and start to record.
Open the Camera app on your iPad, move the list of camera options, and find the “Time Lapse” option below the “Start” or “Stop” button. Then aim at the target and tap the “Start” button to start recording the time-lapse video. Tap it again to stop recording.
No. During the time-lapse recording, the device cannot record the audio, and the time-lapse effect is only visible after the recording is completed. You must use a third-party application to adjust the video’s sound effects. Or you can record a normal video with the recording software in this article and convert it to a timelapse video later.
Terms and Conditions | Privacy Policy | License Agreement | Copyright © 2009-2025 WonderFox Soft, Inc.All Rights Reserved