Many users have had issues while playing some MKV files on Sony TV. This problem can be caused by either an issue of the USB or the poor compatibility with some of the codecs contained in the MKV file.
This solution to this is also easy. You can try another USB or change the unsupported MKV codec with a handy converter. This article will share a full-fledged MKV to Sony TV converter with you. It allows you to change both the MKV container and the codec inside with ease.
In the next part, you'll get a competent MKV to Sony TV converter and a detailed conversion guide to help play MKV on Sony TV with no hassle. Please read on.
If you are not familiar with format and codec or have no idea of video transcoding, you are highly recommended to try WonderFox HD Video Converter Factory Pro, a powerful video converter with straightforward and intuitive interface. It aims to help users of all levels. With it, you can convert any video to Sony TV supported format. Besides, it also allow you to change not only the incompatible codec inside but also the MKV container. Coming with built-in popular device presets, you can effortlessly convert MKV to Samsung TV, LG, Apple TV, Xbox, etc. You can also trim, split, crop, rotate, add subtitles/filters/watermarks, and do more. It supports batch conversion and works fast.
Now, free download the robust video converter and follow the steps below to batch convert and play MKV on Sony TV.
Install
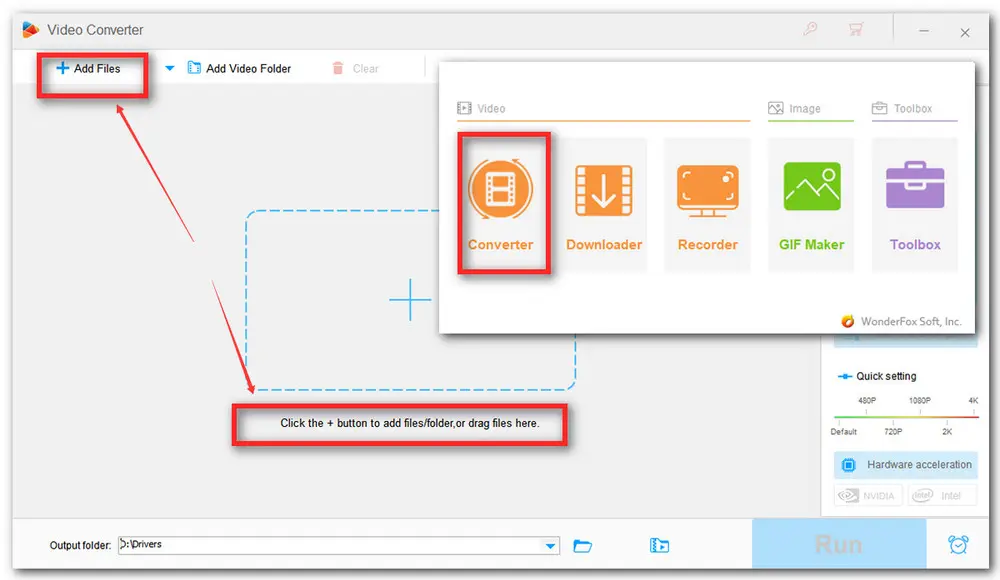
Install and launch HD Video Converter Factory Pro on your PC and enter the Converter module.
Next, straightly drag your MKV files into the program. Also, you can press the center + button or the upper-left + Add Files button to import the MKV videos.

Press the format image on the right side of the program to open the output format library. Then go to the Video category and select MP4 (recommended) or any other format supported by your TV. You can also keep the MKV format unchanged.
Next, navigate to the Parameter settings section. From the Encoder drop-down list, switch the original audio and video codec to other options that your Sony Bravia TV supports, such as H.264/AAC and MPEG4/AC3. You can customize other values if you like. At last, click OK to save the changes and return to the main interface.

Finally, choose an output folder by clicking the bottom triangle button and hit the Run button to start the conversion.

Hot Search: Play MP4 on TV | Play Unsupported Video on TV | Play ISO on TV|Play DVD on Kodi
After the conversion process, transfer the converted MKV files to your USB and connect the USB to your TV.
The following are the steps to connect a USB connector to your Sony TV:
----Step 1. Power off your TV and turn it to connect the USB to the port;
----Step 2. Power on your USB device and TV;
----Step 3. Press the HOME button on the remote control to display the menu.
----Step 4. Depending on the TV model you can go to either one of the following:
Select Media > Photos, Music or Videos > Select name of the connected device;
Select Connected Devices > USB > Photos, Music or Videos;
Select Media Server > USB;
----Step 5. Select the target file from the list. Then press the Enter icon button to play.
That’s the whole process of how to convert and play MKV on Sony TV. Hope you’ll find this article helpful. Thanks for reading.

Privacy Policy | Copyright © 2009-2025 WonderFox Soft, Inc.All Rights Reserved