How to Record Screen Activity in Windows?
Try WonderFox HD Video Converter Factory Pro to :
√ Record any on-screen activity in Windows
√ Screen quality video with audio at 4K/60fps
√ Save recordings in hot video and audio formats
Whether you want to create an engaging software tutorial video for demonstration or capture the gameplay highlights for sharing, a screen recorder is required in this regard. In this article, we compiled 5 handy recorders to help you capture the on-screen activities in Windows with ease. Some of them are pre-installed features on Windows while others are 3rd-party screen recording software. Continue reading to pick the one that fits your needs most.
Windows 10 and Windows 11 both come pre-installed with recording features, offering users a free and safe way to record activities on their Windows display.
Xbox Game Bar is an inbuilt gaming overlay available on both Windows 10 and Windows 11 PC. While it was developed to help gamers take control of their gaming activities, like recording game videos, broadcasting, chatting with friends, monitoring PC performance, and so on, it can also be used to screen record activities on Windows from other non-game applications.
Here is how to screen record on Windows with Xbox Game Bar:
Step 1. Press the shortcuts Windows + G on your keyboard to call up the Game Bar overlay.
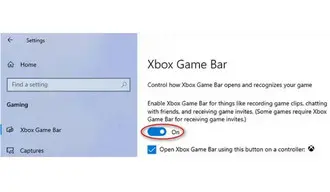
Tips: If the gaming overlay doesn’t show up, there is a good chance the feature is disabled. You can open Settings on your Windows and go to Gaming > Xbox Game Bar. Then turn on the switch to enable the Xbox Game Bar feature.


Step 2. On the overlay, select the Capture widget and hit the recording button (with a dot on it), or press the Windows + Alt+ R to start recording.
Step 3. Then a Capture Status overlay with a timer and two recording control buttons will appear on your screen. You can mute or enable your external microphone by clicking the mic symbol button.
Step 4. To stop the recording, you can click on the stop button on the bar or use the shortcut Windows + Alt + R.
Step 5. Then open the Widget Menu on the overlay and select Gallery to preview the recorded video.


It should be noted that though Xbox Game Bar in Windows is a handy way to screen record videos, it has some limitations. You can only record one application for up to 4 hours at a time and save it in MP4 format. It can’t record the Desktop or Windows File Explorer. Besides, you can’t select an area and record a selected portion of the screen with it.
Snipping Tool is a screenshot utility that has been integrated with the Windows operating system since Windows Vista. With the update to Snipping Tool (version 11.2211.35.0), you can now also screen record a video on Windows 11 using this tool. The newly introduced screen recorder allows you to freely select the recording region. You can capture a whole screen or part of it.
Now, we’ll walk you through how to use it to screen record on Windows:
Step 1. Search Snipping Tool in your Start menu to call it up. If your version doesn’t have the recording feature, you can visit Microsoft Store to update it.
Step 2. After launching, click on the camcorder icon and then hit the + New tab.
Step 3. Then you can define the portion of the screen you want to record.
Step 4. Now, hit the Start button. After the countdown, the recording will start at once.
Step 5. Once you’re done, hit the stop icon to end the recording. You can preview the recording and then click on the Save as icon to save the recording to your Windows.


It is very easy to screen record on Windows 11 with Snipping Tool though, there are still some little drawbacks you need to overcome. For example, the only export format currently is MP4 and the audio recording option is not available yet.
If you are on a tight budget and just want to make a quick and short recording on Windows, you can take advantage of these built-in features. But as you can see, both Xbox Game Bar and Snipping Tool have limited recording capabilities and export format. Moreover, there are no editing features available within them. For those who have special needs for audio recording capability, editing features, or recording formats, they need a more robust recorder. In this part, we’ve prepared 3 third-party screen recorders. In addition to the basic recording functions, each has additional features. Plus, you’ll also be provided with detailed steps on how to record screen on Windows using them.
WonderFox HD Video Converter Factory Pro is an all-in-one screen recorder that is packed with multiple recording modes, enabling you to screen record whatever activities on your display, such as gameplay, online meeting, streaming music, and more. You can record the full screen or a selected area. After recording, you can personalize your recordings with built-in editing tools and then convert them with the required format and video settings for smooth sharing or playback on any device. Its intuitive UI makes it easy to operate for everyone.
Follow along with the steps to start recording the screen on your Windows right now:
Step 1. Download WonderFox HD Video Converter Factory Pro and install it on your Windows (11/10/8.1/8/7/...) to get ready.
Step 2. Launch the program and select Recorder on its startup interface.
Step 3. There are four recording modes available for your choice: Custom, Full-screen, Game, and Audio-only. Select one based on your real needs.


Step 4. Move download to select a recording format. For video recording, you can choose to capture MP4, AVI, MOV, or MKV. For audio, it’s MP3, WAV, AAC, and AC3.
Step 5. Continue to set the desired quality, frame rate (up to 60fps), audio source, and output folder. You can turn on GPU acceleration for better recording performance.
Step 6. Finally, hit the red REC button to start recording your screen after a five-second countdown. When you’re done with the recording, press the hotkeys “Ctrl + F1”. For further edits, you can import the recordings to the Converter module.


OBS Studio is the most famous free and open-source screen recorder for video recording and live streaming. Unlike many other free competitors, it includes a lot of features and settings, allowing you to fully customize the recording experience and even record while streaming. You can record multiple sources at once, including your screen, webcam, game captures, microphone, and other audio sources.
OBS enjoys high popularity among game streamers. Next, we’ll guide you through how to screen record a gameplay video on Windows with OBS:
Step 1. Install OBS Studio on your PC first. Then start your game before opening OBS.
Step 2. Launch OBS. At the bottom of the program window, click the plus sign on the Sources panel and choose Game Capture.


Step 3. In case you want to create multiple sources for recording, you can give a label to the source like “Game Capture 1” and hit OK to save.
Step 4. Then, a properties window will appear on the screen. Choose a recording mode to decide the recording area. You can select “Capture any fullscreen application” for a full-screen game, or choose “Capture specific window” to record a specific area of your game session on the screen. Press OK to confirm the settings.
Step 5. When you are ready, click on the Start Recording button in the Controls box to start.


Snagit is a feature-packed paid software available on both Windows and Mac. It can help screen record video and a webcam along with microphone audio and system audio. You can also customize the recording area. However, Snagit only offers a simple trimming tool. Certainly, it has its merits, such as the support for picture-in-picture mode and drawing tools, making it an ideal choice to create demonstration videos.
Here is how to record your screen on Windows using Snagit:
Step 1. Get Snagit from its official site.
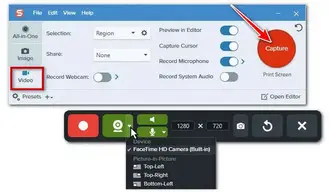
Step 2. Launch the program and choose the Video capture mode at the left panel.
Step 3. Then click on the big red Capture button.
Step 4. On the floating bar, you can specify the part of the screen you want to record.
Step 5. Press the icons on the recording bar to record the webcam, set the recording resolution, and choose the audio source.
Step 6. Finally, hit the red Record button to start recording your screen on Windows.


Well, that’s all about how to screen record on Windows in 5 easy ways. Just pick one based on your needs.
If you are using Windows 10 or Windows 11 and just want to save clips of video, Xbox Game Bar and Snipping Tool can get your job done well enough.
If you’re a beginner but are looking for a comprehensive toolkit capable of recording, editing, compressing, and converting for easy sharing, you’re highly recommended to try WonderFox HD Video Converter Factory Pro.
As for those who want to highlight important information when recording, they should look no further than Snagit.
For a tech person, OBS, without any doubt, is the top pick. With a little setup, it can deliver professional-look video.
Q1: How do I record my screen and audio on Windows 11?
All the described methods can help you record screen with audio on Windows 11.
Q2: Can you screen record with Windows Media Player?
No, Windows Media Player doesn’t offer the recording feature.
Q3: Why is screen recording not working on Windows 11?
If the built-in screen recording function doesn’t work, it might be caused by an outdated Windows system or graphics drivers, conflicting applications, insufficient system resources, etc.
We’ve covered you with a comprehensive guide to fix the screen recording issues. Check the troubleshooting tips here: Why Is My Screen Recording Not Working on Windows, Mac, iPhone, and Android?
Terms and Conditions | Privacy Policy | License Agreement | Copyright © 2009-2025 WonderFox Soft, Inc.All Rights Reserved