Can you add subtitles to your QuickTime movies? In fact, it’s easy to add closed captions or hard subtitles to a video with a good subtitle-adding tool. And the following part will introduce two useful applications to help you add subtitles to MOV, QuickTime, or other video files at ease. Read on for more details.
We can use WonderFox HD Video Converter Factory Pro to finish this task. It offers a straightforward way to add captions to QuickTime videos or MOV files on PC. It allows you to add .srt and .ass subtitle files, and set them as soft/hard subtitles based on needs. Moreover, this software can help you change the video format, add an audio track to QuickTime videos, add watermarks, special effects, and more. The self-explanatory interface makes it easy to handle for all users.
The next part is the guide on how to add MOV subtitles. Please free downloadfree download HD Video Converter Factory Pro on your computer and follow the steps.
Launch HD Video Converter Factory Pro and open the Converter. Import the QuickTime or MOV videos that you want to add subtitles to by clicking the Add Files button. Of course, you can drag and drop the target files into the software directly.


Go to the output format section on the right side to choose your desired preset. If you’d like to remain the container format, select MOV under the Video tab. If you want to change MOV to MP4, MKV, or other formats, just click the corresponding icon.


Click the first plus ‘+’ button below the imported video. Select your wanted SRT or ASS subtitle file and press Open to add it to the software.
Note: A video can contain multiple soft subtitles, but only one hard subtitle. If the output format is MP4, MOV, or MKV, you can add multiple subtitle tracks and set them as closed captioning (soft-coded subtitles). If you choose AVI, MPG, and other formats, the subtitle you add will be hard-coded to your video automatically.


You can repeat step 3 to add subtitles to other MOV/QuickTime videos.
Then click the inverted triangle button to select an output destination. Press Run to start merging subtitles with videos immediately. Soon, the final files will be exported to the folder you set before.


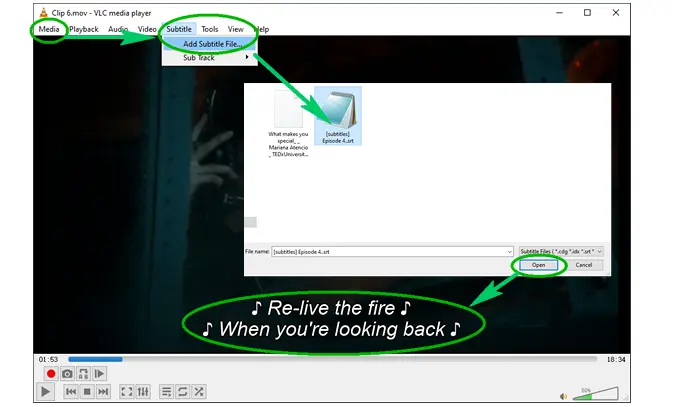
VLC is also helpful when adding subtitles to videos. It’s not only a simple multimedia player, but a powerful video converter, editor, and screen recorder. Here is how to add captions to QuickTime videos/MOV using VLC media player. Read on and follow if you have VLC installed.


Step 1: Run VLC media player, go to Media > Open File, and select a MOV file;
Step 2: Click Subtitle on the top menu bar and click Add Subtitle File to load your subtitle file;
Step 3: Press Media > Convert/Save to set an output format and then export the new file.
Tips. If the subtitle is not in sync with your video, you can press the ‘G’ and ‘H’ keys on the keyboard to adjust the playback delay.
As we know, the file extension of QuickTime Player videos is .mov. So we can also add QuickTime closed captions directly in this program. Here is the how-to:
1. Open your MOV movie in the QuickTime Player.
2. Click View on the menu bar and select the Subtitles option.
3. Choose a language, then click the Subtitles icon to add the file while playing the video.
A: Yes, you can add soft subtitles to an MOV file without re-encoding. This method keeps the original video quality intact. Hardcoding subtitles will re-encode the video inevitably.
A: After you add an internal or external subtitle file, click the "CC" icon and switch to "Hard-Coded Subtitles", which allows you to burn the subtitles into the MOV file.
A: Yes, MOV can contain multiple soft subtitles. So you can click "+" icon to add multiple options to the subtitle list.
That’s all about how to add subtitles to MOV or QuickTime Player videos effectively. I believe you can watch movies with your wanted subtitles now using the methods above. Finally, if you have other questions, don’t hesitate to contact us. Thanks for reading!
Terms and Conditions | Privacy Policy | License Agreement | Copyright © 2009-2025 WonderFox Soft, Inc. All Rights Reserved