Subtitles help us understand the plot better when watching a foreign movie or on mute. Many media players support external subtitles, and VLC is the favorite for most people. The multi-purpose media player is able to convert, edit, stream media files, and add subtitles to videos temporarily or permanently. If you have installed the VLC player on your PC, follow and learn how to add subtitles in VLC below.
Tips. It doesn’t take much effort to put subtitles on a video during the playback in VLC. However, embedding subtitles into videos permanently in this media player is quite circuitous. Here’s an easier subtitle-adding tool, WonderFox HD Video Converter Factory Pro (add multiple soft subs or one hard-coded subtitle track to a video, and all can be done in simple clicks on the intuitive UI). Navigate to the #alternate way to add subtitle files to your videos permanently.
To play your video with external subtitles,
1. Prepare the subtitle file. If you have no subtitles for the movies you want to play, download the needed ones from a subtitles website, such as Subscene, OpenSubtitles, YIFY, etc.
Also Read: Subtitles Download in VLC Media Player Automatically
2. Run VLC and click Media to open your video in the player.
3. Click Subtitle in the top menu and select Add Subtitle File. Locate your subtitle file and click Open to add it to the video.
4. Then, VLC will play your video with a new subtitle track.
Tip. If the subtitles are either ahead of or behind the video scene, you can adjust the playback delay using the hotkeys G and H. Learn details >


In this way, you can enjoy movies or series with subtitles in VLC Media Player. But it won’t add the subtitle file permanently to your video. Don’t worry! The next part shows you how to embed subtitles into video permanently in VLC step by step. Keep reading.
To add subtitles to VLC permanently,
1. Launch the VLC media player. Click Media and select Stream from the drop-down menu.
2. Click +Add in the pop-up window and choose the video you want to play.
3. Check the Use a subtitle file option and click Browse to add the subtitle. VLC supports many subtitle file formats, including .srt, .ass, .ssa, .txt, .vtt, .sub, and more. Then, click Stream and Next.


4. Press Add to specify a new destination. Hit the Browse button to select a folder and name the output file. Make sure the file extension is .mp4 or any other supported format. Then, click Save and Next.


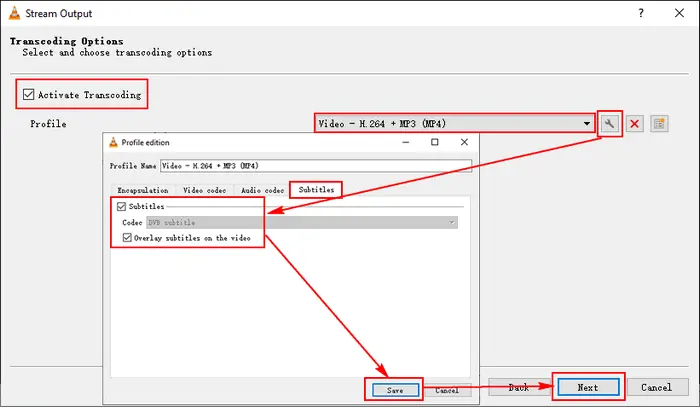
5. Check the Active Transcoding option.
6. Select an output profile from the drop-down list. Hit the “wrench” icon and go to the Subtitles tab to check Subtitles and Overlay subtitles on the video. Then, click Save and Next.


7. Finally, click the Stream button to add subtitles to video VLC permanently. Once the process is complete, your video with subtitles will be saved to the folder you selected before.


That is how to embed subtitles into video permanently in VLC. As you can see, the process is very circuitous, which will take a lot of time and energy. Most of you prefer a simple yet efficient way to add subtitles to a movie or video clip permanently. Therefore, the following part shares how to add subtitles to video with VLC alternative in handy. Read on if you’re interested.
WonderFox HD Video Converter Factory Pro is the recommended alternative way to VLC add subtitles to a video on Windows PCs. It can help you add soft subs or hard-coded subtitles to your videos in one simple click. The versatile software also offers various solutions for converting, downloading, recording, and editing videos, much like VLC but simpler.
DownloadDownload the software and follow the below steps to insert subtitles to your video easily & permanently.
Launch HD Video Converter Factory Pro and open the Converter. Click Add Files in the top left corner to import your video files. Drag & drop is also available.
Open the output profile menu by clicking the big image on the right side. Select MP4 or another container format under the Video tab.


Note: MKV, MP4, and MOV support closed captioning (also known as soft subs or soft-coded subtitles). You can add multiple closed captioning tracks to a video and select the desired one while playing the video. On the other hand, hard-coded subtitles are supported in all video formats. You can add only one hard-coded subtitle track and can’t remove it from the video.
Click the first “+” sign below the video to add a local subtitle file. You can download subtitles from websites. Repeat the step to add more subtitles and select the wanted tracks from the options.
If you want to hardcode subtitles to your videos, click the CC/H icon beside the “+” button and select the Hard-Coded Subtitles type. Once done, press OK.
Press the inverted triangle button at the bottom of the interface to set an output folder. Finally, click the Run button to start to merge subtitles with videos immediately. The final files will be exported to your computer soon.


This article illustrates how to add subtitles in VLC and its alternative permanently. Since the VLC media player doesn’t offer a straightforward way to embed subtitles in videos and sometimes the process may fail, you can turn to the alternative solution to add subtitles permanently using HD Video Converter Factory Pro. Beyond that, this all-in-one video program can do more for you:
Terms and Conditions | Privacy Policy | License Agreement | Copyright © 2009-2025 WonderFox Soft, Inc.All Rights Reserved