
Subtitles can transform your viewing experience, making videos more accessible and enjoyable, especially when you watch foreign-language movies or if you need clarity in understanding the dialogue.
While MKV is a very versatile format, it sometimes lacks of built-in subtitles. This is where third-party subtitles in SRT or other formats come to the rescue. Next, we'll discuss 5 simple and reliable methods to add external subtitle files like SRT to existing MKV videos.
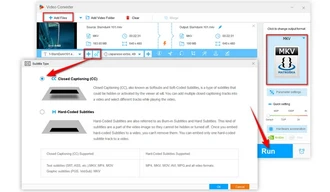
WonderFox Free HD Video Converter Factory is a Windows-based free video processor that also comes bundled with a handy MKV subtitle adder, simplifying the entire workflow. Even novices can navigate its features with ease. Here's a more detailed breakdown:
Step 1. Install and runInstall and run the freeware on your PC.
Step 2. Open "Converter" and click "Add Files" to load your MKV file.
Step 3. Choose MKV as the output format to maintain consistency.
Step 4. Click the "+" icon next to the "T Disabled" section and select your external .srt or .ass file.
Step 5. Click the "CC" icon to choose your desired subtitle type:
Step 6. Specify a location and hit "Run" to start embedding subtitles in your MKV file.

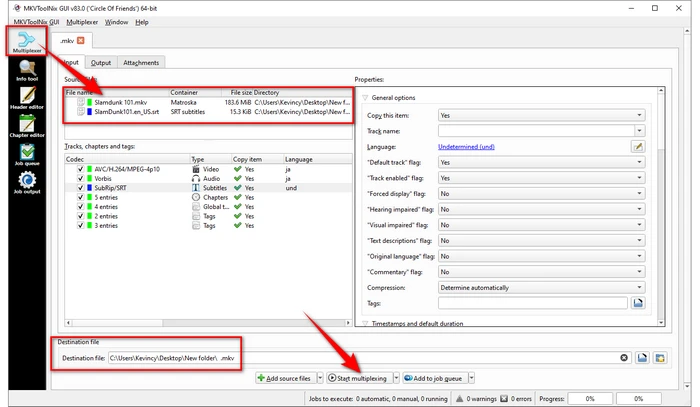
MKVToolNix is a powerful and multi-platform MKV file editing suite. You can use its simple GUI tool to add external subtitles without touching command lines:
Step 1. Download and install MKVToolNix on your computer.
Step 2. Upon opening MKVToolNix GUI, navigate to the "Multiplexer" tab.
Step 3. Drag and drop your MKV and subtitle file into the "Input" section. The program supports multiple subtitle formats, providing flexibility.
Step 4. Specify your output destination and filename, ensuring your file is easy to locate post-processing.
Step 5. By clicking "Start multiplexing", the tool merges your MKV file with the subtitle file without re-encoding, keeping the original quality intact.
Tips. Although MKVToolNix excels in embedding subtitles, it lacks the capability to hard-code (burn) them into the video.

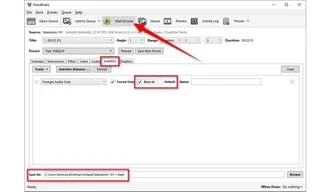
HandBrake is a free and open-source video transcoder available for Windows, Mac and Linux that can also be used to add subtitles to your MKV files, allowing users to choose between soft and hard subtitle options. Here's the process:
Step 1. Download and install HandBrake on your computer.
Step 2. Launch HandBrake and add your MKV file to the "Source" section.
Step 3. Choose a desired preset and select "MKV" in the "Format" drop-down list.
Step 4. Navigate to the "Subtitles" tab, click the "Tracks" button, and select "Import Subtitle" to add your subtitle file (SRT, ASS, or SSA format).
Step 5. Check the "Burn in" option to hardcode the subtitles into the video, making them a permanent part of the image. If you leave this option unchecked, the subtitles will be added as a separate track, allowing you to turn them on or off.
Step 6. Click the "Browse" button at the bottom to choose a location and name the video.
Step 7. Click the "Start Encode" button to initiate the encoding process to integrate the subtitles into your MKV file.

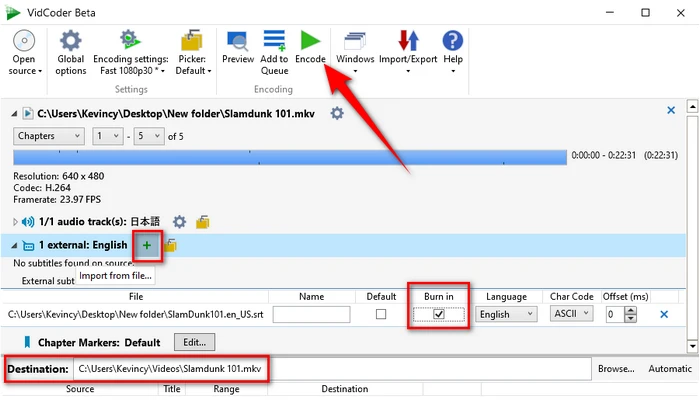
VidCoder is another free and open-source video transcoder built on HandBrake's framework and encoding engine, offering a similar, but more streamlined interface for subtitle embedding.
Step 1. Download and install VidCoder on your computer.
Step 2. Run VidCoder and add your MKV file.
Step 3. Choose a preset and select MKV as the container format.
Step 4. Click the "+" icon in the "Subtitle Tracks" section to add your subtitle file (SRT, ASS, or SSA format).
Step 5. Check "Burn in" for hard-coding subtitles to MKV or leave it unchecked for embedding soft subtitles.
Step 6. Choose your desired output folder and give it a specific name.
Step 7. Click the "Encode" button to add the subtitles to your MKV file.
Tips. Similar to HandBrake, the "Burn in" option in VidCoder is useful for ensuring that the subtitles are always visible, even on devices that may not support separate subtitle tracks.

XMedia Recode is a versatile utility that stands out for its comprehensive control over video processing. It also allows you to add subtitles to your MKV files, catering to both soft and hard-coded subtitles.
Step 1. Download and install XMedia Recode on your computer.
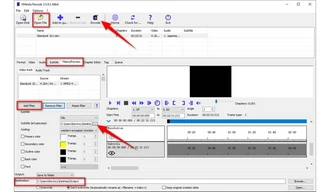
Step 2. Launch XMedia Recode and click "Open File" to add your MKV file.
Step 3. Choose "Matroska MKV" as the output format.
Step 4. Choose your desired subtitle type:
Step 5. Choose a destination folder at the bottom to save the output file.
Step 6. Press "Add to queue", and then hit "Encode" to start merging your MKV file with subtitles.

As you can see, embedding subtitles into your MKV file doesn't have to be complicated. By utilizing the five free and easy-to-use methods mentioned above, you can seamlessly get the job done, whether you prefer soft subtitles or hard-coded ones. I hope this comprehensive guide helps you a lot, see you in the next article.
A: Soft subtitles are added as a separate track within the MKV file, allowing you to turn them on or off as needed. Hard-coded (or burned-in) subtitles are permanently embedded into the video, becoming a part of the image itself.
A: Yes, MKV supports multiple subtitle tracks. Most of the above tools support adding multiple external subtitle tracks to a single MKV file by repeating the import process. Viewers can choose the preferred language subtitles. But it only works for adding soft subtitles.
A: Yes, but you have to configure each MKV file beforehand. Some of the tools like Free HD Video Converter Factory and XMedia Recode offer batch processing capabilities, streamlining the process.
A: Adding soft subtitles will not re-encode or affect the video quality in any way since subtitles are just an additional text track synced to the video. However, hard-coding subtitles will re-encode the video, slightly altering the quality during the encoding process.
A: Yes, websites like Kapwing, VEED, and Clideo offer functionalities to add subtitles to MKV files. But web-based tools always have limitations, such as file size restriction, watermark, privacy concern, and processing speed.
Terms and Conditions | Privacy Policy | License Agreement | Copyright © 2009-2025 WonderFox Soft, Inc. All Rights Reserved