Adobe Premiere Pro is a professional video editor that can be used to do tons of editing tasks and produce industry-standard outputs. Now, follow the steps below to learn how to split screen in Premiere Pro.
--Step 1. No matter what split-screen video editor you’re using, your first step is to import your footage into your editor.
Open Premiere Pro and hit New Project. In the upper-left, you can create a Project name and specify a new Project location.
Under the Import section, find and select the target videos. Hit Create to import them.
Tips: When I first import my MP4 videos into Premiere Pro, there is no video but only audio. I noticed that many users have encountered the same Premiere Pro only audio no video issue . And in most cases, this error results from wrong codecs. Therefore, before importing videos, please make sure your file is supported by Premiere Pro. If not, you’ll need a powerful video converter to convert the unsupported file type to a Premiere-editable format. If you have no idea what formats are supported by Premiere Pro and how to convert, you can find answers in this post: Import Video into Premiere Pro without Error
--Step 2. Drag the videos you need onto the Timeline to create a new sequence. Make sure to stack videos on top of each other on the timeline, as shown in the pic below:

If you don’t need the audio track, you can remove the audio from the video in Premiere Pro.
--Step 3. On the left side of the workplace, click on Effects and search Crop in the text box. Then select the effect and left-click to drag it to the video on the timeline. Then go to the Effect Controls panel and find the Crop option.

--Step 4. Depending on how you want to split the screen, you can adjust settings in the Crop effect. For example, here I change the Left to 50.0%, I get a video like this:

Of course, you can go ahead and experiment with other settings to check which works best for your video.
--Step 5. Then repeat the above steps to apply the Crop effect to other videos. Once done, click the Export option and modify the output settings. You can see the final video in the right-side Preview window.
Also Read: Upscale Video in PR | Add Subtitles in Premiere | Import YouTube into Premiere
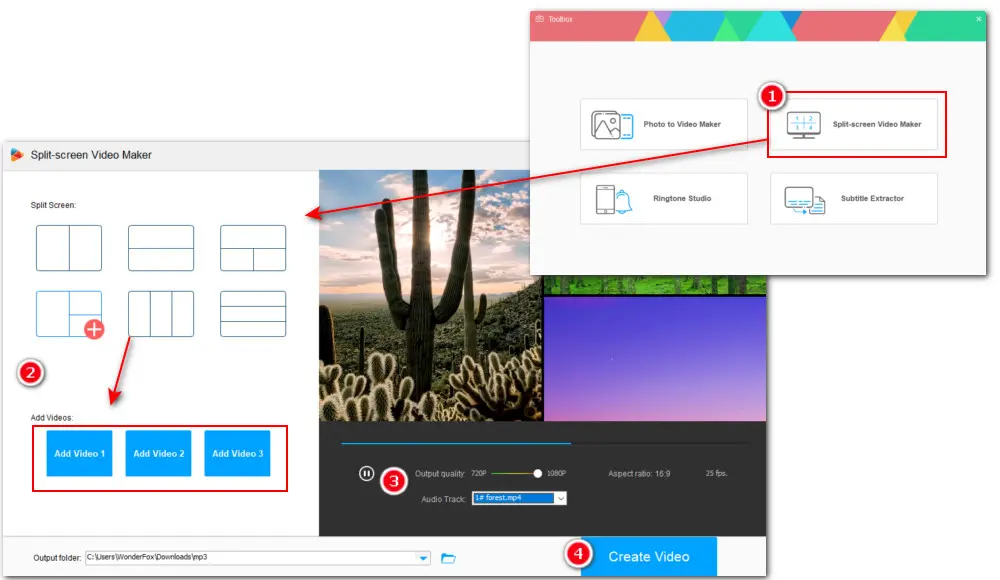
If you prefer a simpler and more efficient tool, WonderFox HD Video Converter Factory Pro is worth a try. This complete toolbox features a dedicated Split-screen Video Maker. It offers various split-screen templates and its self-explanatory interface makes it to work with.
In addition to this, it can trim, cut, merge, rotate, apply special effects, add watermark, attach subtitles, and so on. Even better, you can use it to convert, compress, download, record, and do more.
Free download the versatile program and take the steps below to make a split-screen video effortlessly:
Step 1. Start the program on your Windows PC and go to Toolbox. Then press Split-screen Video Maker.
Step 2. There are six templates for you to choose from. Select the favored option and click on the Add Video buttons below to import the file in sequence.
Step 3. Below the preview window, you can set the output quality up to 1080p and choose an audio track from the imported videos. You can change the track later in the Converter module if you want.
Step 4. At the bottom, specify an output path by hitting the inverted triangle button. Then hit Create Video to begin processing the split-screen video.

That’s all about how to let Premiere Pro split screen. Sincerely hope the guide can help you produce a split-screen video in Premiere Pro easily. Thanks for reading. Have a nice day!

Privacy Policy | Copyright © 2009-2025 WonderFox Soft, Inc.All Rights Reserved