Are you wondering how to get music from a DVD for jamming out to your favorite tunes anytime, anywhere? More benefits include:
Maybe it's that live concert DVD, music video, opera, or a classic movie with epic soundtracks. Whatever it is, ripping audio from DVDs seems a bit complicated at first. But trust me, it's easier than it looks.
Next, I'll show you how to do that using different methods, tools, and techniques, all in one go. I'll keep it simple and walk you through step by step, avoiding that tech jargon wherever possible. Let's get started!
This is just a friendly reminder to check if it's legal to rip DVDs in your area. We're all about staying on the right side of the law here. This guide is for personal use and making digital copies of your DVDs.
WonderFox DVD Ripper Pro is a powerful and versatile tool designed to help users extract, convert, and back up the content from their DVDs with ease. It offers an intuitive interface perfect for beginners and experienced users.
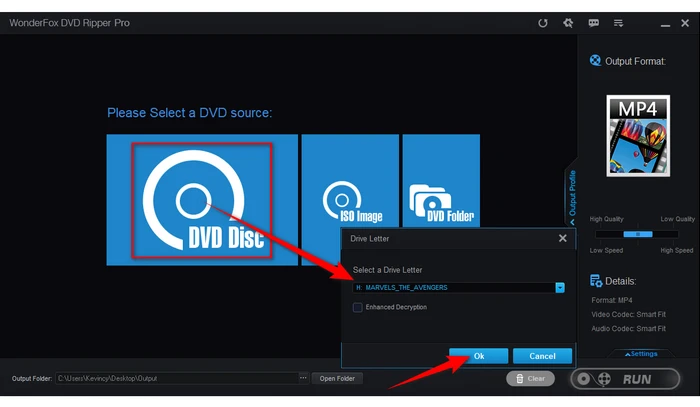
WonderFox DVD Ripper Pro stands out for its impressive speed, extensive format support, and ability to handle copy-protected DVDs. Users can effortlessly extract audio from DVDs. Here's the step-by-step guide.
Before you get rolling, insert a DVD disc into your DVD-ROM drive.
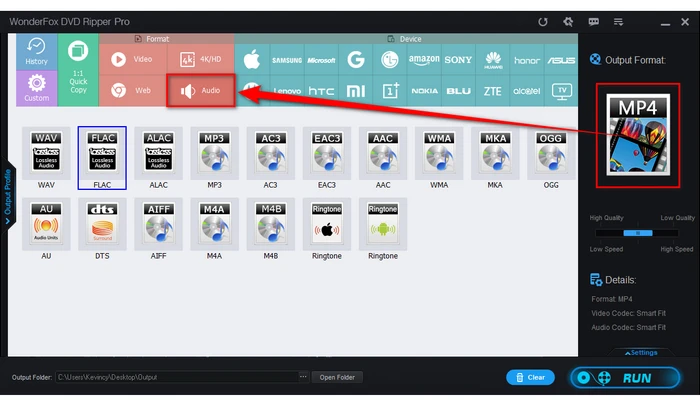
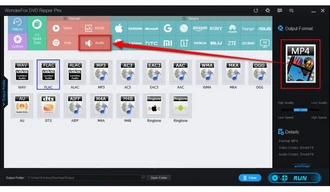
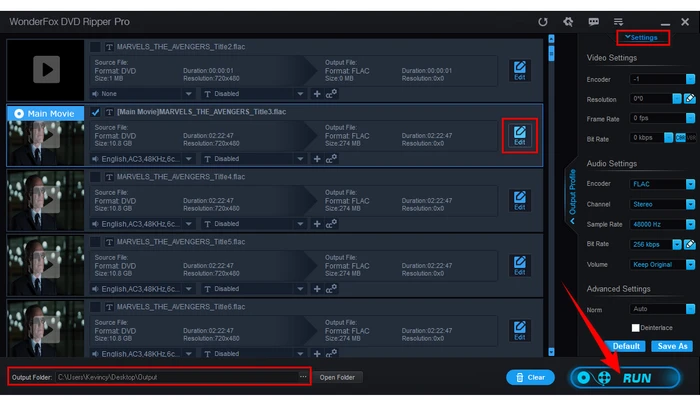
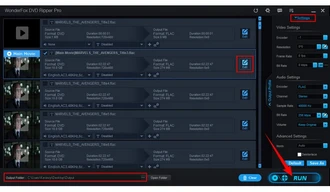
You can customize the audio quality, bitrate, channel, and sample rate by expanding the "Settings" panel. For example, you can select a higher bitrate for better DVD audio quality.
If you only want to rip a specific part of the audio, you can use the "Trim" feature available in the "Edit" menu to cut out unwanted segments.
WonderFox DVD Ripper Pro will start extracting the audio from the DVD based on the settings you've configured. The software will notify you once the process is complete. You can then find the ripped audio in your selected output folder.
DVD Audio Extractor, also known as DVDAE or DAE, is a powerful and easy-to-use software tool designed to extract audio from DVD discs and convert it to various formats such as MP3, WAV, FLAC, OGG, and others.
This software is widely appreciated due to its cross-platform support, intuitive interface, high speed, and high-quality audio extraction capabilities. It supports DVD-Audio discs, Blu-ray audio discs, and even Video DVDs, making it a versatile tool for various multimedia projects or personal use.
Insert the DVD from which you want to extract audio into your computer's DVD drive.
Download and install DVD Audio Extractor on your computer.
Launch the software, it should automatically detect your DVD and display its contents, listing titles and chapters. If it doesn't auto-detect, select your DVD drive manually.
In the left pane, you will see a list of titles and chapters. Select the title or chapters containing the audio you want to extract. You can also use the preview feature to play the chapters and confirm.
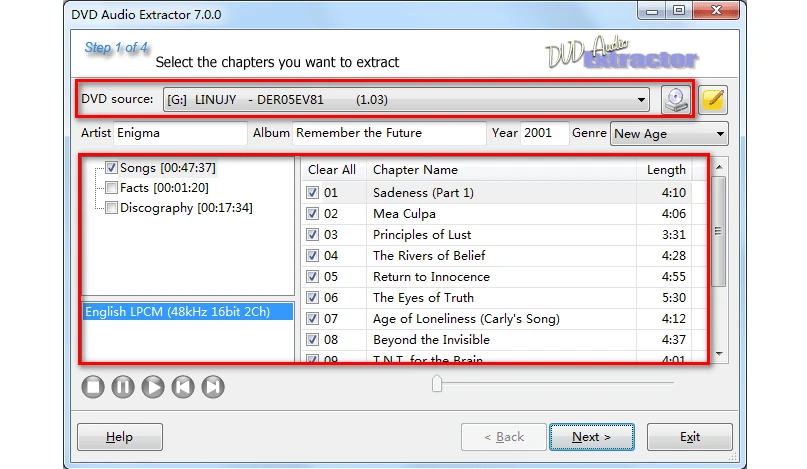
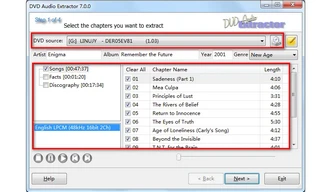
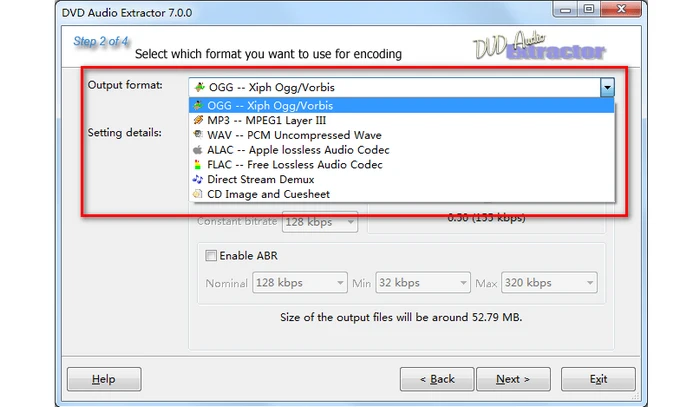
Click on the "Next" button to proceed. Here you can choose your preferred output format from the drop-down menu, such as MP3, WAV, FLAC, OGG, etc.
You can configure the bitrate and quality settings based on your preference. For high-quality rips, select a higher bitrate or lossless format.
On the next screen, you'll be asked to choose a location on your computer where the extracted audio files will be saved. Make sure to choose a folder with sufficient space.
You can also modify the name format, create an M3U playlist, or normalize the audio if needed.
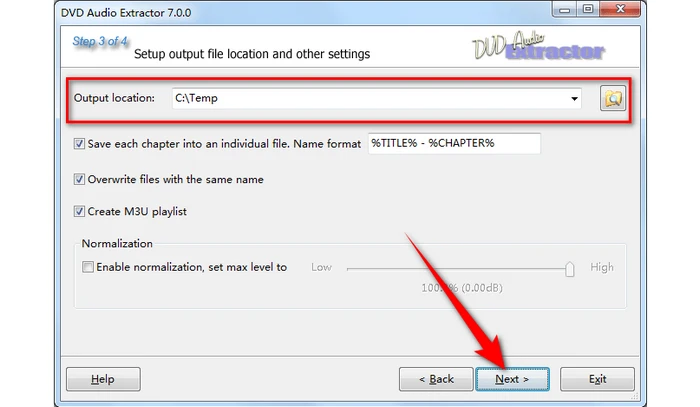
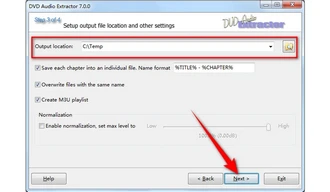
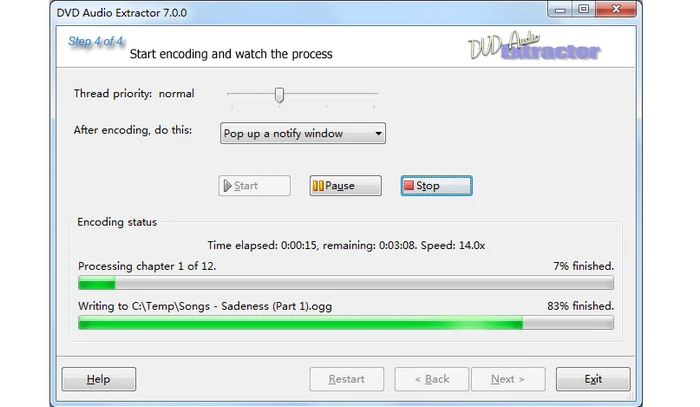
Once everything is set up, click the "Next" button to begin the extraction process. The software will display a progress bar, and the time it takes will depend on the length and complexity of the audio files being extracted.
Once the process is complete, navigate to the output folder to review your extracted audio files. Use an audio player to confirm that the extraction quality and content are correct.
DVD-Audio Explorer 2008 is a Windows-based freeware designed specifically for extracting audio from DVD-Audio discs (DVD-A). It works by reading the AUDIO_TS folder on a DVD-Audio disc and allows users to access and extract the high-resolution audio files contained within.
The application is mainly targeted towards enthusiasts or professionals who want to extract and convert high-quality audio tracks from DVD-Audio discs without the need for complex tools or procedures. While no longer developed, it still works for many DVD-Audio discs.
As the official website is no longer available, you will need to find a reliable source or dedicated forum like VideoHelp to get a copy of the application.
Once you've downloaded the portable compressed file, create a new folder in your desired location, and extract all the files into it. Go to the "bin" directory and directly run "DVDAExplorer.exe".
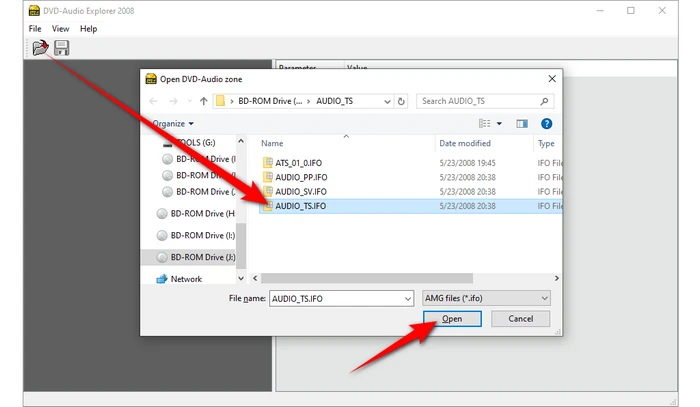
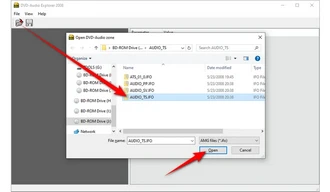
Click the "Open" button, navigate to your DVD drive, and open the AUDIO_TS folder.
Then select the "AUDIO_TS.IFO" file and click "Open". It may need a few seconds to load it up.
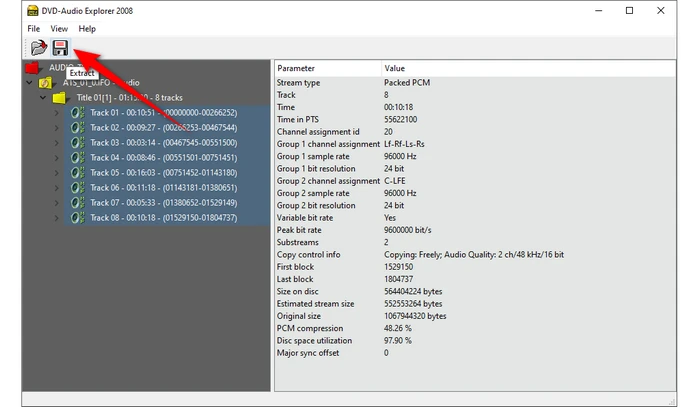
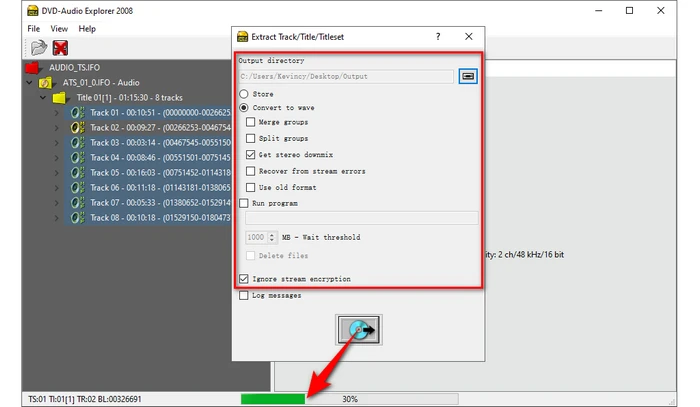
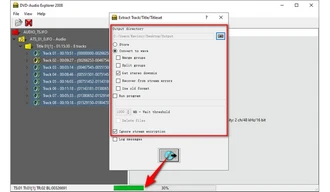
Choose an output folder for your extracted audio files. DVD-Audio Explorer often extracts files in PCM WAV format directly, preserving the quality of the source audio.
Tick any option as you wish. If the disc is encrypted, don't forget to tick "Ignore stream encryption".
Finally, click on the "Disc" button at the bottom to begin the extraction process. This can take a while depending on the disc's size and the number of tracks being extracted.
If the extracted files are not in a format you want to convert, you can use a third-party audio converter to convert them.
Foobar2000 is a powerful, flexible, and lightweight audio player. It's known for its customizable interface, support for numerous audio formats, and a wide range of features that can be enhanced with various plugins (also called components).
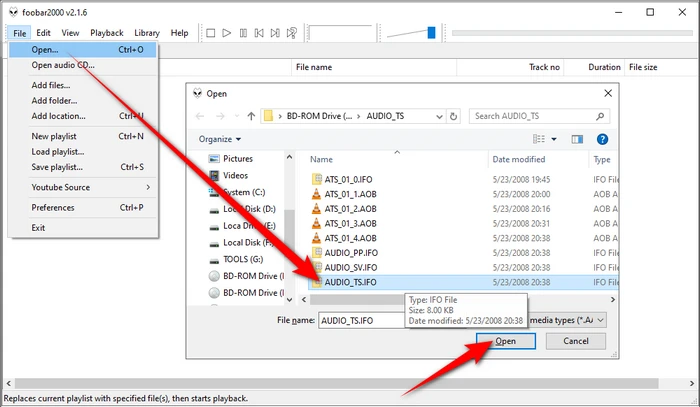
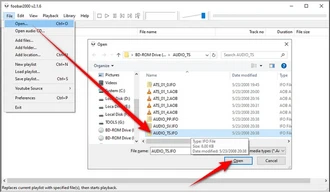
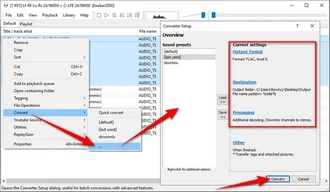
While primarily designed for playback, Foobar2000's capabilities can be extended to convert and extract audio from DVD-Audio discs through plugins. Here's how you can use it.
Go to the foobar2000's official website, get the latest version of the player, and install it on your computer.
Next, install the following two required plugins respectively:

XMedia Recode is a versatile and user-friendly audio and video conversion software. It can be used to convert, edit, and extract audio and video files, making it a great choice for users who need to rip audio from DVDs or even Blu-rays (without copy protection). It's popular because of its wide-ranging support for file formats, the flexibility of settings, and an intuitive interface. Here's the step-by-step guide.
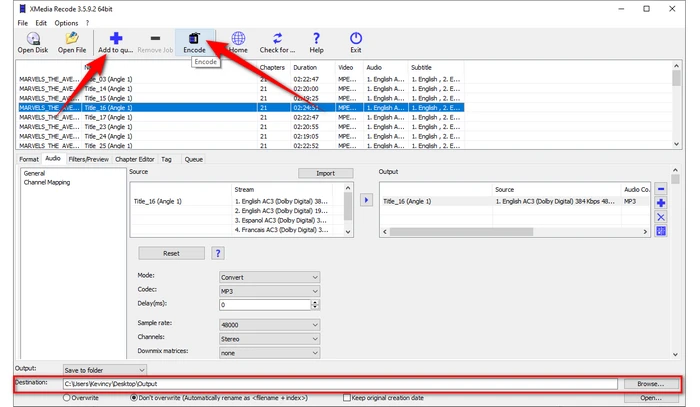
Choose the title containing the audio track you want to rip. Typically, the main movie or feature will have the longest duration. You can preview each title to verify if needed.
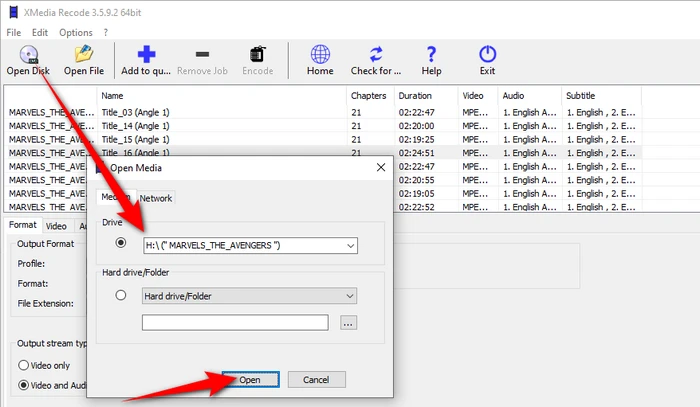
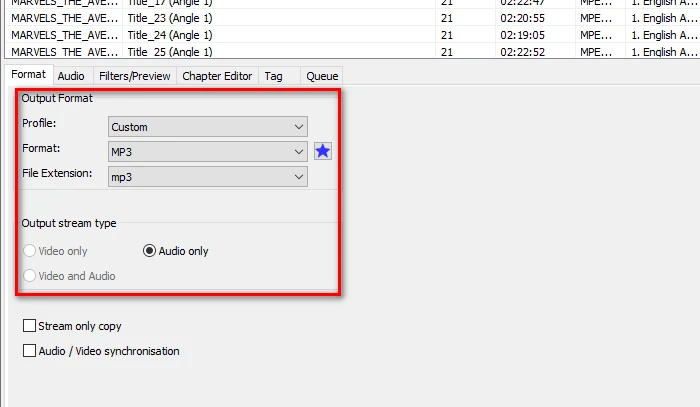
Go to the "Audio" tab, and select the specific audio track you wish to extract. DVDs may contain multiple languages or commentary tracks, so choose the one you need.
In the lower section, you'll see some configurable options like bitrate, channels, and sample rate. Choose settings based on your preferences or keep them default if you're unsure.
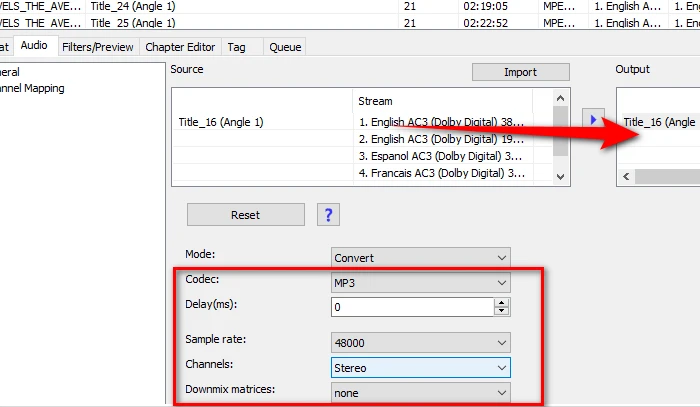
Click "Encode". XMedia Recode will now begin extracting the audio from your DVD based on the settings you've chosen.
The conversion process time will vary depending on the length of the title and the power of your computer.

HandBrake is a free, open-source tool primarily designed to convert video files. It's also widely used for converting DVDs and Blu-ray discs that do not contain any kind of copy protection into MP4, MKV, or WebM formats. HandBrake supports a wide range of presets and is cross-platform, running on Windows, macOS, and Linux.
As HandBrake doesn't support audio export, a video-to-audio converter tool is essential after using HandBrake, enabling you to convert extracted DVD video into the desired audio format. Popular choices are Audacity (with FFmpeg library installed), VLC Media Player, or fre:ac. These tools are also free and open-source, with a user-friendly interface. Here are the steps.
Visit HandBrake's official website, download, and install the appropriate version for your operating system.
Launch it, and select your DVD drive from the list of sources. HandBrake will take a moment to scan the DVD and display its content.
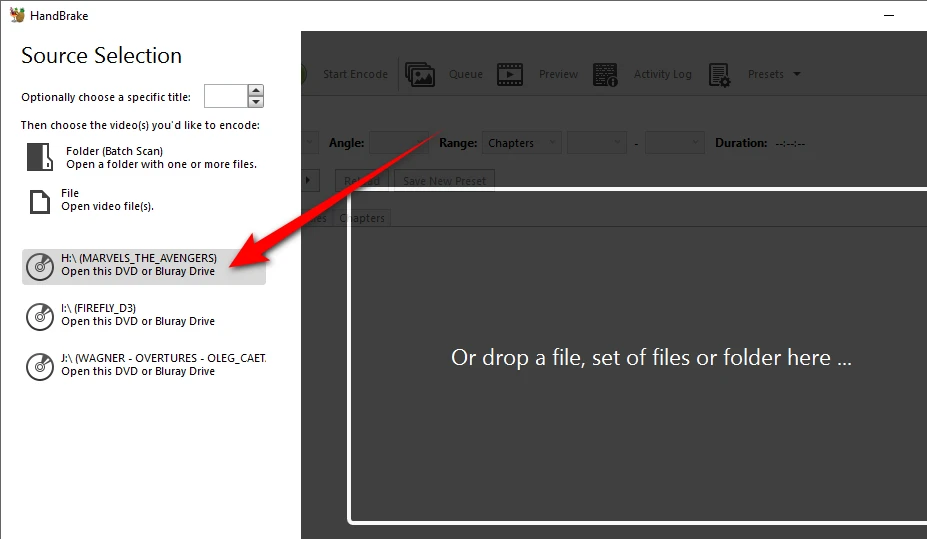
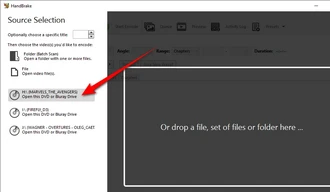
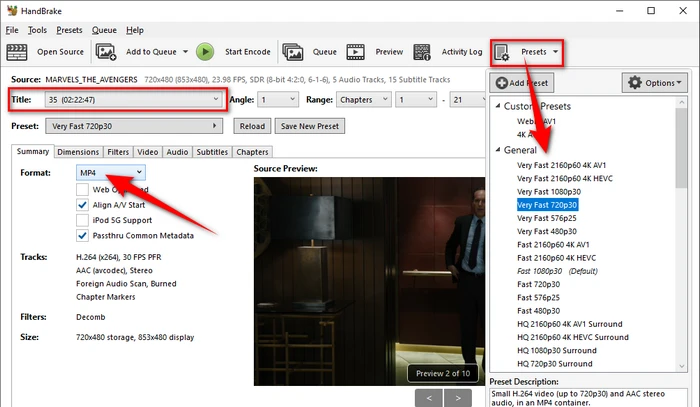
DVDs often contain multiple "titles" (such as the main movie, bonus content, and trailers). Typically, the main content will be the longest title. You can manually select which title you want to extract audio from.
Open the "Presets" list and choose your preferred option. Then navigate to the "Summary" tab.
Choose either MP4 or MKV from the "Format" section. (since you're just extracting audio, either format will work fine).
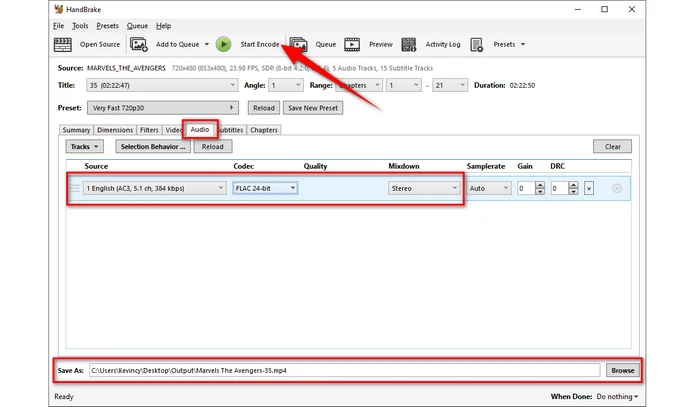
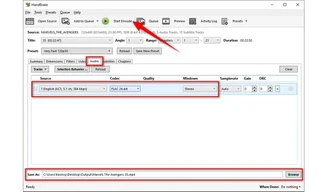
Navigate to the "Audio" tab. Here, you'll see a list of audio tracks available on the DVD. Select the appropriate audio track and codec (you can usually choose between different languages and quality options).
Click the "Browse" button at the bottom to choose a location for your output video file.
Hit the "Start Encode" button at the top to initiate the DVD-ripping process.
Once you have the video files ripped by HandBrake, the last step is to batch extract audio from multiple videos using HD Video Converter Factory Pro. You can also try other free audio extractors like Audacity, VLC, fre:ac, etc.
MakeMKV is a powerful and versatile software designed to rip DVDs and Blu-ray discs into MKV (Matroska Video) format. This software is highly popular due to its simplicity and efficiency in extracting entire movies, including all the associated audio and subtitle tracks, without compromising quality. MakeMKV can handle copy-protected discs and bypass encryption using its own decryption techniques.
However, it's important to note that MakeMKV does not export audio-only files directly. To extract the audio from these MKV files, you will need an additional conversion step. Here are the how-tos.
Make sure you have installed MakeMKV on your computer, you can download it from MakeMKV's official website.
To register this tool, keep an eye on this forum thread, you can often find updated beta keys to keep using the software for free.
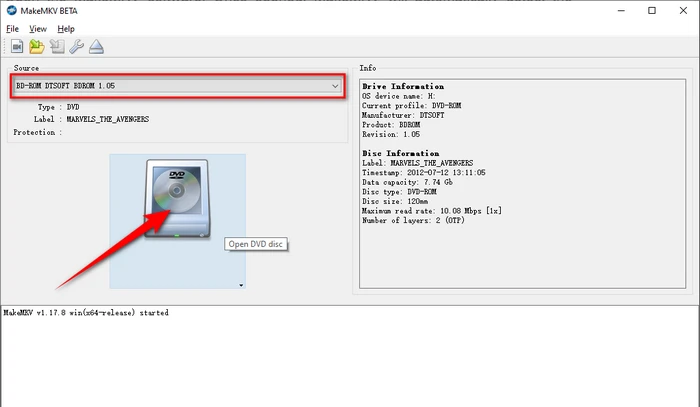
Open the MakeMKV software. Once opened, MakeMKV will automatically detect the inserted DVD.
On the main screen of MakeMKV, you should see your DVD drive listed. Click on the DVD drive icon to initiate scanning.
Once the scan is complete, MakeMKV will list the content on the disc, including video files, audio tracks, and subtitles.
If you only need a specific audio track, deselect the unnecessary titles and subtitles by unchecking their corresponding boxes.
Ensure that the desired audio track(s) is selected. Typically, DVDs contain multiple audio tracks in different languages or formats (Dolby, DTS, etc.).
On the right side, click the folder icon to choose a location where you want to save the output files. It's advisable to select a folder with sufficient space.
Click the "Make MKV" button. MakeMKV will start ripping the selected content to an MKV file.


Similar to HandBrake, extracting audio tracks from DVD requires an additional conversion step using some video-to-audio converter tools.
Let's clear up some jargon that might have your head spinning: DVD-A and DVD-V.
Here's a brief comparison between the two formats:
Feature |
DVD-Audio (DVD-A) |
DVD-Video (DVD-V) |
|---|---|---|
Primary Focus |
High-resolution audio |
Standard-definition video |
Main Content |
Multi-channel audio, high-resolution, surround |
Video content (movies, shows, etc.) |
Audio Quality |
Higher (96 kHz to 192 kHz, 24-bit) |
Lower (Dolby Digital, DTS, MPEG Audio) |
Video Capability |
Limited (visual enhancements, album art) |
High (full video support, multi-camera) |
Folders |
AUDIO_TS folder |
VIDEO_TS folder |
File Formats |
AOB (Advanced Resolution), low-res visuals |
VOB (video, audio, subtitles), IFO, BUP |
Interactivity |
Menus for track selection, optional visuals |
Menus for chapters, subtitles, languages |
Compatibility |
Needs DVD-A compatible players |
Plays on most DVD players |
A: Technically, yes, with the right software like WonderFox DVD Ripper Pro, DVD Audio Extractor, and MakeMKV. However, bypassing copy protection may be illegal in some regions. Proceed at your own risk and be aware of your local laws.
A: If the DVD plays well, this can happen due to software glitches, incorrect settings, encryption, or copy protection on the DVD. Using software that can handle encrypted DVDs should solve the problem.
A: DVD Audio Extractor supports Blu-ray audio discs, but others are limited to Blu-ray or DVD video. Check the software specifications to be sure.
A: Unfortunately, Windows Media Player cannot do that. The player can rip CDs but lacks the functionality to read and extract audio from DVDs.
A: No. Audacity can't directly rip audio from DVDs because it's an audio editing tool, not a DVD-ripping program. However, you can use Audacity to capture audio from a DVD that's being played on your computer.
A: Yes, we have posted an article about this topic before. It cannot deal with most DRM-protected DVDs, and sometimes, the resulting file might have no audio. So you'd better use a more specialized tool for DVD audio download.
A: Yes, if your DVD has 5.1 surround sound audio, you can rip it using a tool that supports surround sound extraction.
Terms and Conditions | Privacy Policy | License Agreement | Copyright © 2009-2025 WonderFox Soft, Inc. All Rights Reserved