![]() by Kevincy
by Kevincy
Updated on Feb 5, 2024
In the past two decades, Adobe Flash Player has been firmly dominant in video streaming on the web. But with the demise of Flash Player and the rise of HTML5 video, we can now play videos directly using the browser without installing extra plug-ins. The problem is that not all videos conform to HTML5 standard, even universal MP4 videos. Sometimes we have to wait for the playback until it's fully downloaded or buffered. The following article will detail how to fast start MP4 for progressively streaming.
Wanna optimize video files? Try the freeware for simple video downloading, editing and conversion: https://www.videoconverterfactory.com/download/hd-video-converter.exehttps://www.videoconverterfactory.com/download/hd-video-converter.exe
 MP4 Fast Start
As you know, WebM, MP4 and OGG are the three supported HTML video formats. Among them, MP4 is the most familiar to everyone, but also the best compatible with all major browsers. An MP4 video is composed of various data chunks named atoms which can appear in any order, and an important one is moov atom that stores the detailed video metadata. When you stream the video online, the browser will request the video and try to find the moov atom. Without it, the browser will waste time making extra requests again and again, even download the entire video.
So, MP4 Fast Start refers to, by optimizing MP4, moving the moov atom to the beginning of a video, so that browser will easily locate the moov atom to load and play the video faster, it can progressively stream while it's buffering. You don't have to wait for it to finish downloading. There is other alternative parlance like "web optimized", "streaming enabled" or similar. Without further ado, let's get started to make a web-optimized MP4 with 3 handy freeware.
As its name implies, MP4 FastStart will automatically place moov atom at the beginning of MP4 file and optimize MP4 for progressive download. Attention, this program only works for .mp4 video files, and it will change your original videos. You'd better make a copy before your first tryout.
Step 1. Download it via the official website: http://www.datagoround.com/lab/. And most amazingly, you don't need to install the program, just unzip "mp4 FastStart.zip" package and run the .exe file like a portable program.
Step 2. Click on "Open Folder" button and select the folder where saves your MP4 copies. All MP4 files will be listed in the main box. Press and highlight each video title to make sure they are selected.
Step 3. Hit "Make FastStart" button to proceed. Be sure to check the Log field to see the outcome of the process.
Also Read: HTML5 Video Converter | Compress Videos for Web | Download HTML5 Video | Free WebM Video Converter

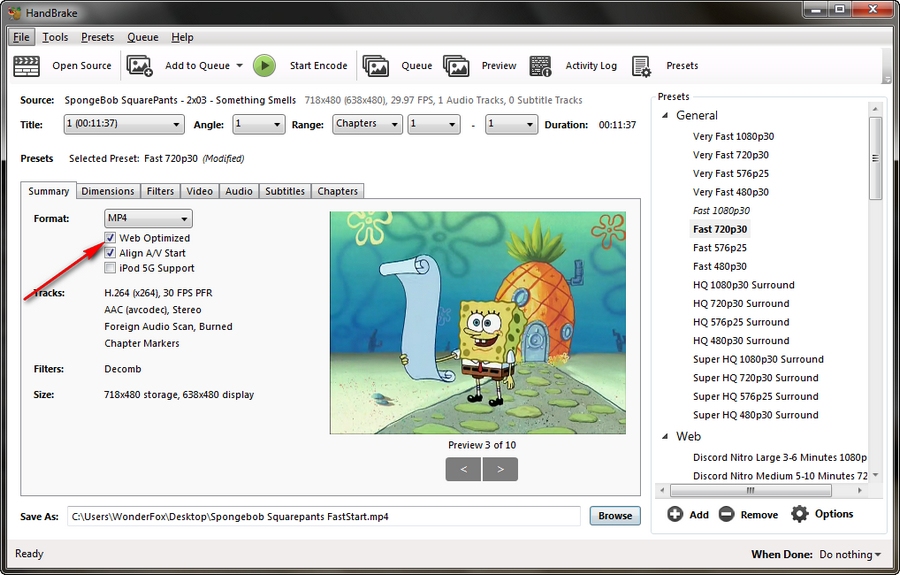
Since plan A only works for MP4 videos, if you have other video files in various formats that need to optimized for web, no worries, there is still a way out. Well, there is no need to say more about the big name Handbrake. This freeware transcoder has a "Web Optimized" feature you may not notice. Follow the steps below to experience it.
Step 1. Launch Handbrake and import your video file. Select your preferred preset on the right side.
Step 2. Under the "Summary" tab, select MP4 as output video format, then turn on "Web Optimized" checkbox to optimize MP4 for progressive download.
Step 3. Specify a "Save as" directory to save the transcoded video file on the bottom. Lastly, hit "Start Encode" button on top menu bar to fast start MP4. After encoding, data is reorganized and rewritten to allow immediate playback over a network, without needing to download the entire file.

XMedia Recode is another well-known free A/V transcoding program that also supports MP4 Fast Start feature to arrange video file to play better as a progressive download. Compared with Handbrake, this option is not obvious on the interface, you have to select certain profile to activate it.
Step 1. Run XMedia Recode, click on "Open File" button on top menu bar to import the videos you want to optimize.
Step 2. Under "Format" tab, select "HTML5" option in the drop-down list and you'll see the "Streaming - Fast Start" option has been enabled on the right side.
Step 3. Specify a destination directory on the bottom, then select your imported video and press "Add to queue" button on top menu bar. At last, hit "Encode" button to make a web-optimized MP4 video.


At last...
Now you have figured out 3 plans to optimize MP4 for web. After done, upload the video file to your server, your HTML5 video can progressively stream. Hope this tutorial will be helpful to solve your burning issue. I appeal for your sharing if you've benefitted from this post. Take care of yourselves during the global terrible epidemic!