![]() by Oswald
by Oswald
Updated on July 12, 2022
If you like the idea to share your PowerPoint presentation (with or without audio) on YouTube, I can tell you it’s doable and actually quite easy. But YouTube takes only video uploads, and the video format it accepts is restricted as well. I’ll demonstrate how to convert PowerPoint presentations to YouTube video file type, and how to upload PowerPoint to YouTube correctly afterward. Here we go.
BTW, here’s a free PowerPoint to YouTube converter suggested:
 Export PowerPoint video
Step 1. Launch PowerPoint, go to the top-left corner, click the “File” tab.
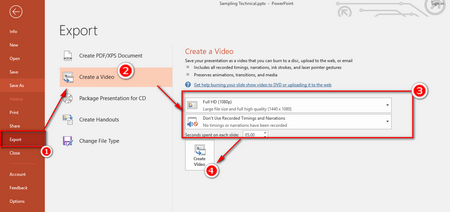 Create a video from PPT
Step 2. Go to “Export” > Create a Video. Use recorded timing or narrations if needed, or just hit Presentation Quality otherwise. Then click “Create Video” button to create video from PowerPoint.
About that “Quality”: Note that in the later upload process, YouTube will automatically compress your video, which naturally brings about quality loss, and it’s inevitable. Later in Part 2, I’ll utilize a free program to minimize that.
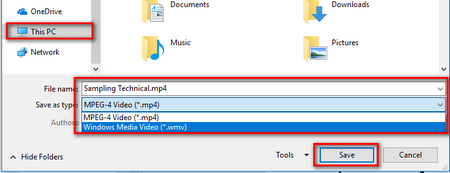 Save as a video type
Step 3. Two output formats for the export video are provided by PowerPoint, choose to Convert PPT to MPEG-4 if you’d like to skip Part 2, or choose either one otherwise. Enter the desired metadata, and click “Save”.
Hint: You can add music to PowerPoint beforehand, or I’ll show you how to add music to YouTube video after uploading, if you’d care for some beautiful background music.
With the help of this recommended YouTube uploader: WonderFox Free HD Video Converter Factory, you get to compress videos with advanced coding technology and circumvent YouTube compression, so as to keep the best video quality preserved.
Before start, please free downloadfree download the software.
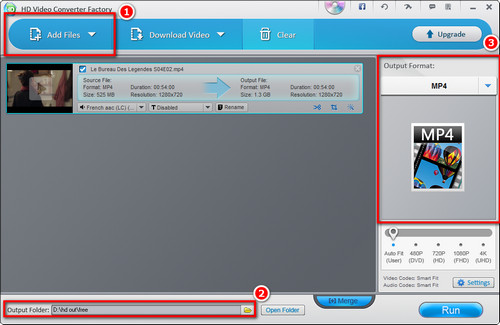
Launch Free HD Video Converter Factory and enter the converter interface, then click the “Add Files” button to add the video(s) you just exported, then define the destination path at the bottom. Now, go to the right side of the interface, click on the output format section.
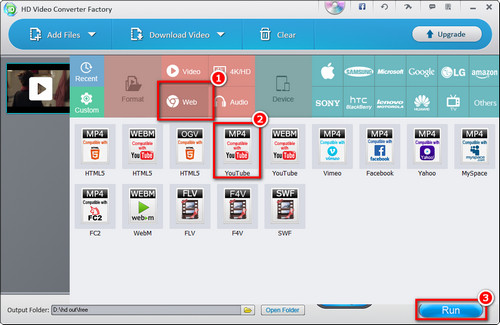
From within the output format section, you can easily spot numerous output format icons provided. Locate and click on the “Web” block from the category box above, and click “YouTube” icon, that’s the optimized ready-made profile of YouTube video specs. At last, click “Run” to start the compression. In a bit, your PPT video will be best fit YouTube uploading process. The uploading will be much shorter and the result will be super.
 How to put PPT on YouTube
Step 1. Navigate to YouTube Studio studio.youtube.com, and start uploading. Once uploaded, Publish your video.
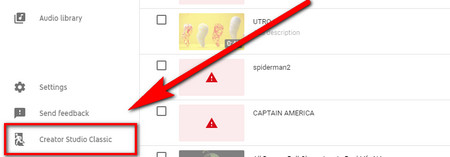
Step 2. Then go to your own channel, hit “Creator Studio Classic” on the lower-left corner.
 Add audio to PowerPoint video on YouTube
Step 3. In Creator Studio Classic, locate the PowerPoint Video you just uploaded and click on the “Edit” option from its information bar, then select “Audio”. Then, add audio at will, and save changes when it’s all set.
Top-rated DVD Ripping Program

WonderFox DVD Ripper Pro
If you’d like to share some DVD contents or adopt them in your PowerPoint presentation, DVD copy protection might stand in the way. With DVD ripper pro, you can fast and easily bypass/decrypt any DVD protections and rip DVD-VIDEO to digital files with original quality preserved.