Enabling the Plex subtitles feature is an overall easy job. But we need to pay attention to several things which we’ll cover in the following article to guarantee a smooth configuration process. Please read on to know more!
When you are learning a foreign language or can’t understand certain accents in the movies, it’s pretty nice to have well-synced subtitles around. And you are in luck if you’re using Plex because it supports adding local subtitles to the Plex Media Server. Even better, it can be set to download subtitles automatically for your movies or TV shows as well. However, to enable these functions needs a little configuration over the settings. And this Plex subtitles guide will illustrate to you how to get online and local subtitles on Plex in a step-by-step manner.
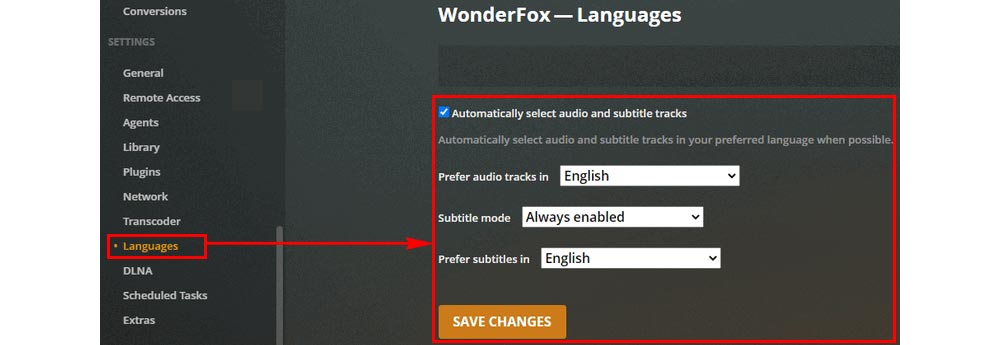
This step is optional but recommended. By making Plex subtitles turning on by default, the subtitle (if there is one) will appear on your video without further toggle. Of course, if you don’t feel like having the subtitles on all the time, you are always free to turn it off using the on-screen menu during playback. Below are the steps to enable this subtitle mode:
>> Open your Plex Media Server (Plex web app) and navigate to the settings at the upper-right corner.

>> On the left side menu, scroll down to select Languages under the SETTINGS section. Then, check the box before Automatically select audio and subtitle tracks and select your preferred language for the audio tracks and subtitles (This will help Plex auto stream your media in your preferred audio track and subtitle language when possible). Next, change the Subtitle mode to Always enabled. When all is ready, click SAVE CHANGES to complete the process.

The above instruction is to make the subtitles show by default on the premise that you have accompanying subtitles for your videos. Otherwise, Plex won’t show any subtitles either. Put another way, you need to grab a third-party subtitle provider so that Plex can download the subtitle resources for your relevant media content on-the-spot. And the coming process will show you how to link to an external subtitle source provider and how to make Plex auto-download subtitles in detail.
Note: Finding the right subtitles depends greatly on the accuracy of the media metadata information. The more accurate the information, the better result for a matching subtitle. And that means you should name your media files properly so that the Plex media scraping agents could recognize them precisely, and hence download the most matching subtitles. Check the official Plex support articles: TV Show Naming Convention; Movie Naming Convention
>> While still under the SETTINGS section, choose Agents. Click Movies → Plex Movie (Legacy) → check OpenSubtitles.org.

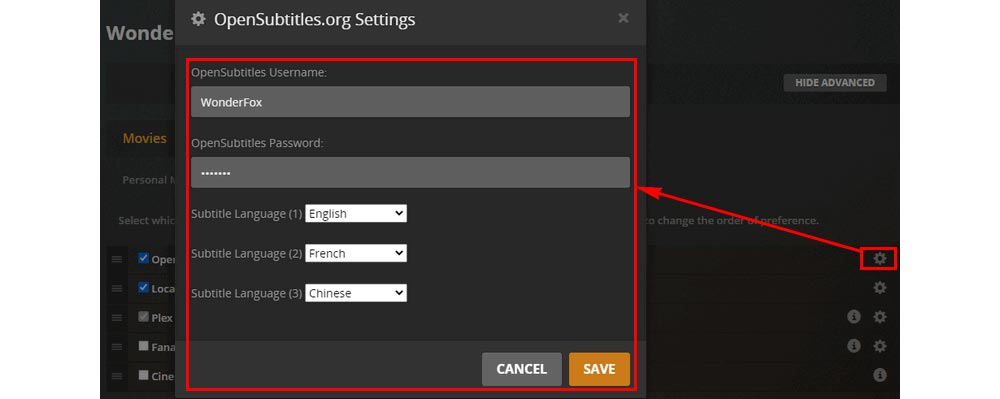
>> Drag the OpenSubtitles.org agent to the first row and click the corresponding gearwheel icon. The OpenSubtitles.org Settings window will appear. Enter your OpenSubtitles username and password (register at https://www.opensubtitles.org/en/search/subs) and then select your preferred subtitle languages (you can choose up to three languages). Then click SAVE.

>> Switch to Shows → TheTVDB → check OpenSubtitles.org. Then repeat the whole process that was done for the movies.

>> At this point, you’ve made Plex add subtitles to your media automatically. But that’s only for the new content added to your library. If you want to add subtitles to the existing library, you need to refresh the library metadata. Here is how: Go to the Plex home screen and on the left library menu, hover your mouse on the library you want to update, and click on the three-dots → Manage Library → Refresh All Metadata.
Tips: You can do this to a single video by selecting the video in question → clicking the three-dots → Refresh Metadata.

If OpenSubtitles.org does not have the subtitles for your media, you can download subtitles for Plex elsewhere and then add it to Plex. (Check other Subtitle Sites available). Here are the details:
>> Go to the folder that contains the video you want to add subtitles to and place the subtitle file (SRT, SMI, SSA, ASS, or VTT) in that same folder like this:

>> Refresh the entire library.
Another thing that needs to be noticed when auto-searching online subtitles is that not all devices support this feature. And there are chances that Plex subtitles not working. That being said, you may consider embedding subtitles to your videos permanently to avoid any such issues. Here we’re going to use WonderFox DVD Video Converter to demonstrate how to hardcode subtitles.

Before start, please free download free download this software and install it on your PC.
>> Launch WonderFox DVD Video Converter and click on Add Files to import your media file into this program (It supports DVD loading as well)
>> Click on the Disabled drop-down box → Add subtitles to select your prepared subtitles.
>> Click the format image on the right side and choose an output format, such as MP4, MKV, AVI, MOV ...
>> When all is set, click Run to start the process. It should take two to three minutes depending on the media size.

That’s all the Plex subtitles information I want to share. Thanks for reading!

WonderFox HD Video Converter Factory Pro
1. Convert video among 500+ formats and devices.
2. Download movies and music from 1000+ website.
3. Downsize video without losing quality.
4. Upgrade video quality from 360P to 720P to 1080P...
5. More surprising features waiting to be explored!
Privacy Policy | Copyright © 2009-2025 WonderFox Soft, Inc.All Rights Reserved