Have no idea how to add music to QuickTime videos? Follow the guide to add desired background music to QuickTime or other movie files. With the handy audio-adding software, you can replace the original soundtracks with your preferred ones. Keep reading to learn how to change or add audio to QuickTime video.
WonderFox HD Video Converter Factory Pro can help you add the wanted audio files to QuickTime movies without an effort. It only needs several simple clicks to finish the task. In addition to audio tracks, this software allows you to add subtitles, watermarks, and special effects as you wish. Besides, it can change video format and the related parameters, reduce file size, improve video quality, join video clips, and more. Although the software combines vast features into one body, its interface is still clean and self-explanatory. Try it now!
Free downloadFree download the software and follow the steps to add audio to QuickTime movies.
Launch HD Video Converter Factory Pro and open the Converter. Click Add Files to import the QuickTime movies. Alternatively, you can drag and drop the target files therein.


Click the format image on the right side of the interface. Go to the Video tab and select your desired profile. MOV, MP4, and MKV support multiple audio tracks.


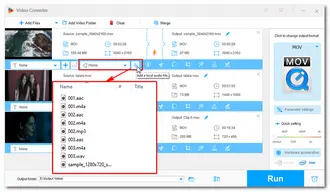
Click the second “+” button below the imported video to add a local audio file. Repeat the step to add more audio. Then tick on the inverted triangle icon to pick your wanted audio tracks from the list.


Click the bottom triangle button to specify an output path. Then press Run to merge the audio and video files. When the process is completed, a new window will prompt you to check the output videos.


Although developed by Apple, QuickTime is not only available for Mac but also for Windows. QuickTime Player comes with some basic video editing features, which enable you to trim, rotate, split, merge video clips, and add audio tracks. If you would like to add music to QuickTime video in this application, follow the instructions below.
Site to download: https://support.apple.com/kb/dl837?locale=en_US


Step 1: Run QuickTime Player. Navigate to File > Open File to import a QuickTime movie and the audio file you want to add to the video.
Step 2: Click Edit > Select All to choose the entire audio track. Then copy the audio to the clipboard by Edit > Copy.
Step 3: Select the movie clip and place the playhead at the start of the timeline. Then click Edit > Add to Movie.
Step 4: Now the audio track is added to the QuickTime video successfully. You can check and adjust audio tracks by Window > Show Movie Properties. After that, tap on File > Save as and enable the “Save as a self-contained movie” option to export the QuickTime movie with the new audio track.
That’s all about how to add audio to QuickTime videos easily and effectively. Hope you can get your wanted output videos with the two methods above. Thanks for reading!
Terms and Conditions | Privacy Policy | License Agreement | Copyright © 2009-2025 WonderFox Soft, Inc.All Rights Reserved