You know, subtitles make videos accessible, engaging, and globally friendly. Here are why subtitles matter:
- 🦻🏻 More than 400 million people worldwide suffer from disabling hearing loss (according to WHO).
- 🗣️ Subtitles break language barriers.
- 🎬️ 80% of social media videos are watched on mute, and subtitles keep viewers hooked.
However, adding subtitles often leaves people frustrated 😕 because it involves format wars, encoding errors, and clunky interfaces.
So, in this article, we aim to show you how to add both soft and hard subtitles to a video using XMedia Recode, a free and popular tool for video conversion and editing. Additionally, a simpler yet equally effective alternative is also recommended. Let's dive in!
🧐 About Subtitle Types
First, let's take a moment to understand the two main types of subtitles:
What Are Soft Subtitles?
Soft subtitles are closed captions stored separately as a track within the video file and can be turned on or off by the viewer during playback. It's often used when you want the flexibility to offer different languages or disable/remove subtitles for a cleaner viewing experience.
- Can be enabled or disabled in compatible media players.
- Supports multiple languages in a single file.
- Does not affect video quality.
- Not all formats and devices support soft subtitles.
- Requires a compatible media player (e.g., VLC, MPC-HC).
What Are Hard Subtitles?
On the other hand, hard subtitles (or burned-in subtitles) are permanently integrated into the video. They cannot be turned off. This is ideal when you want to make sure your subtitles are always visible, regardless of the device or platform being used to watch the video.
- Works on all devices and platforms.
- No compatibility issues.
- Useful for subtitles that must always be displayed.
- Cannot be turned off or removed.
- Can slightly reduce video quality.
Now that you know the difference, let's go through the steps to add subtitles using XMedia Recode.
😎 How to Add Subs in XMedia Recode?
XMedia Recode is a versatile, free video/audio converter for Windows with some editing capabilities. One of the standout features is that it can handle both soft and hard subtitles, allowing users to either add subtitles as separate tracks or burn them directly into the video.
If you haven't installed XMedia Recode yet, go to the official website and get the latest version on your Windows computer. Launch it and then follow the detailed steps:
👉🏻 A. Soft Subtitles (Selectable Subtitles)
Step 1: Add Your Video
- To start, open XMedia Recode, and click "Open File" to import the video you want to add subtitles to.
- To make it easier, you can also drag and drag it into the software interface.
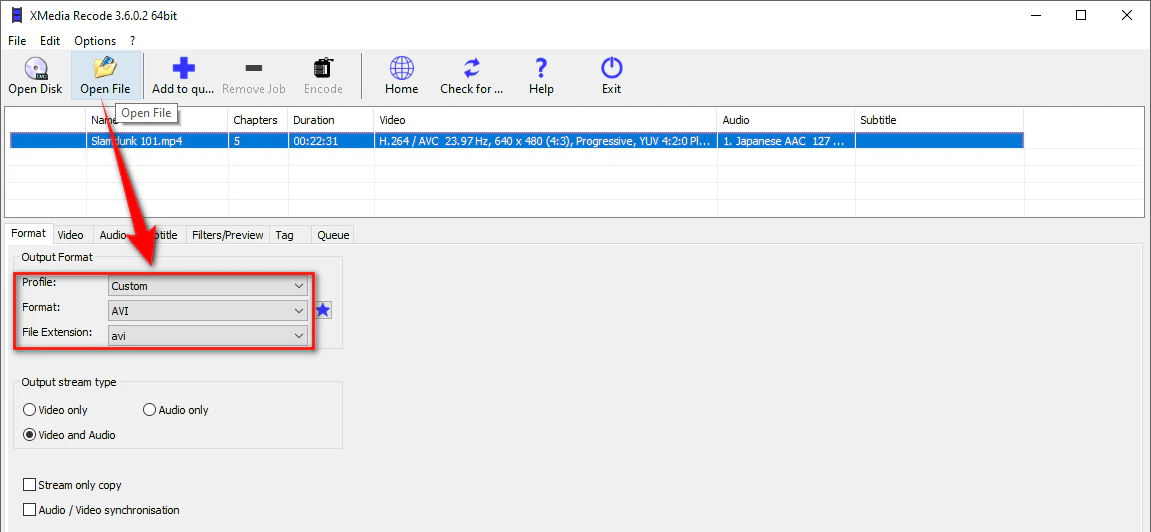
- Once the video is loaded, choose an output format under the "Format" tab.
For soft subtitles, we recommend selecting MP4 (.mp4) or Matroska (.mkv) as these formats are widely supported and allow subtitle integration without affecting video quality.

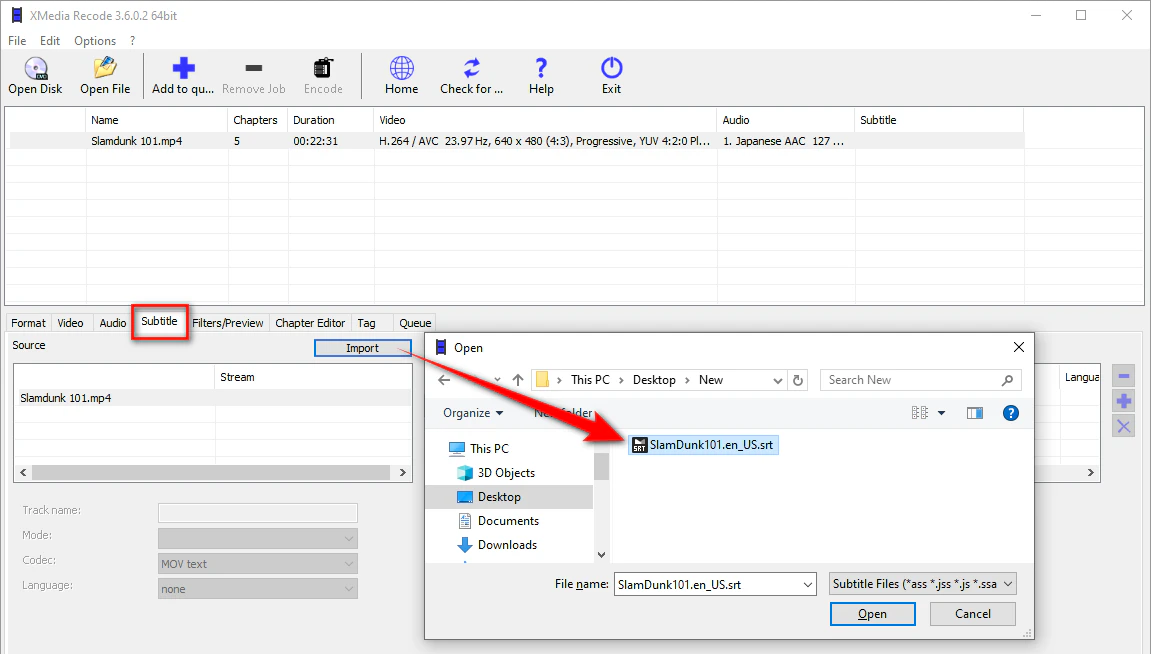
Step 2: Add the Subtitle File
- Switch to the "Subtitle" tab. This is where you can manage subtitle tracks for your video.
- Click on the "Import" button to select the subtitle file (e.g., an .srt, .ssa, or .ass file) from your local drive.
- Choose the subtitle file that corresponds to the language or content you want to add to your video.
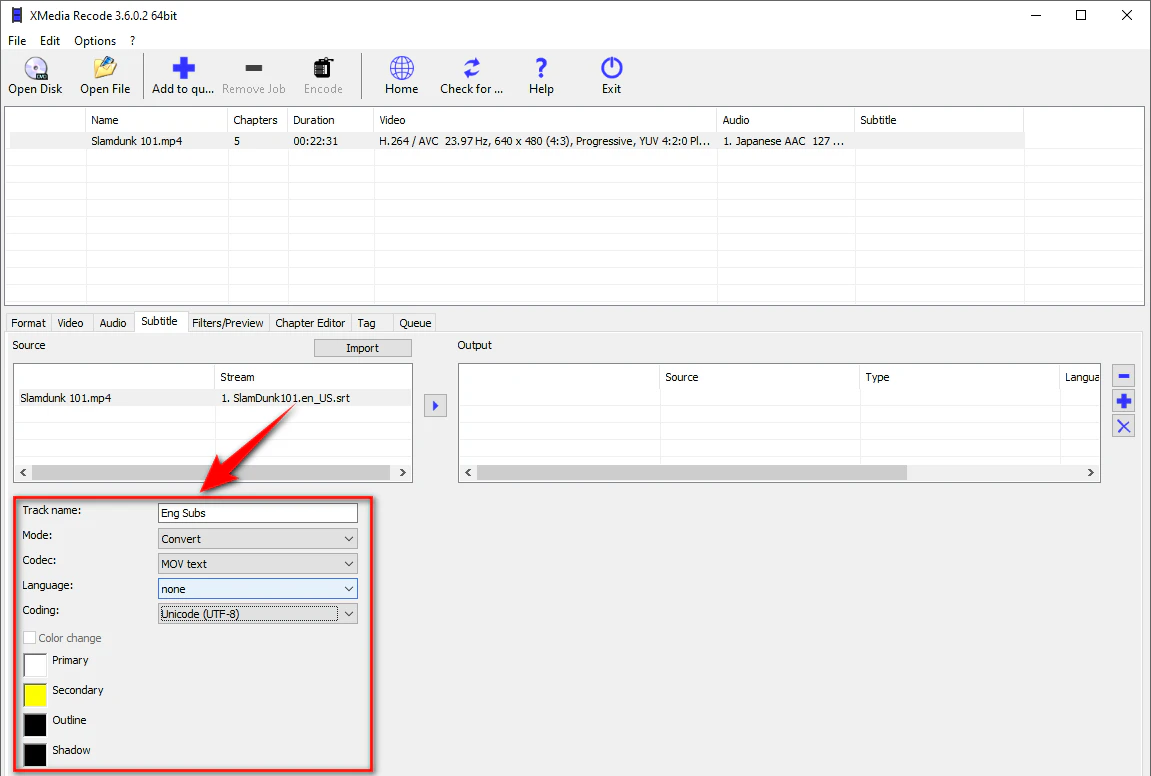
Step 3: Configure Subtitle Settings
After importing your subtitle file, select it in the "Source" section. Below that, there are several settings you can adjust, such as:
- Track Name: Enter a name for your subtitle track.
- Mode: Choose "Convert" or "Copy".
- Codec: Select the subtitle codec (usually, the default option works fine).
- Language: Specify the language of the subtitles.
- Forced Subtitle: If you want certain subtitles to appear without being toggled off, change it to "yes".
- Default Track: Choose if the subtitle will be displayed by default.
- Coding: UTF-8 is commonly used because of its compatibility and support for a wide range of characters.
- Color: Customize the color of your subtitles to your liking.
Step 4: Add Subtitles to the Output
- Once configured, click the arrow to add the subtitle file from the "Source" to the "Output" section.
- After that, you can continue setting up your video. Make sure to check the settings and adjust any final details.
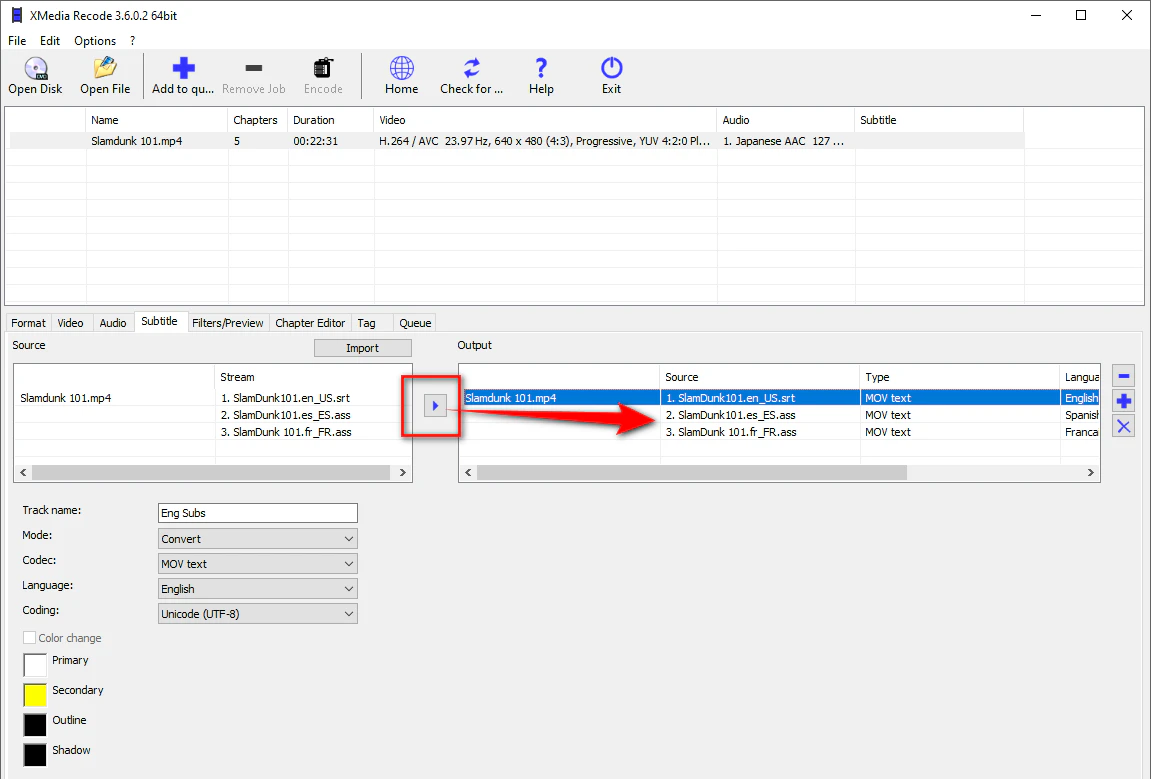
💡 Tips: MP4 and MKV can hold multiple subtitle tracks. If required, you're able to import and add more than one subtitle file.
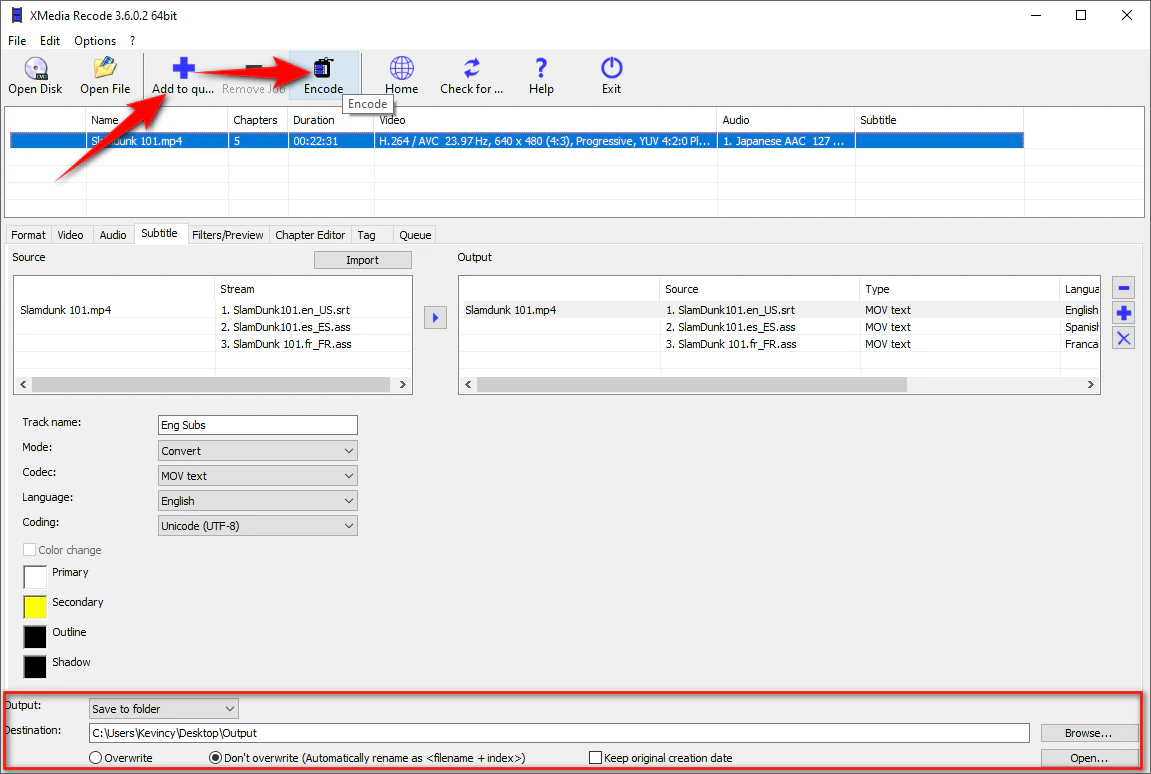
Step 5: Finalize the Process
- At the bottom of the screen, specify the output path where you want to save the video with the subtitles.
- Finally, click "Add to Queue" and then hit the "Encode" button to begin the process.
XMedia Recode will now add the soft subtitles to your video, and the output file will be ready once encoding is complete.
👉🏻 B. Hard Subtitles (Permanent Subtitles)
Adding hard-coded subtitles is a little different. Instead of just attaching the subtitle file to the video, you'll be inserting the subtitles directly into the video stream.
Step 1: Import Your Video
- Same as the steps above, start by opening XMedia Recode and adding the video you want to add subtitles to.
- Choose the output format for the video. Unlike soft subtitles, hard subtitles can be added to any video format.
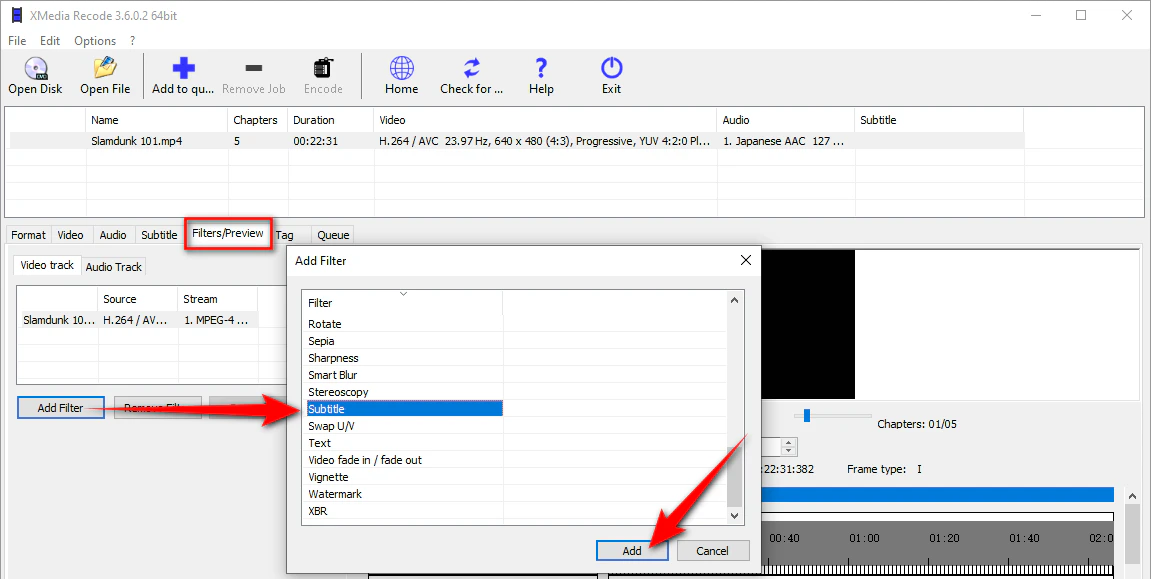
Step 2: Apply the Subtitle Filter
- Go to the "Filters/Preview" tab. Here, you will be able to add various filters to your video, including the subtitle filter.
- Click "Add Filter" and scroll down to find the "Subtitle" option.
- Click "Add" to enable the subtitle filter for your video.
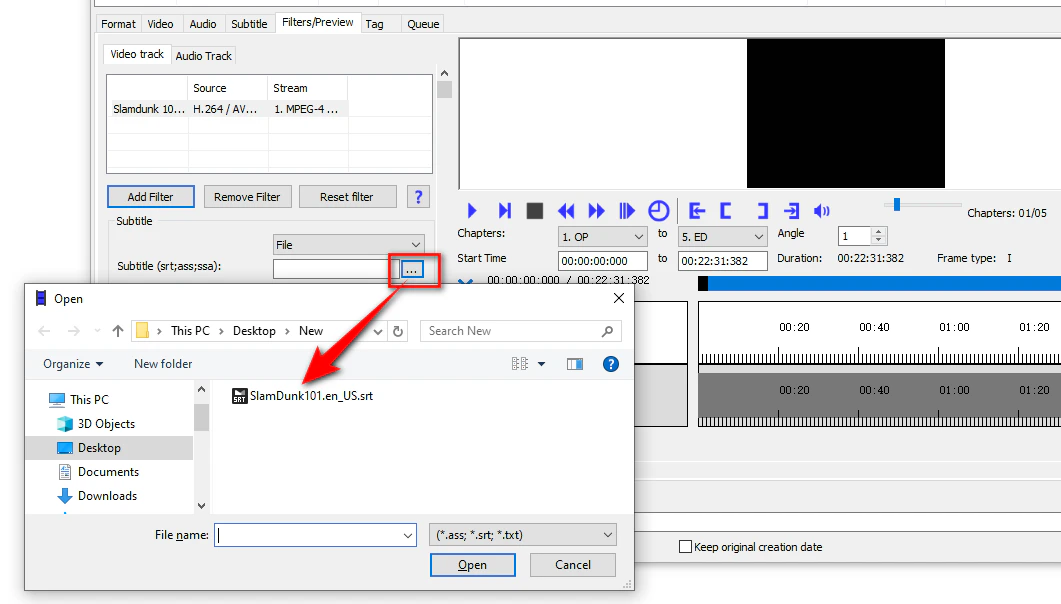
Step 3: Add a Subtitle File
- Under the Preview window, scroll down to the newly added "Subtitle" track.
- Select the track to display the subtitle panel on the left side.
- Click the "..." icon to add your subtitle file (again, you can use SRT, SSA, or ASS formats).
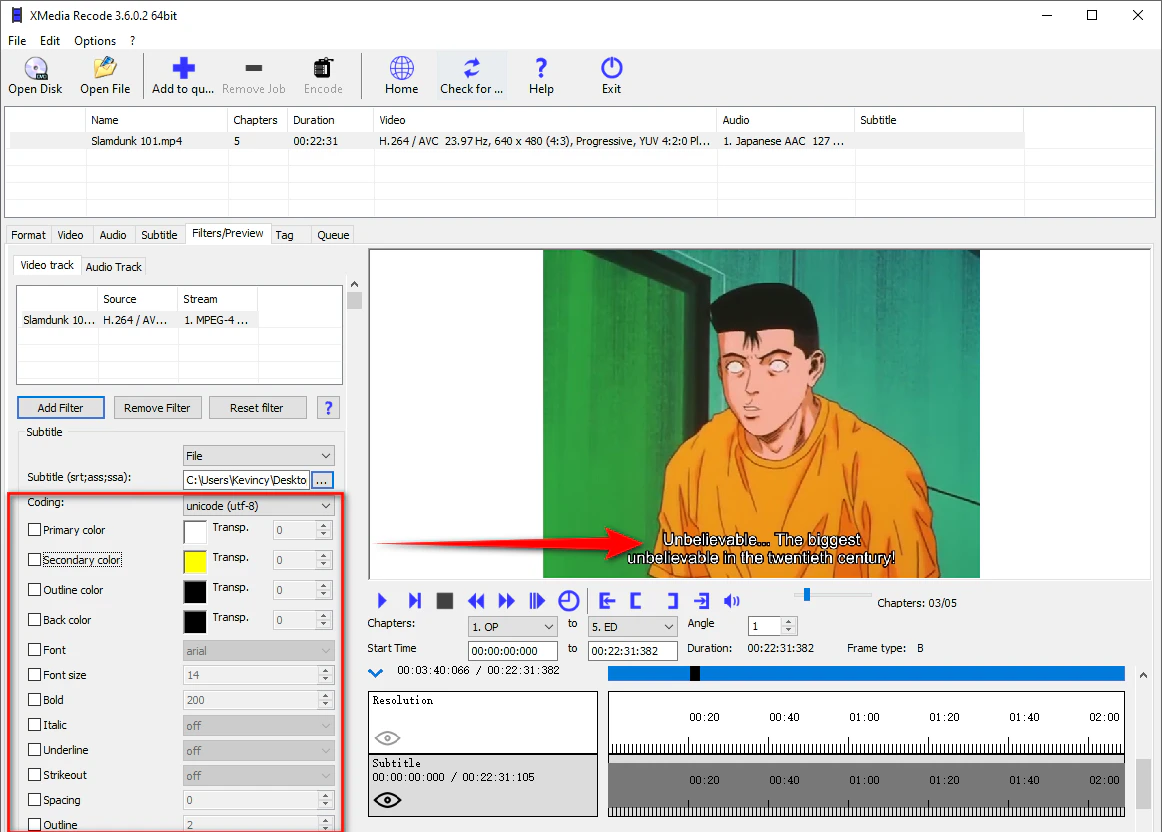
Step 4: Customize Subtitle Settings
- Just like with soft subtitles, you can customize the subtitle's appearance, including the font, color, size, and position on the screen.
- Adjust these settings based on your preferences and preview how the subtitles appear on the final video.
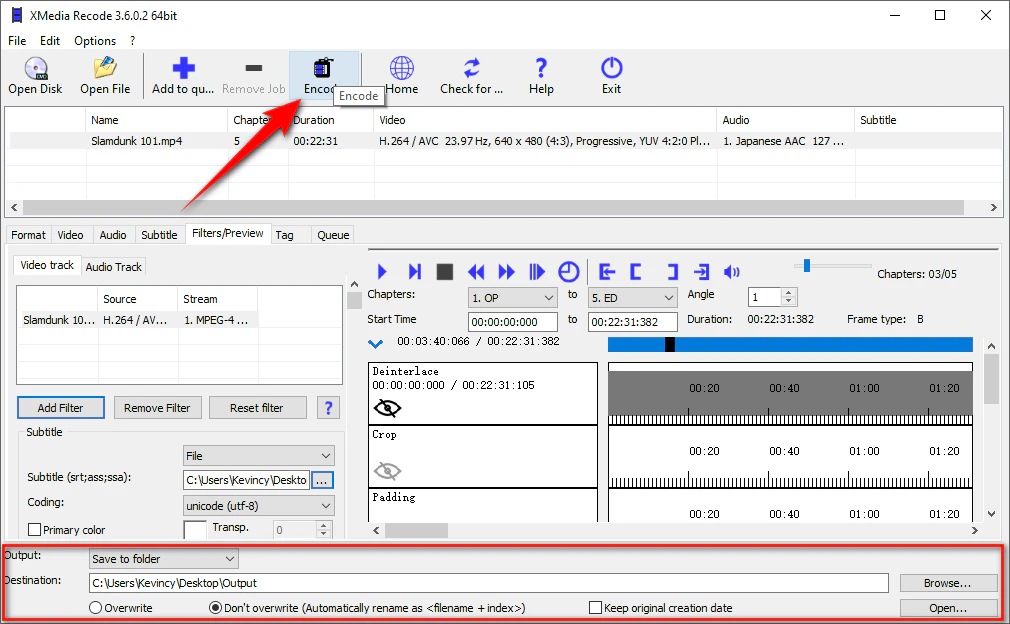
Step 5: Start Encoding Process
- After making your adjustments, set the output path and click "Add to Queue".
- Finally, hit the "Encode" button to burn the subtitles directly into the video.
Once the process is complete, your video will have hard subtitles embedded. They've become part of the video image itself.
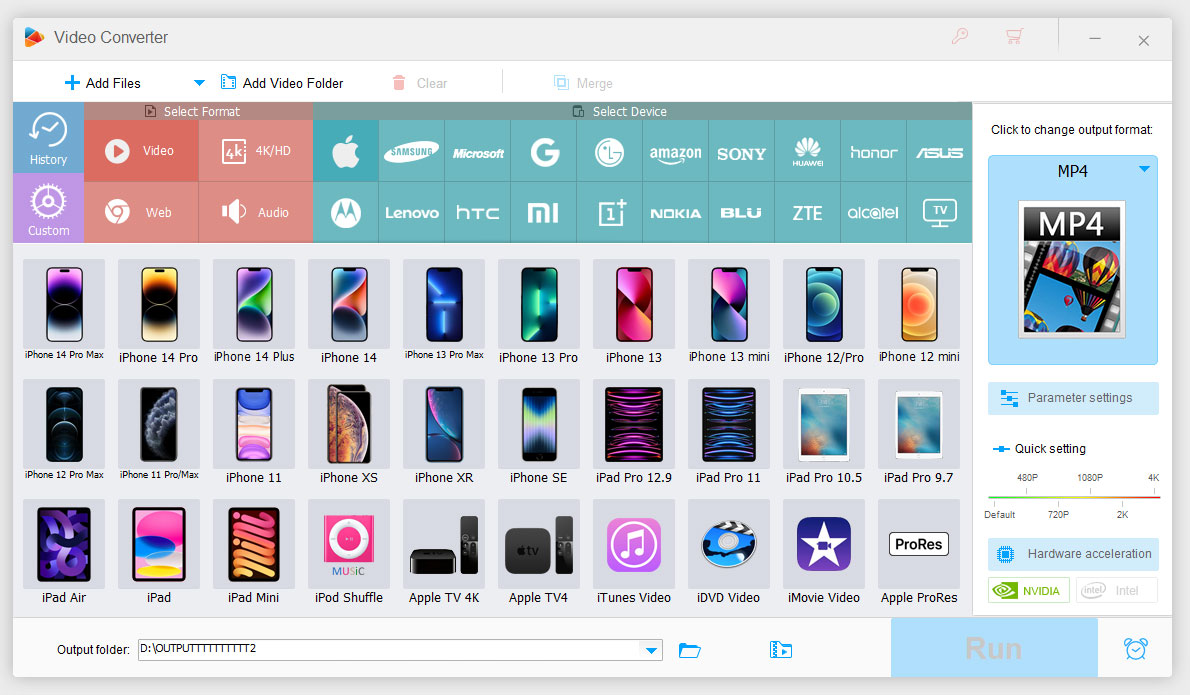
🔥 The Easier Alternative: WonderFox Free HD Video Converter Factory 🔥
If XMedia Recode is too complicated or not working as expected, WonderFox Free HD Video Converter Factory is an excellent alternative. This functional video processor offers a faster and more user-friendly way to add both soft and hard subtitles.
Why Choose It:
- Supports both soft and hard subtitles.
- Simple, user-friendly interface.
- Faster processing speed than XMedia Recode.
- Works with more file formats.
Step 1: Add a Video File
- DownloadDownload and install the latest version of WonderFox Free HD Video Converter Factory on your PC.
- Run the freeware and select the "Converter" module.
- Then, click "Add Files" or perform a simple drag-and-drop to add your target video.

Step 2: Add Soft or Hard Subtitles (An Either-Or Choice)
👉🏻 a. Soft Subtitles
- Expand the full list of the output format library on the right side.
- Go to the "Video" category and select an output format that supports soft subs, such as MP4, MKV, or MOV.
- Then, click the "+" icon next to the "T" section to add your subtitle file.
- You can add multiple subtitle files in SRT or SSA format one after another.

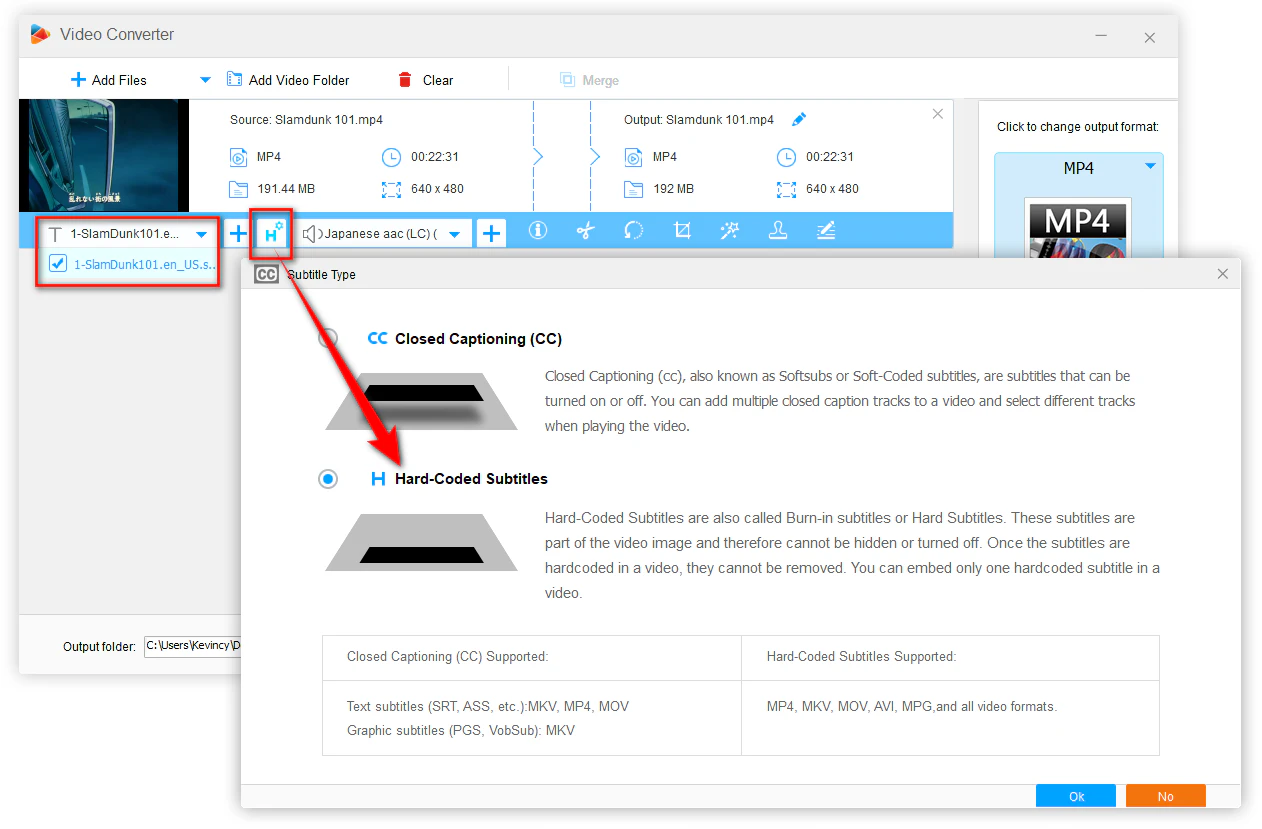
- Once your subtitles are added, click on the "CC" icon and choose the "Closed Captioning (CC)" option.
- Make sure all desired subtitle options are selected in the drop-down menu.
- After this, you're ready to move on to the next step.
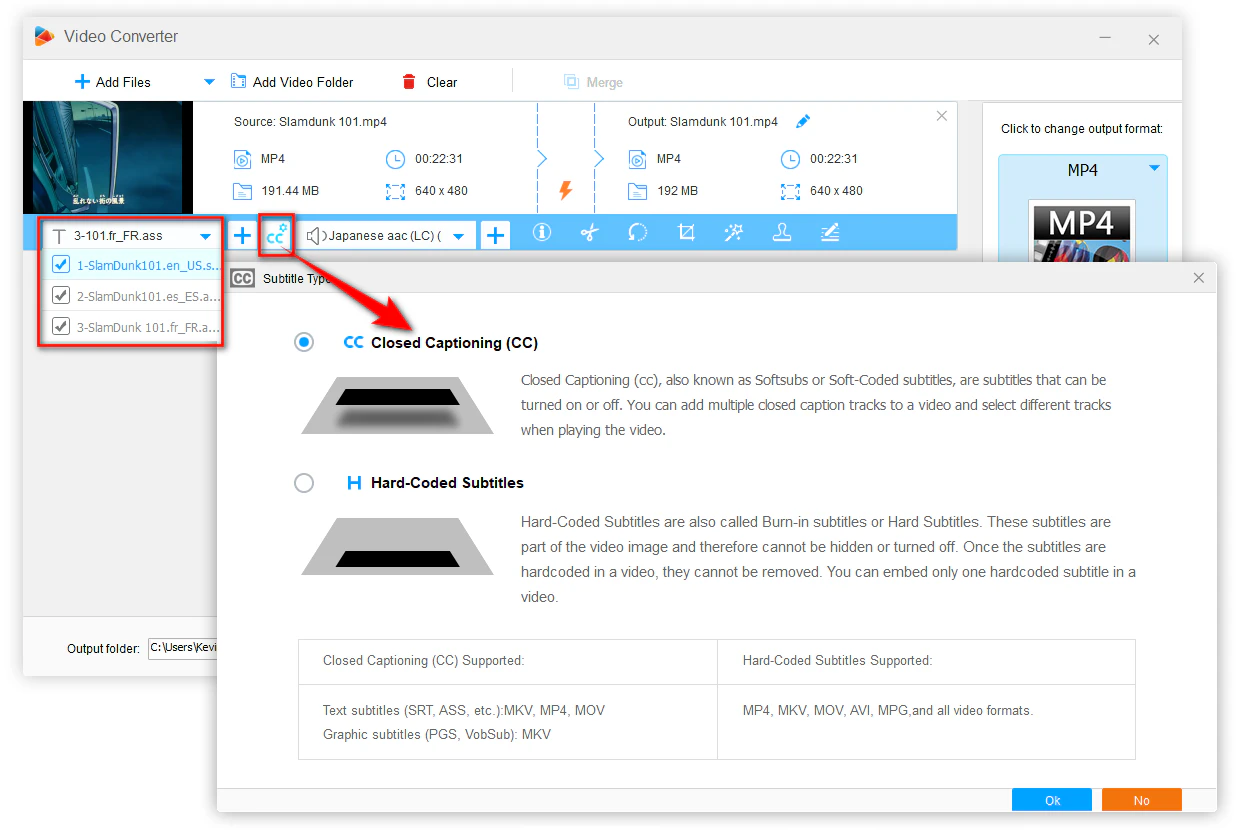
👉🏻 b. Hard Subtitles
- To add hard subtitles, you can select any format for your output file.
- Like with soft subtitles, click the "+" icon to add an SRT or SSA file.
- You can only hardcode one subtitle file to the video.
- Make sure to choose the "H Hard-Coded Subtitles" option in the Subtitle Type window.
Step 3 (Optional): Adjusting Output Settings
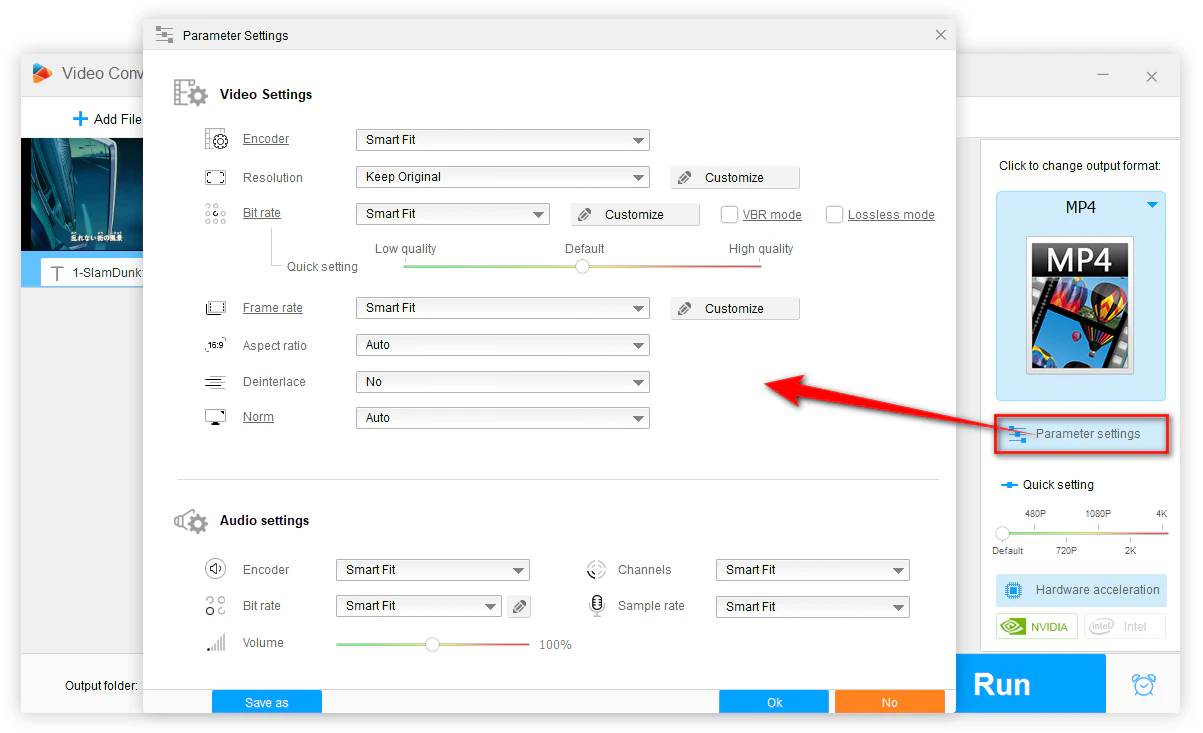
- You can adjust additional parameters such as video resolution, bitrate, and more by clicking the "Parameter settings" button.
- This is optional but can be useful if you need to change the quality or size of the video.
- Don't forget to click OK to save the changes.
Step 4: Initiate the Process
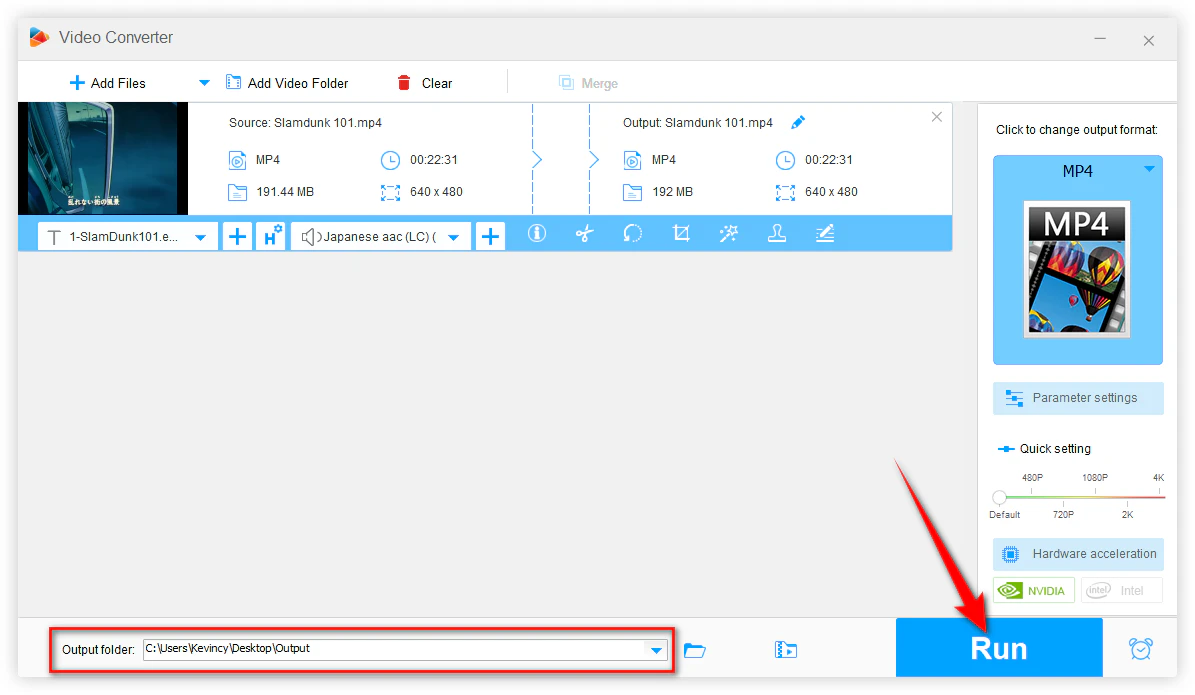
- Choose your desired output folder at the bottom by clicking the inverted triangle icon.
- Finally, hit the "Run" button.
- The software will process the video, adding the subtitles and saving the file in the specified location.
This solution is particularly helpful for those who want a simple, user-friendly interface that works reliably for both soft and hard subtitle embedding.
🎉 Wrapping Up
In this article, we've explored how to add both soft and hard subtitles to a video using XMedia Recode. We also introduced WonderFox Free HD Video Converter Factory, a simpler alternative that provides an easy solution.
Whether you need to provide captions for accessibility or translations for a global audience, both tools can help you achieve your goal with ease. Now it's your move, try it today, and make your videos more accessible and engaging!
❓ FAQs
Q1: Can I Add Multiple Subtitle Files?
A: Yes, but only for soft subtitles. Hard subtitles allow only one track. With both XMedia Recode and WonderFox Free HD Video Converter Factory, you can add multiple soft subtitles for different languages or content.
Q2: Is it possible to add subtitles to a video without re-encoding the entire video?
A: Adding soft subtitles usually doesn't require re-encoding the entire video as long as you keep the video format and parameters untouched. But when burning hard subtitles, re-encoding is necessary as the subtitles are integrated into the video's visual data.
Q3: How do I fix subtitle timing issues?
A: If your subtitles are out of sync, open it with Notepad or use subtitle editing software like Aegisub to adjust the timing of the subtitle file before adding it to your video.
Q4: Why are my soft subtitles not showing in the output video?
A: If your subtitles aren't appearing correctly,
- Make sure the subtitle format is supported (SRT, ASS, SSA)
- Check that the coding, language, and codec settings are properly configured
- Enable the subtitle track in your media player if you don't have subtitles set to display by default.
Sometimes, soft subtitles may not work on some media players or devices. If you experience issues, consider embedding hard subtitles instead.
Q5: Can I remove subtitles from a video after adding them?
A: Soft subtitles can be removed and even extracted as they are stored as a separate track within the video, but hard subtitles are permanent as they have become part of the video.