Best Video & Audio Processor: HD Video Converter Factory Pro
You know, FLV (Flash Video) used to be a very popular video format. Although it has been gradually replaced by more advanced video formats, there are still many people who keep a large number of FLV video files. Some are usually very large or high-bitrate, especially those generated by screen recording software. Therefore, this article will introduce you how to compress these FLV videos in Windows, Mac, and Online.
The bitrate is one of the core factors that determine the size and quality of a video file. The higher the bitrate, the better the video picture quality, but the larger the file size will be; conversely, too low a bitrate may lead to obvious quality loss or a mosaic effect.
The higher the video resolution, the better the picture clarity, but also the larger the file size. Depending on the specific needs, the resolution can be reduced from 4K to 1080p or even 720p to significantly compress the FLV file size.
FLV typically uses old compression formats to encode videos. Use some advanced video encoders to make FLV files smaller but keep the same quality, such as:
The higher the frame rate (FPS), the more frames need to be encoded per second, and the file size increases significantly. If the video content does not require a high frame rate, it can be reduced from 120fps to 30fps or lower to reduce the FLV file size.
By cutting useless segments at the beginning, end, or middle, the duration of the video can be directly reduced, thereby reducing the overall volume of the FLV file.
With the basics out of the way, let's see how we can use some tools to easily compress FLV files on various platforms.
WonderFox HD Video Converter Factory Pro is a fully functional video processing tool. It supports a wide range of import/export formats and provides various easy-to-use compression functions. For those who want to reduce FLV file size quickly without a steep learning curve, this tool has a very user-friendly interface and operation process.
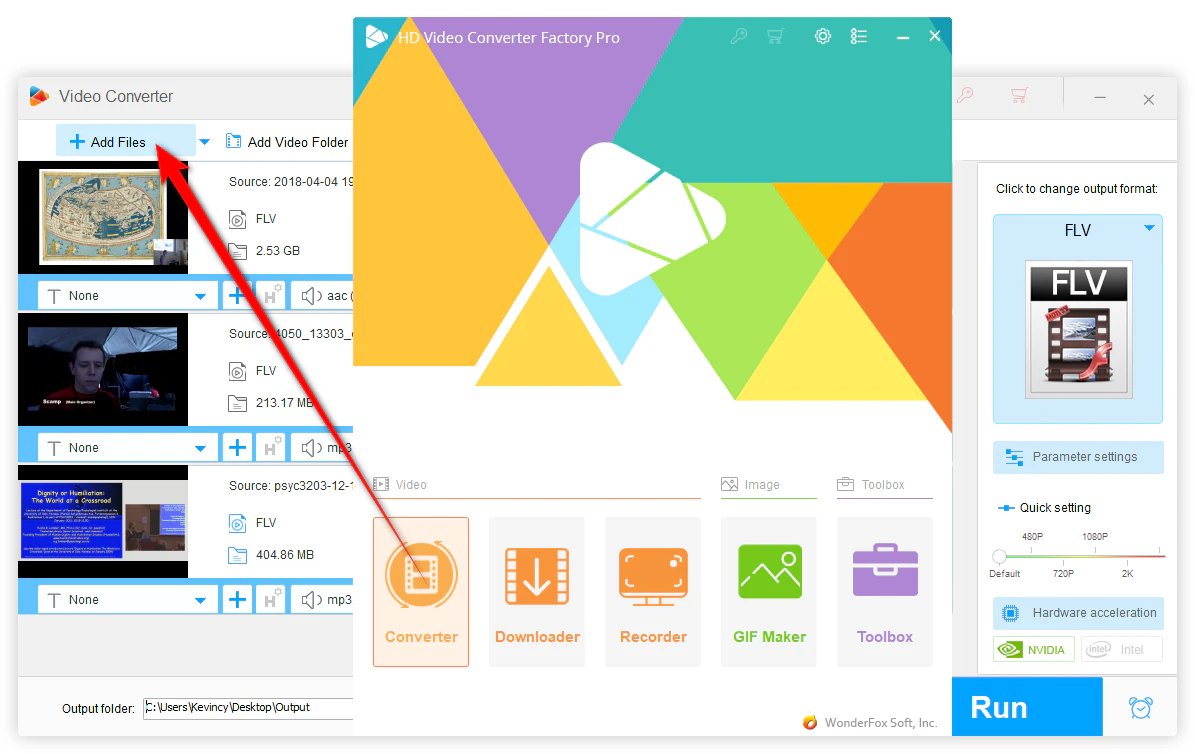
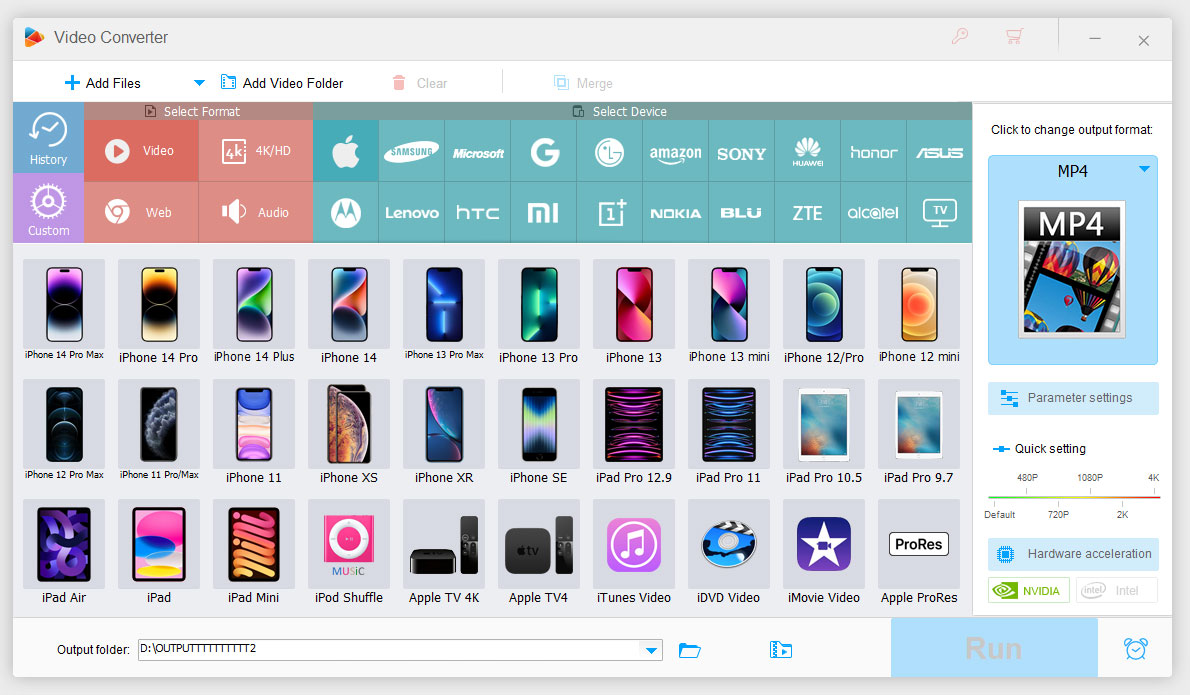
DownloadDownload and install WonderFox HD Video Converter Factory Pro on your PC. Then launch it and open the Converter module.
Click + Add Files to import the FLV files you want to compress. You can also drag and drop them into the blank space.
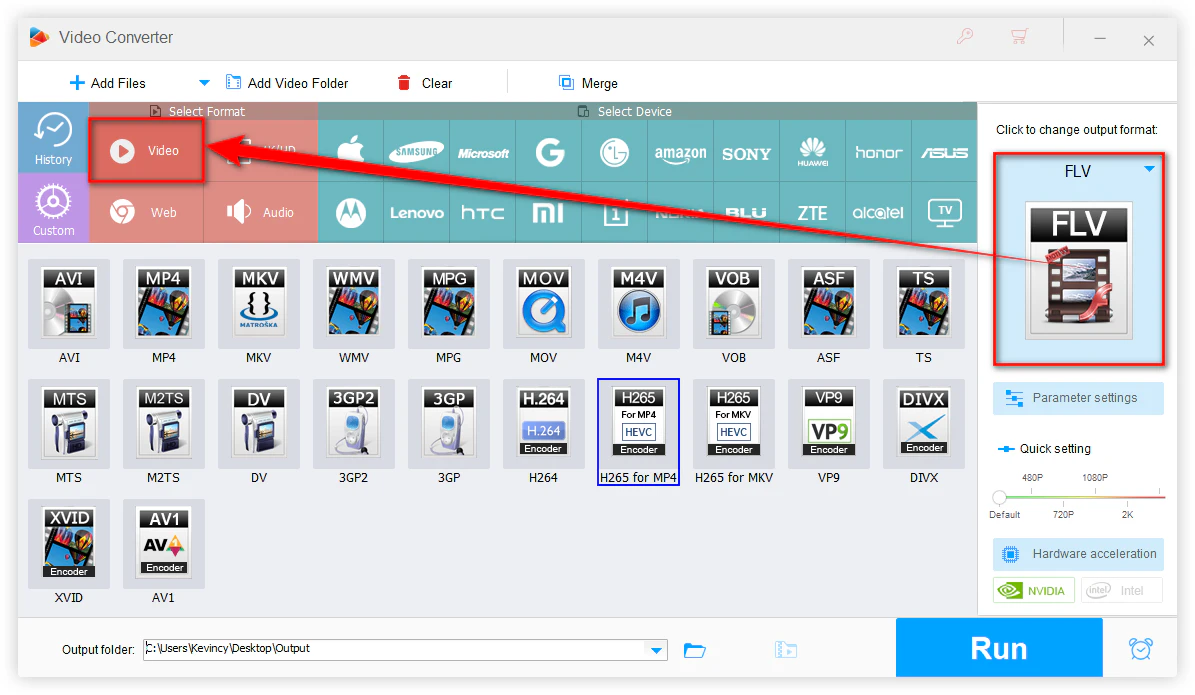
Unfold the Output Format library on the right side of the software, and select the output format. You can keep it as FLV or choose the MP4 (H.264/HEVC/AV1) format with higher compression efficiency.
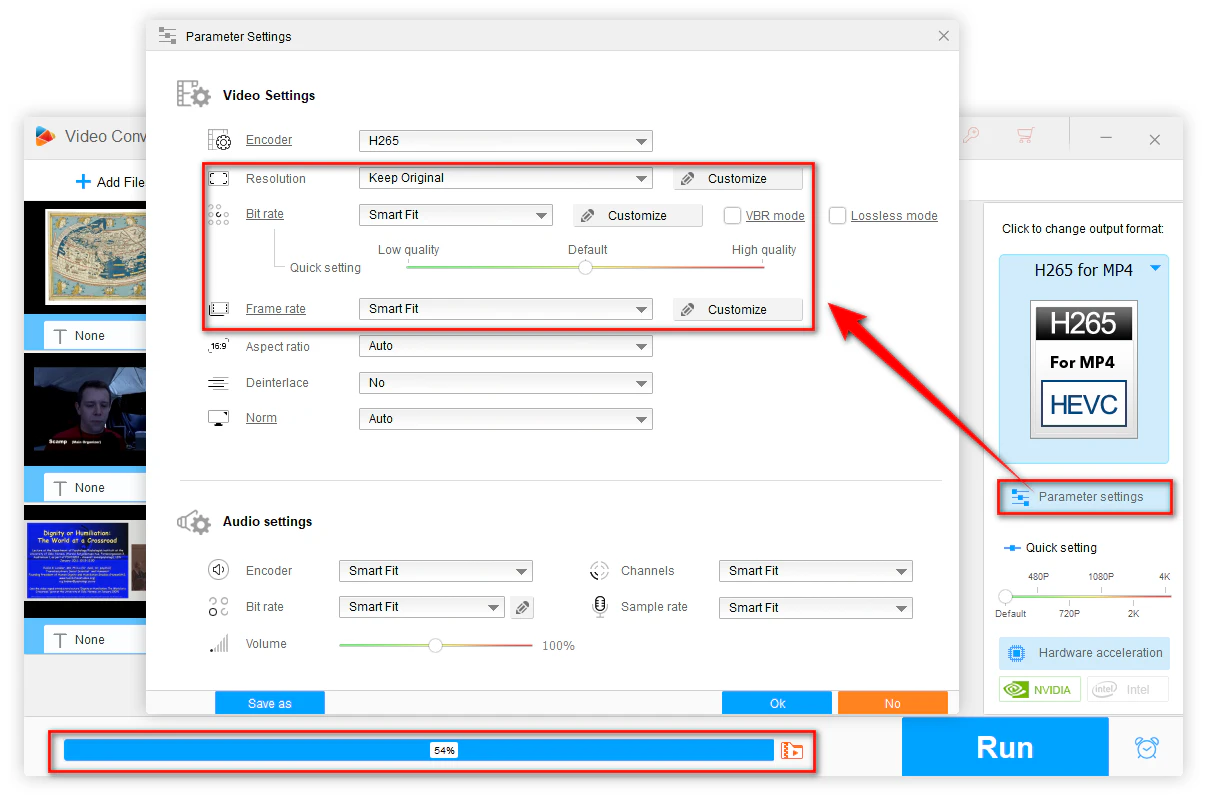
Click Parameter settings, here you can make some changes to make your FLV files smaller:
- Resolution
Select a lower resolution according to your needs, for example, downscale 8K to 4K, 1080p or 720p.
- Bitrate
You can choose an option in the drop-down menu or manually input a low bitrate.
If you are not sure how to choose, you can also enable the Batch Compression function at the bottom of the software. Once the icon becomes orange, move the slider along the bar toward the right to increase the compression ratio.
- Frame Rate
If there is no high frame rate requirement, you can set it to 30fps to reduce the amount of data and maintain a relatively smooth viewing experience.
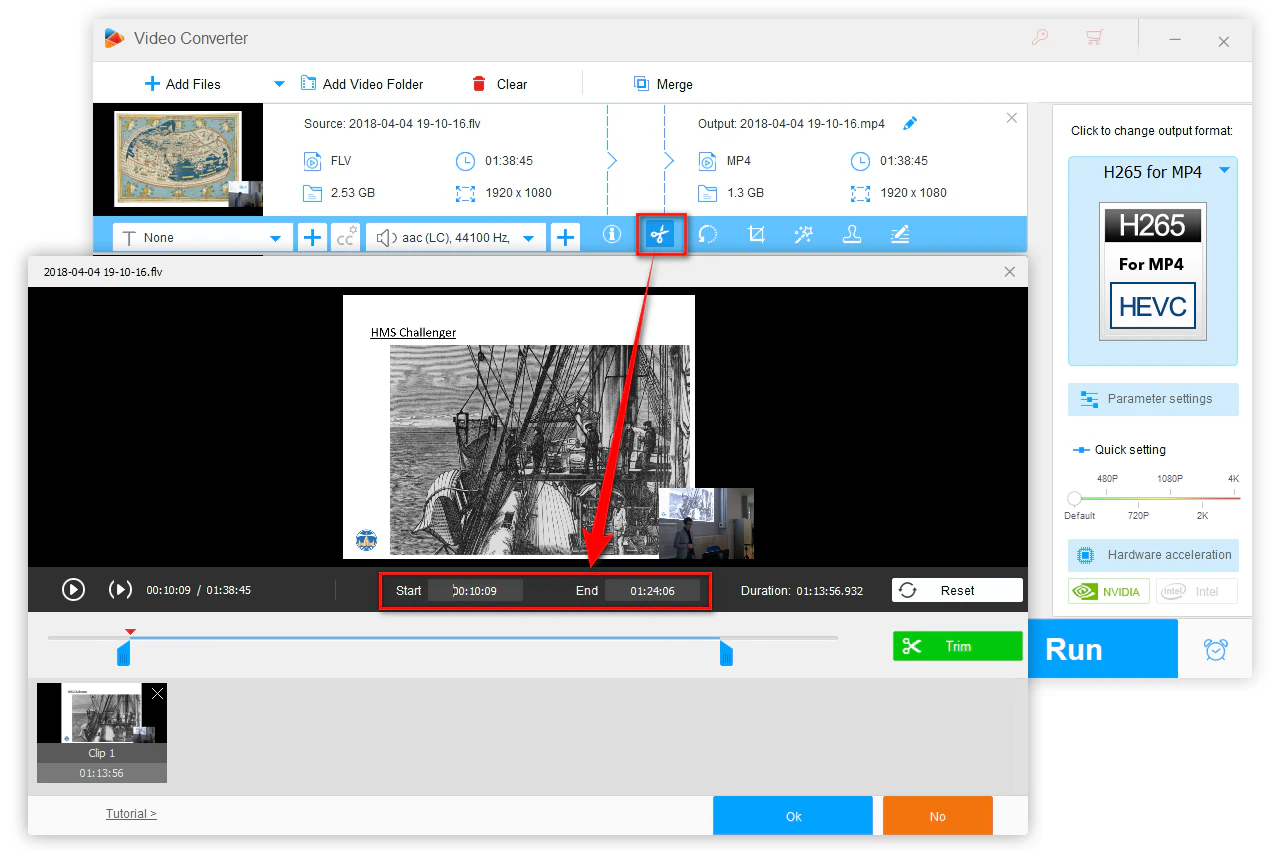
This is an optional step. If you want to cut the video length, click the Scissors icon on the editing toolbar to open the Trimming window.
You can drag both sliders or set the start and end times to remove unnecessary segments and keep the parts you want.
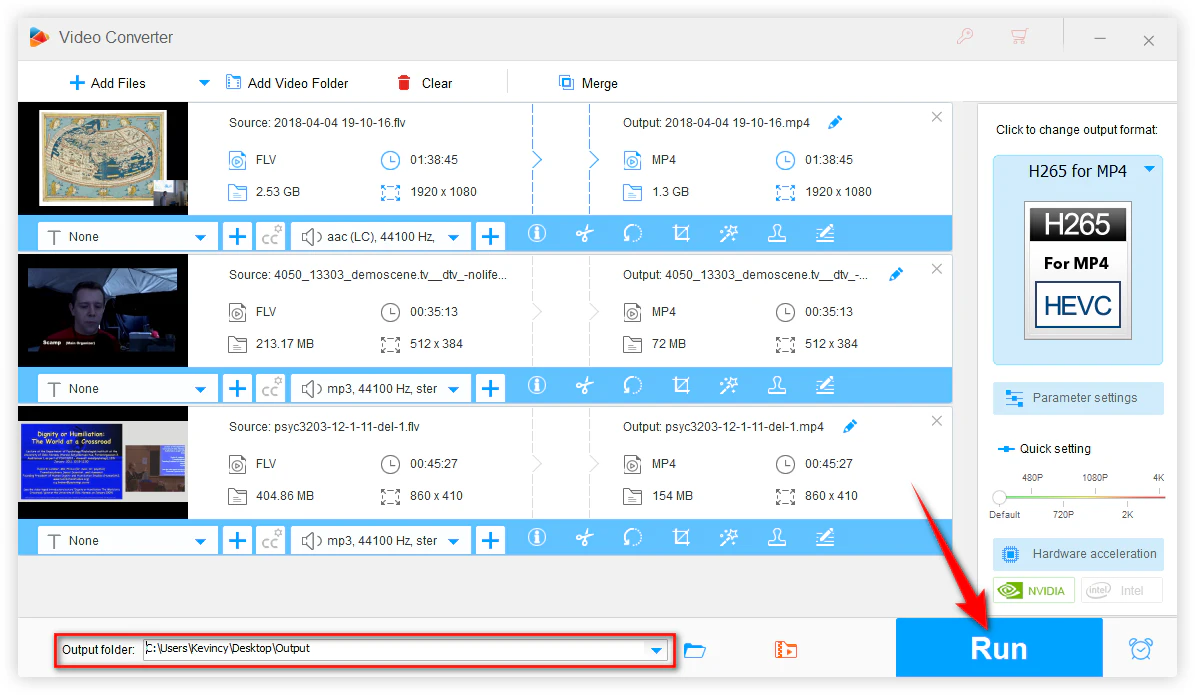
When everything is ready, click the Down Arrow icon at the bottom to specify a directory to save the compressed video.
Finally, hit Run to start compressing your FLV files.
HandBrake is a free and open-source video transcoder with great flexibility. After setting up the appropriate parameters, it works great for FLV compression. The interface is relatively professional. For beginners, it might have a bit of a learning curve. But once you get familiar with it, you can make full use of its powerful functions to achieve high-quality video compression and conversion.
Download and install HandBrake from its official website or the Mac App Store.
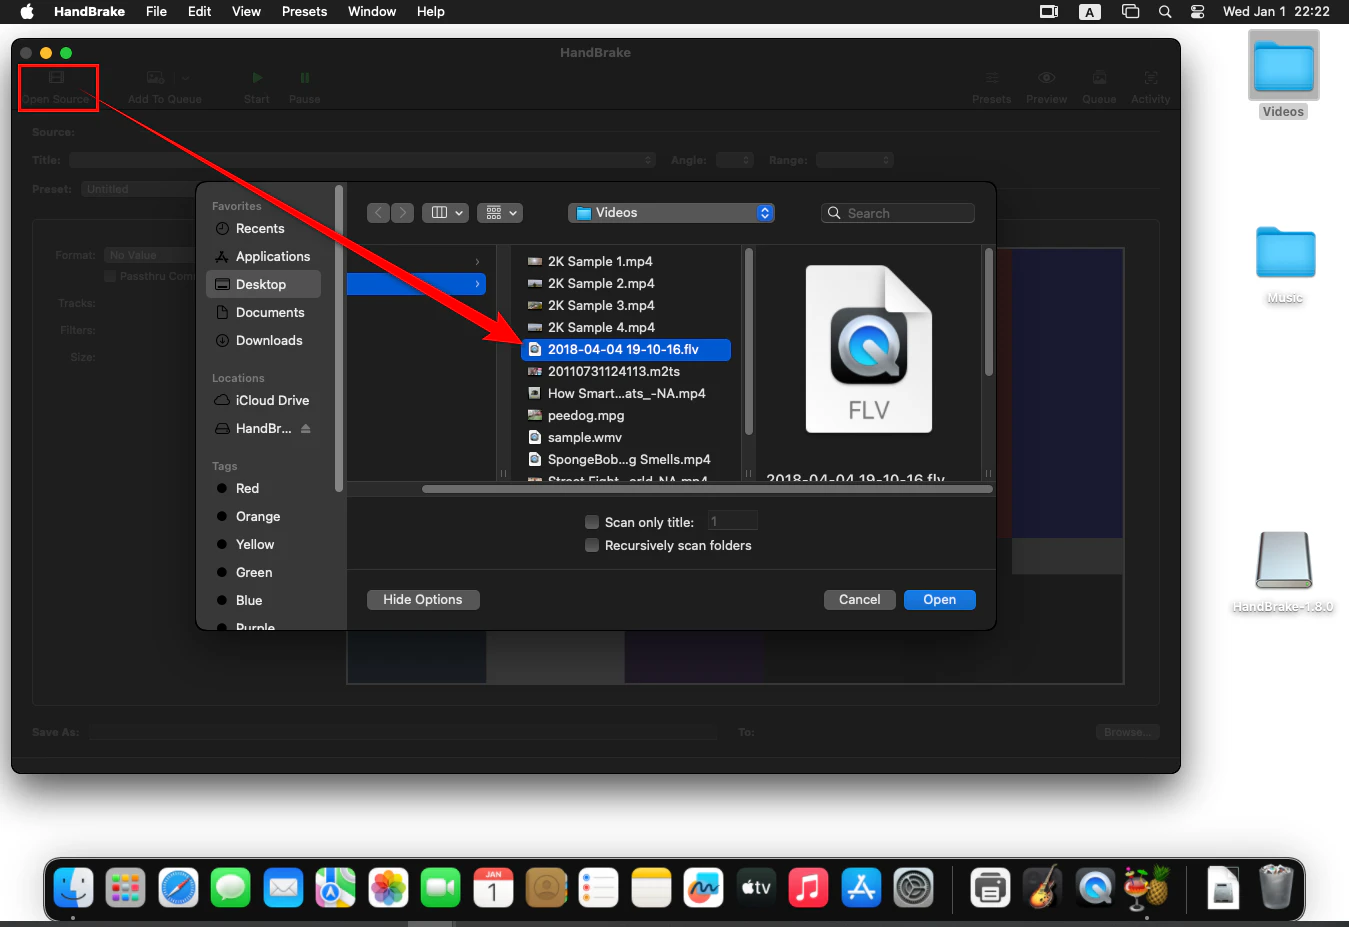
After launching this tool, it will open a file browser where you can pick the FLV file that needs to be compressed.
You can also click the Open Source button to import the file.
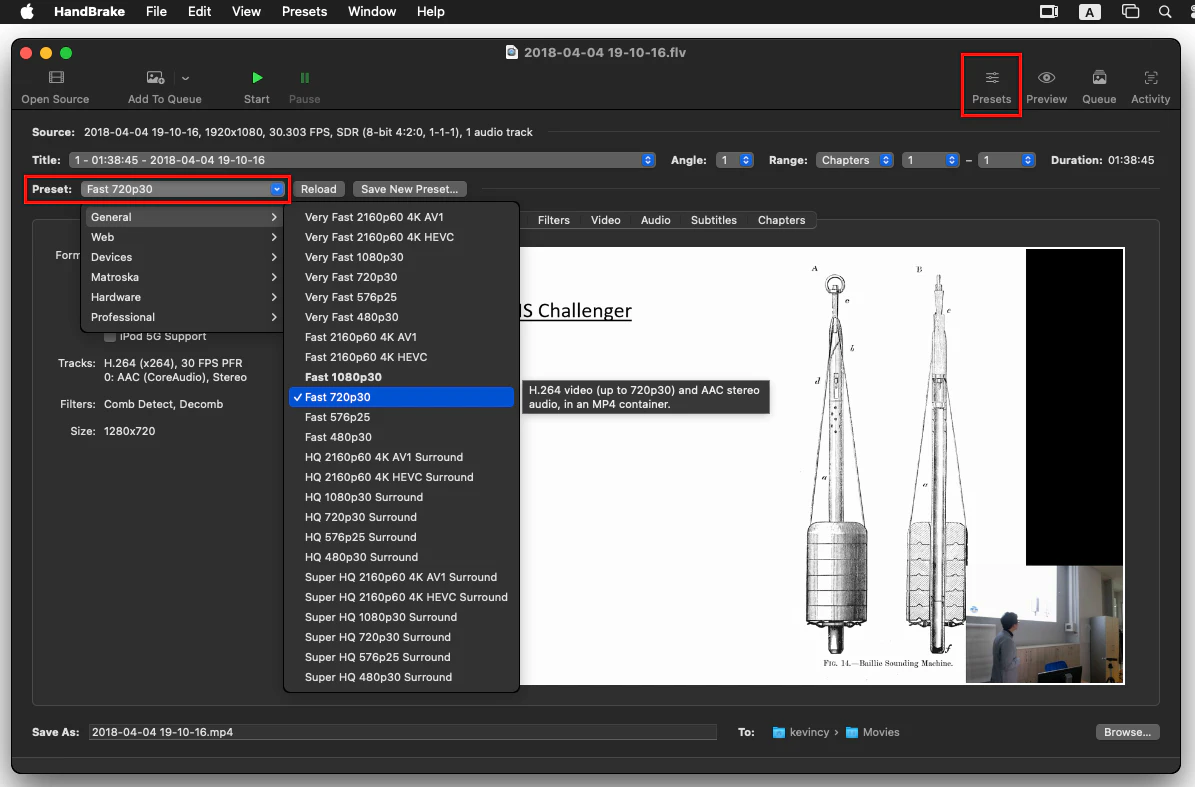
HandBrake provides multiple presets. You can choose the preset that suits your needs (such as Fast 720p30).
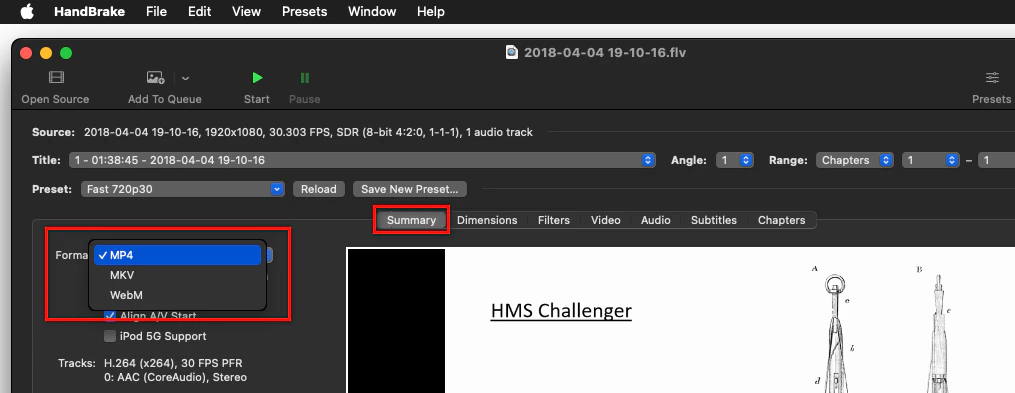
In the Summary tab, choose MP4 as the output format (recommended), because it has high compatibility and supports efficient compression.
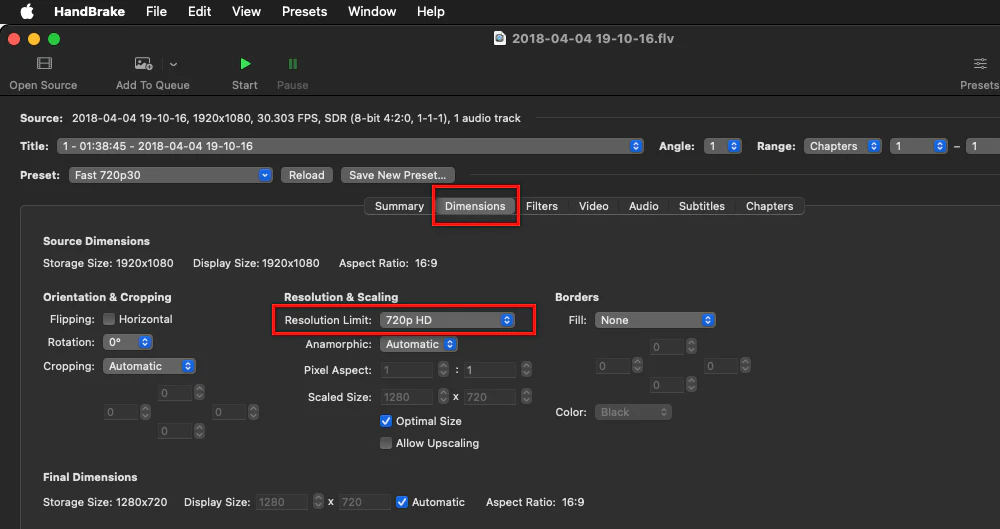
In the Dimensions tab, adjust the resolution lower according to your needs in the drop-down menu.
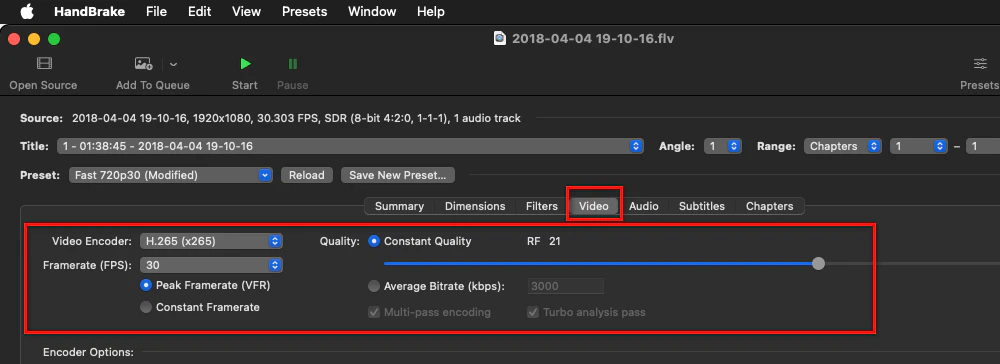
In the Video tab, head over to the Video Encoder section. It is recommended to choose H.264, H.265 (HEVC), or AV1 as the main encoder, which can significantly reduce the size while maintaining good picture quality.
You can also reduce the frame rate to 24fps or 30fps here if you don't have strict requirements.
Now, find the Quality slider. You can use it to reduce the target bitrate. Set it to RF 20 - 23 (the higher the value, the smaller the file, but the picture quality will drop slightly).
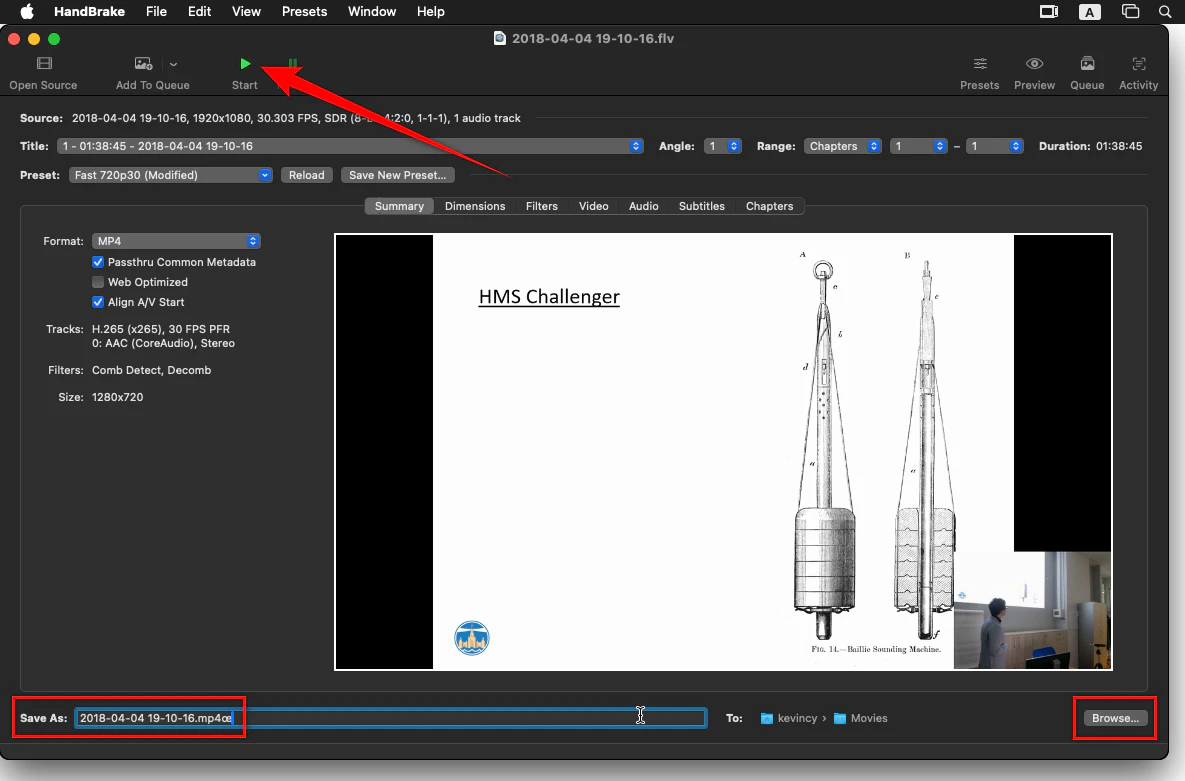
At the bottom of the interface, click Browse to give your file a name and choose an output location where you want the compressed video to go.
Finally, hit the Start button in the top toolbar to start the compression process. The compression process may take several minutes to dozens of minutes, depending on the file size and settings.
Many people prefer to compress FLV files online. To be honest, while online tools may seem convenient and require no software installation, they come with three major drawbacks: file size limits, long upload and download times, and watermarks on generated files.
Taking all these factors into account, Clipchamp is recommended. It is a versatile online video editing platform acquired by Microsoft and can be used for FLV video compression. Here's the how-to guide:
Visit Clipchamp website in your browser and log in directly. If you don't have an account, click "Try for free" and create an account.
Click Create a new video to open the editor. Click the Import media button to upload your FLV file from your local computer. You can also open the drop-down menu to import it from your OneDrive, Google Drive, and Dropbox. Then add it to the timeline.
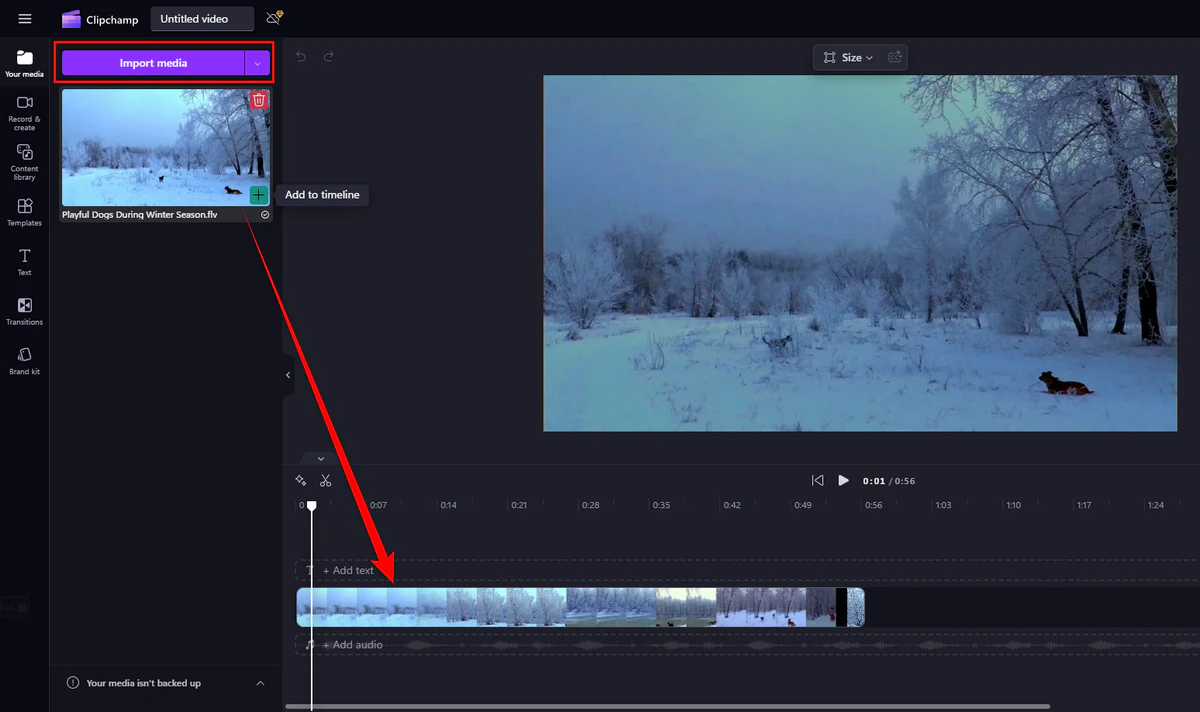
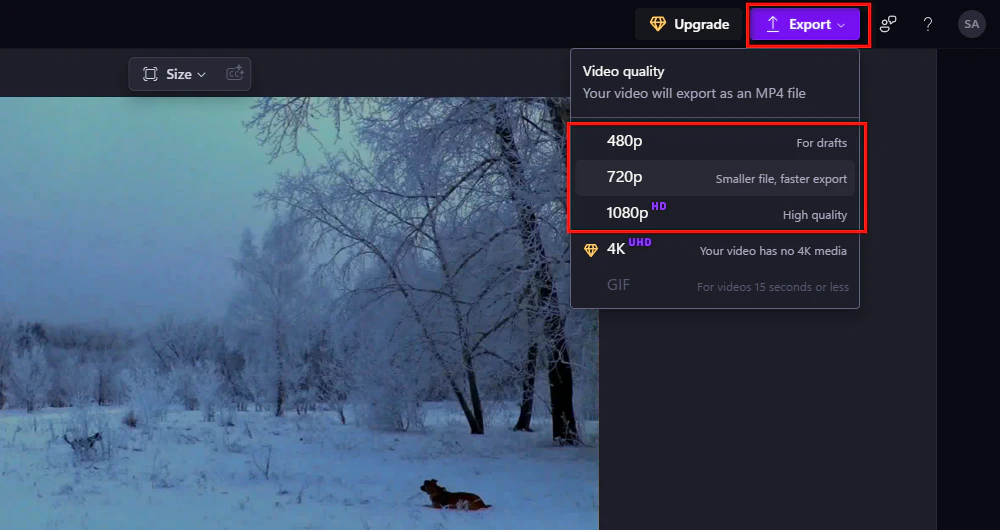
If you just want to compress it and don't need to do any editing operations, click the Export button in the upper right corner of the editor. The output format of Clipchamp defaults to MP4, and it can't export in other formats.
To reduce the file size, you can choose the resolution and the video quality level according to your own needs:
After selecting one option, Clipchamp will automatically process and compress the video in real time.
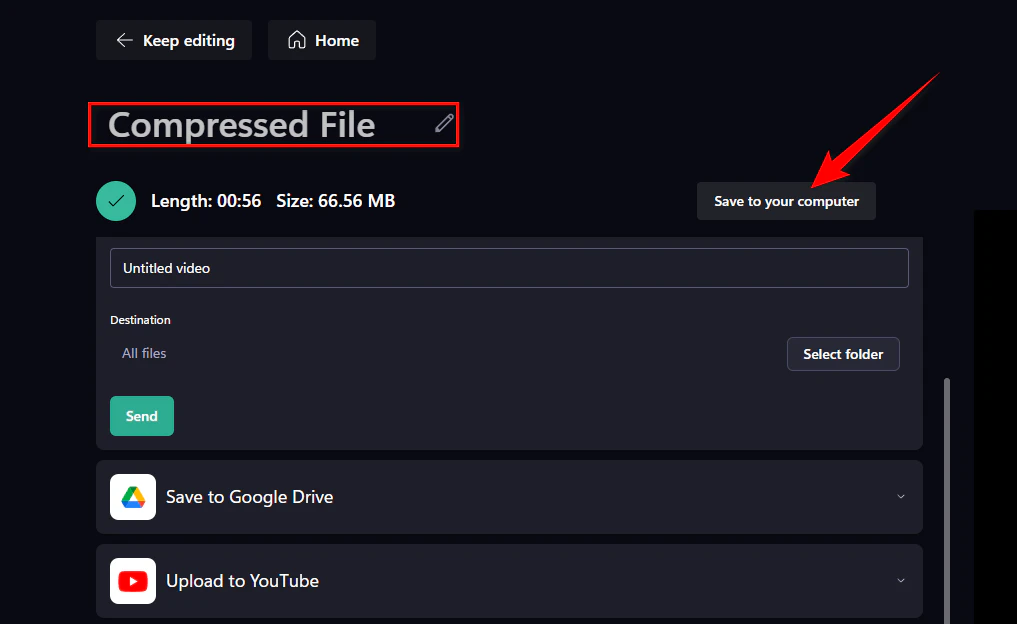
When the process is complete, click Save to your computer to download it to your device. If you need to share it on other platforms, you can also directly use the cloud sharing methods provided by Clipchamp (such as Google Drive, YouTube, TikTok, etc.).
|
WonderFox HD Video Converter Factory Pro |
HandBrake |
Clipchamp |
Platform |
Windows |
Mac |
Online (Browser-based) |
Ease of Use |
Easy, user-friendly interface |
Moderate learning curve for beginners |
Easy, requires account setup |
File Import Options |
Drag & drop or file browser |
File browser |
Upload from local, OneDrive, Google Drive, etc. |
Output Formats |
FLV, MP4 (H.264/HEVC/AV1), and more |
MP4, MKV |
MP4 (default) |
Compression Techniques |
Adjust bitrate, encoder, resolution, frame rate; trim video |
Adjust bitrate, encoder, resolution, frame rate |
Adjust resolution, quality settings |
Advanced Codecs |
H.264, H.265, AV1 |
H.264, H.265, AV1 |
H.264 (default, limited choice) |
Resolution Options |
Customizable (e.g., 4K to 1080p or 720p) |
Customizable (e.g., 4K to 1080p or 720p) |
Fixed presets: 1080p, 720p, 480p |
Frame Rate Adjustment |
Yes, e.g., 120fps to 24fps |
Yes, e.g., 120fps to 30fps |
Not adjustable |
Editing Options |
Trim, split, crop, rotate/flip, merge, effects, watermark |
None |
Basic edits available in the timeline |
Batch Processing |
Yes |
Queue up task |
No |
Output Quality Control |
Manual bitrate or batch compression slider |
RF slider (20–23 recommended), manually input bitrate |
Quality presets (high, medium, low) |
Processing Speed |
Fast (hardware acceleration supported) |
Fast (hardware acceleration supported) |
Depends on internet speed and file size |
File Size Limit |
No limit |
No limit |
Limited by upload/download capability |
Watermark |
No |
No |
May include watermark in free plan if using premium features |
Cost |
Paid (Free trial available) |
Free |
Free and Paid options available |
Excessive compression may lead to a significant loss of video quality. The relationship between file size and quality should be weighed according to actual needs.
If the video only needs a simple background sound or voice explanation, the audio bit rate or sample rate can also be decreased appropriately to further reduce the size.
When processing multiple files at the same time, higher CPU/GPU computing power is required, pay attention to the computer's running status and prevent it from overheating and crashing.
If you need to play on more devices or platforms, it is recommended to choose the more universal MP4 format (H.264/HEVC).
Before uploading or sharing, make sure you have the legal right to use the video and comply with copyright laws and regulations.
That's what I want to share with you guys on how to compress FLV files on multiple platforms. Of course, there are many tools to choose from, but I bet the methods recommended in this article are the easiest and most suitable for people who know little about video editing.
While pursuing a high compression ratio, we should also take video quality into account to achieve the best balance. I hope that through this article, you can easily use various video compression tools and create video files that are more convenient to share and manage. Cheers!
WonderFox
HD Video Converter Factory Pro
Terms and Conditions | Privacy Policy | License Agreement | Copyright © 2009-2025 WonderFox Soft, Inc. All Rights Reserved.