How to burn some .ts video files to a blank DVD disc for playback on a standalone or portable DVD player? Sometimes, it would be a temporary need on a whim, so it's not cost-effective to purchase a full-featured DVD burning program. In this post, I'll show you an open-and-shut solution to TS to DVD burning work at no cost. Just read on!
You're recommended to download the freeware to convert TS to DVD compatible format for fast DVD burning: https://www.videoconverterfactory.com/download/hd-video-converter.exehttps://www.videoconverterfactory.com/download/hd-video-converter.exe
As you may know that, a TS file (abbr. Transport Stream) is primarily used to save streamed or broadcast MPEG-2 videos in broadcast systems such as DVB, ATSC and IPTV. The TS files recorded on a DVD will directly play in a DVD player without any extra program.
However, there are always exceptions and special cases. For those .ts movie files or a series of .ts chunks or segments downloaded from HLS streaming sites, M3U8 playlists, camcorders or CCTV camera that don't conform to DVD format, you have to make a further step to convert and burn TS videos to DVD using some 3rd-party software. Not to worry, it doesn't cost you a penny. Now, let's go for the details.
Also Read: Burn M4V to DVD | Burn MTS/AVCHD to DVD | Burn VIDEO_TS to DVD | Join/Merge TS Files | TS Video Editor
Before we go ahead, the following stuff is necessary for the next TS to DVD burning work:
1. A blank recordable DVD-R or DVD+R disc, either single-layered DVD5 or double-layered DVD9 disc is acceptable based on the file size of your TS videos.
2. An internal/external optical Disc drive burner that can read, write and burn DVD.
3. DVD Flick, a free and open source DVD authoring application for Windows, enables you to convert "non-standard" TS videos to DVD format and then burn to DVD, with the help of the built-in FFmpeg project and ImgBurn burning application.
Insert a blank DVD5 or DVD9 disc into your internal/external optical Disc drive burner, then run DVD Flick. Drag your TS video files into the window, or click "Add title" button on the right side to import them all. Select each title and press "Move up" and "Move down" buttons to arrange the video sequence as you wish. Heads up, keep an eye on the "yellow sidebar" on the left side, which signifies the used disc capacity.
Note: If you run into some error messages like "Error 13: Type dismatch", "...has no unable video track", "...file is damaged or truncated", it means DVD Flick fails to decode and import the TS video files. In this case, use some free video converters to transcode TS video to MPG format and try it again.

Click on "Project settings" button on the top menu bar, go to "General" tab, you can change title, target size, encoder and thread count right there. If you have inserted a double-layered DVD-9 disc into the DVD drive burner, select "DVD DL (7.9 GB)" in the drop-down list of "Target size".

Switch to "Video", "Audio", "Playback" tabs successively to customize the DVD standard format (NTSC or PAL format), encoding speed, target video bitrate, audio volume & channel and playback method as you wish.

Now come to the most vital step, check the "Burn project to disc" option on "Burning" tab, and select the correct DVD Drive burner, you're allowed to change Disc label and burning speed. Mark other options as well based on your need, then click "Accept" button.

An optional step. You can add a DVD menu for easier DVD navigation. Click "Menu settings" button to choose a build-in DVD menu template and check the result by clicking "Preview" button. Then press "Accept" button.

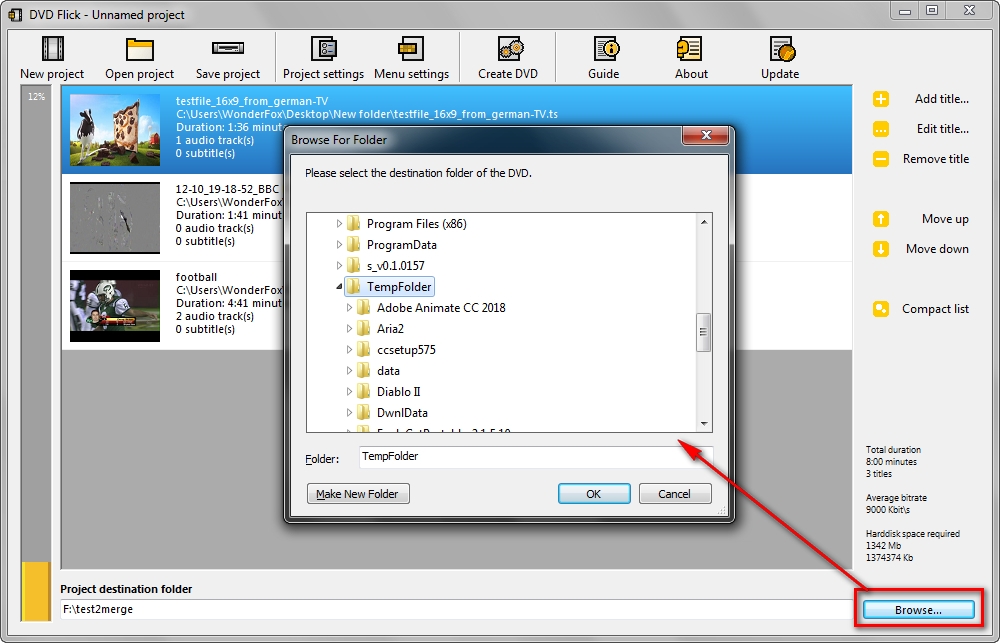
Click "Browse" button on the bottom of DVD Flick to assign a project destination folder to save this burning project work. You'd better create a new folder as you'll be prompted to empty everything in the folder subsequently.

Lastly, click "Create DVD" button on the top menu bar and press "Yes" on the warning message window to start converting TS videos to DVD compatible format using FFmpeg project. It may take a while to finish the TS video encoding process, depending on your computer configuration and TS file size.

After the video encoding process is finished, the built-in ImgBurn will automatically take over the last step to burn TS to DVD disc. It will eject the disc when the process is done, just be patient.
That's the entire workflow of TS videos to DVD burning. Now you're able to watch DVD on your home DVD player, media center or home cinema set. Most importantly, you can achieve this goal at no cost. If there is any question or problem in the follow-up, don't hesitate to contact me for help via Facebook Messenger.

WonderFox DVD Ripper Pro
1. Fast digitize DVD to digital video or audio in 3 steps.
2. Support commercial/homemade/recorded DVDs.
3. Decrypt all sorts of DVD copyright protection.
4. Come with 300+ presets without further settings.
5. Add subtitle to DVD movie/TV series, trim video...
Privacy Policy | Copyright © 2009-2025 WonderFox Soft, Inc. All Rights Reserved