PowerPoint offers a built-in screen recording method to record PC screens for better presentation performance. However, if you don’t know how to stop the recording process, the recorded content may be useless. So knowing how to stop recording PowerPoint to avoid capturing unnecessary parts is essential.
This post explains how to stop PowerPoint screen recording with a detailed guide. You can also learn more about PowerPoint screen recording in this post.
If you want to record your PowerPoint screen recording, knowing how to stop recording is important to avoid capturing unwanted parts. To end the screen recording in PowerPoint and finish your presentation, follow the steps below:
In PowerPoint, you can find the recording toolbar at the top-right corner of the screen under the “Insert” > “Media” section. When you start a screen recording in PowerPoint, it will pop up immediately.
Once you have finished recording, you can move your mouse to the top side of the PC screen, and a recording toolbar will appear. Then press the “Stop Recording” option (the blue square symbol) to stop the screen recording. You can also press “Windows + Shift + Q” to stop the recording quickly.
* You can also click the “Pause” icon to stop recording for a while and continue recording later.

After finishing the recording, the recorded video will be shown in the PowerPoint. You can press the playback icon to view it. If you are satisfied with the recorded video and want to save it, just right-click on the video and select “Save Media As” to export the recording.

Though PowerPoint offers a built-in feature for screen recording, it may not satisfy your needs for high recording quality and more features. In this case, here is an HD screen recording tool with better recording performance for you.
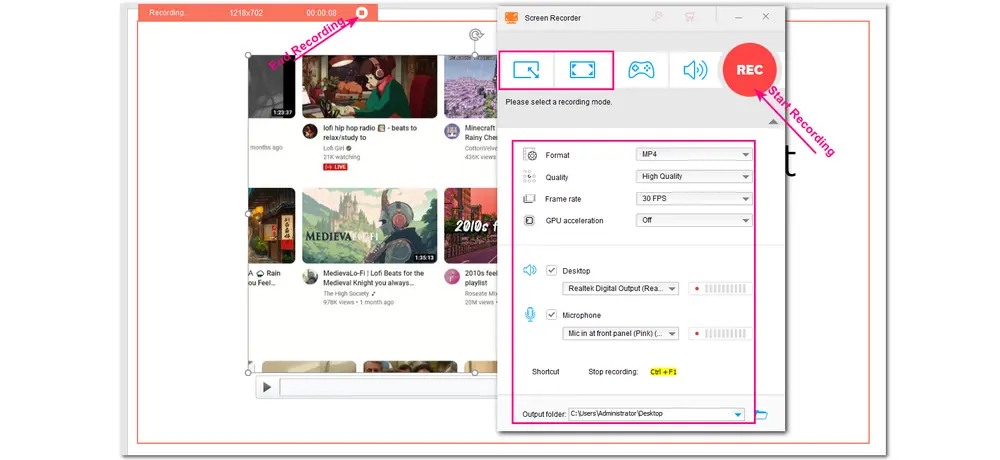
WonderFox HD Video Converter Factory Pro is an all-in-one video processing tool that offers a handy screen recorder to help you easily start and stop recording. With it, you can effortlessly record the screen with audio simultaneously in high quality.
Features:
✔ Straightforward interface makes it easy for beginners to access
✔ Different recording modes for kinds of recording requirements
✔ Offer high video and audio recording quality
✔ Various popular output video and audio formats
✔ Support further editing, conversion, compression, etc.
Follow the steps below to capture your PowerPoint in high quality now!
* Before starting the recording, please open the PowerPoint you want to record.
Step 1. Download and install WonderFox HD Video Converter Factory Pro on your PC. Launch it and open the “Recorder” module.
Step 2. Choose a recording mode (Custom or Full-screen) on the top of the interface. Then select the recording region and press “OK” to confirm it.
Step 3. Go down to modify the required recording settings and select the audio source you want to record. Click the bottom ▼ button to specify an output path.
Step 4. Finally, hit the red “REC” button to start the recording. When you’re done with the recording, click the square icon on the recording toolbar or press “Ctrl + F1” to stop recording.

Then a window will pop up to show your recorded video. You can click to view it. If needed, you can close the “Recorder” module and open the “Converter” module to import recorded video for editing, compressing, etc.
Follow the steps we share in the post, you can successfully stop screen recording on PowerPoint and bring your presentation to a close. What’s more, if you want a high-quality output recording and more advanced features, WonderFox HD Video Converter Factory Pro may benefit your needs.
Above is all I want to share with you. Thanks for reading till the end. Have a nice day!
1. Can I edit a screen recording in PowerPoint?
Yes, you can.
If you want to edit the recorded video in PowerPoint, you need:
1. Right-click on the recorded video.
2. Then you will see the “Style”, “Trim”, and “Start” options. You can choose the video style, trim the video, and adjust the playback start time.
3. Right-click on the video again and select “Save Media As” to export the edited video.
2. Where does PowerPoint save screen recordings?
Typically, PowerPoint saves screen recordings as videos in the default location on your computer, such as the Documents and Movies folder. But you can also save the recording as a separate video in another folder you like.
3. How to enable the recording tab in PowerPoint?
Sometimes, you may not find the recording feature in PowerPoint. That may be because you don’t enable the recording tab.
Here is how to enable the recording tab in PowerPoint:
1. Open the PowerPoint and press “File” at the top-left corner.
2. Select the “Options” tab from the left-side list to open the “PowerPoint Options” window.
3. Go to the “Customize Ribbon” tab and check the “Recording” box under the “Main Tabs” section. Press “OK” to save the change.
Now, you can find the recording tan under the “Insert” > “Media” section.

WonderFox HD Video Converter Factory Pro
WonderFox HD Video Converter Factory Pro is an all-in-one video & audio processing tool that can easily convert any video and audio files to 500+ profiles with high-quality preserved. Video editing, compressing, recording, downloading, GIF & ringtone making, and more features are also provided.
Simple, full-featured, batch conversion and hardware acceleration support. Get it here to have a try now!
Privacy Policy | Copyright © 2009-2025 WonderFox Soft, Inc.All Rights Reserved