Want to edit videos in DaVinci Resolve but find that you cannot import any media into DaVinci Resolve? Don't worry! I'll explain the possible reasons and share 7 solutions to fix the DaVinci Resolve not importing media issue. Just continue reading!
DaVinci Resolve is a professional video editing program that allows users to create and edit videos. However, during the usage, some users may encounter some issues like DaVinci Resolve import media not working. Not just the incompatible formats/codecs can cause the issue, other reasons can also lead to this problem. So this post is here to show why you can’t import media to DaVinci Resolve and provide the solutions to fix it.
If the issue is caused by unsupported formats, try HD Video Converter Factory Pro! It can convert unsupported files to DaVinci Resolve compatible formats and codecs. It also supports changing the variable frame rate to a constant frame rate!
If you encounter the DaVinci Resolve not importing media issue, the following are the possible causes.
DaVinci Resolve is a professional video editing program that may be a little complicated for beginners. So, you may import media incorrectly to DaVinci Resolve, causing the file import error.
If the filename of the video contains some emojis, special characters, etc. that cannot be specified by DaVinci Resolve, then you will inevitably fail to import the media file. So you should rename your media file and then import it to DaVinci Resolve.
Like other software, DaVinci Resolve cannot support all file formats and codecs. You cannot import the unsupported files to DaVinci Resolve for editing. Moreover, even if the file format is compatible with DaVinci Resolve, you should also check if the video and audio codecs inside the file are supported in DaVinci Resolve.
You can refer to the “DaVinci Resolve 18 supported file formats and codecs” document to check the DaVinci Resolve supported formats. However, note that in DaVinci Resolve older versions, the MKV format is not supported.
Tips: How to Check the Video Format/Codec?
MediaInfo is a good option for you to check various media information like format, codec, framerate, bitrate, etc.
Step 1. Launch MediaInfo and drag and drop the file into the top of the application.
Step 2. Click on “View” > “Tree”.
Then you can see the detailed information like video/audio codec, frame rate, etc. in the video file.
Some video converters, like HD Video Converter Factory Pro, can also check these video settings easily.
Some videos may be shot with a variable frame rate. However, DaVinci Resolve cannot deal with variable frame rates video. So if your files have variable frame rates, you cannot import media into DaVinci Resolve.
You can also check if the frame rate is variable in MediaInfo.
DaVinci Resolve won’t import media if your media files are corrupted. So you can check your files first by playing it with other programs if you encounter the media not importing issue. If the files don’t play, they could be corrupted. You can search for some data-repairing tools online to fix the corrupted files.
An outdated version of DaVinci Resolve may not support some formats/ codecs and contains some bugs that lead to the file not importing issue. So if your DaVinci Resolve is still an old version, try to update it to the latest version.
After knowing the possible reasons for DaVinci Resolve can’t import media, this part shares some handy fixes to help you solve the issue.
If you are unfamiliar with DaVinci Resolve, you can import media files to DaVinci Resolve as follows:
Method 1. Just select and drag the media file from your PC drop it inside the “Media Pool” and then drag it to the timeline in DaVinci Resolve.
Method 2. Go to the “File” > “Import file” > “Import Media” steps or press “Ctrl + I” (“Command + I” for Mac) and then navigate to the folder where your media files are stored. Select the file you desire to import into DaVinci Resolve.

If the media not importing issue is caused by the incompatible format or codecs, you can use a video converter to convert the file to a DaVinci Resolve-compatible format.
WonderFox HD Video Converter Factory Pro a professional video processing tool. It supports almost all video/audio formats and codecs and provides 600+ output presets for various media file conversions. You can easily batch convert your media files to MP4, MOV, ProRes, and other DaVinci Resolve-supported formats. It can not only convert files but is also available for editing, compressing, downloading videos, recording PC screens, and more.
Now, follow the steps below to convert files to be supported by DaVinci Resolve.
Step 1. Download and installDownload and install HD Video Converter Factory Pro on your PC and then launch it.
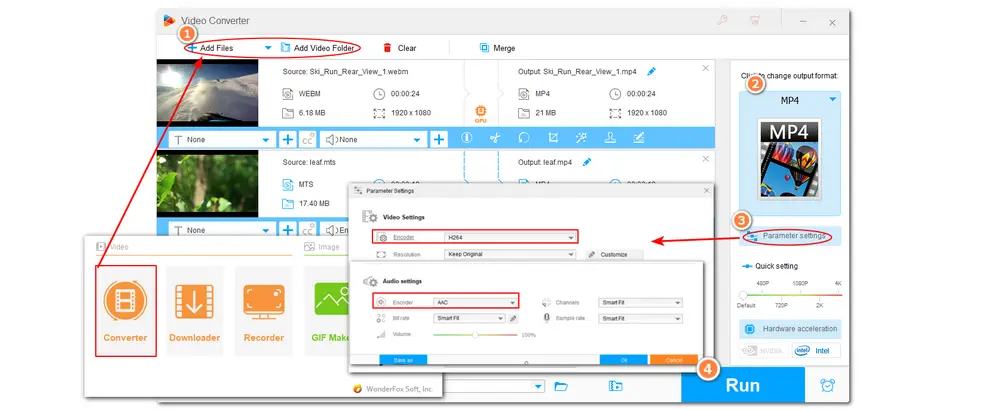
Step 2. Choose the “Converter” module from the initial interface and then click “+ Add Files” or “Add Video Folder” to import the unsupported video files.
Step 3. Click the format image on the right side to open the output format library. Select a DaVinci Resolve supported format under the “Video” tab like MP4, MOV, etc. Or you can also choose Apple “ProRes” under the “Device” > “Apple” section.
Step 4. Open the “Parameter settings” window and customize the video and audio codecs to be compatible with DaVinci Resolve. For MP4 output files, you’re recommended to select “H.264 + AAC”. Finally, click “OK” to save the changes and go back.
Step 5. Click the bottom inverted triangle button to specify an output path for the converted files and click the “Run” button to start the video conversion process immediately.

Since DaVinci Resolve doesn’t support videos that have variable frame rates, you should check if your videos have variable frame rates and convert the frame rate from variable to constant if needed.
To transcode the video from VFR to CFR, you can also use HD Video Converter Factory Pro. It can convert video to a constant frame rate without causing any damage to the video. So just downloaddownload it here and read the following to see how it works.
Step 1. Launch the program and open the “Converter”. Drag and drop the VFR videos into the converter.
Step 2. If the displayed format on the right side is supported in DaVinci Resolve, just leave it as default. If not, click the format image on the right side to choose a DaVinci Resolve compatible output format.
Step 3. Enter the “Parameter Settings” window and find the “Frame rate” setting. Just choose a constant frame rate from the “Frame rate” drop-down list, or you can customize your preferred frame rate. Also, remember to adjust the video and audio encoder to be supported in DaVinci Resolve.
Step 4. Now press “Run” to start converting the video to a constant frame rate.

If you have confirmed that your media files are corrupted, then you can find some reliable video repair tools online or offline to repair your corrupted video files. Then try to import the video into DaVinci Resolve to see if the issue is resolved.
Update DaVinci Resolve to the most recent version if you are using an outdated version. You can check for software updates by clicking on the DaVinci Resolve menu and then selecting the "Check for updates" option. Download and install the most recent update if one is available. After that, restart DaVinci Resolve and import media files to see if the problem has been resolved.
If the issue persists, you might try an alternative to DaVinci Resolve. Some good video editors, such as HitFilm Express, Lightworks, and others, are also professional video editors that will allow you to make some great videos.
Some Mac users who download DaVinci Resolve from the App Store may encounter the DaVinci Resolve import media not working issue due to the app’s access privileges.
You can fix it with the following steps:
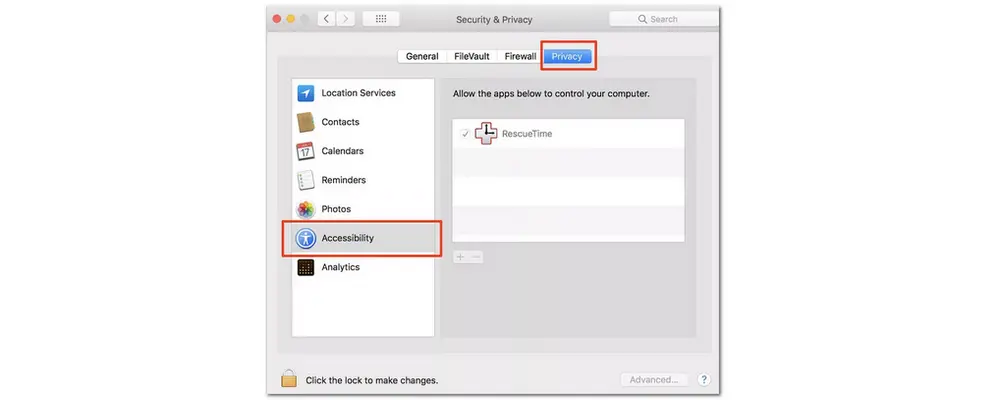
1. Open the Apple menu and select "System Preferences".
2. Click "Security & Privacy".
3. Choose the "Privacy" tab, then click "Accessibility".
4. Check if DaVinci Resolve is enabled in the list of apps.
5. If it’s not, click the “+” icon and select “DaVinci Resolve”.
Now, you should be able to import media into DaVinci Resolve.

If you still cannot import files into DaVinci Resolve, you may need to check the updates and download the latest version of DaVinci Resolve from the official website.
DaVinci Resolve not importing media can be caused by various reasons. This post has listed the main causes as well as the handy solutions to fix the issue. So if you encounter the file not importing issue, just follow the methods provided in this post to troubleshoot it.
The above is all I want to share with you. Thank you for reading till the end. Have a nice day!
When attempting to import an image sequence into DaVinci Resolve, the images may not be named sequentially or continuously. As a result, Resolve will not import the image sequence as a single clip. So rename the images in an image sequence before importing them into this video editor.
DaVinci Resolve can't import your video if the file format or codec is not supported. Not only that, if your files are corrupted, have a variable frame rate, filename contains invalid characters, etc., then these files cannot be imported into DaVinci Resolve, either.
Luckily, this post has given the related solutions for the DaVinci Resolve not importing video issue. Have a look and fix the issue now!

WonderFox DVD Ripper Pro
WonderFox DVD Ripper Pro is a professional DVD ripping program that can easily remove all sorts of DRM from DVDs and rip DVDs to 600+ presets like MP4, MOV, AVI, MKV, MP3, WAV, H264, H265, Android, iPhone, and so on. It also supports compressing and editing DVD videos efficiently with high-quality preserved. Get it here to enjoy the fast and trouble-free DVD ripping experience with DVD Ripper Pro.
* Please DO NOT use it to rip any copy-protected DVDs for commercial purposes.
Privacy Policy | Copyright © 2009-2025 WonderFox Soft, Inc.All Rights Reserved