DaVinci Resolve offers an all-in-one solution for editing videos on computers. In this article, we will show you how to add subtitles in DaVinci Resolve in two ways. Keep reading for the detailed steps.
Optional method: Free download WonderFox HD Video Converter Factory Pro to add SRT/ASS subs to videos easily and fast: https://www.videoconverterfactory.com/download/hd-video-converter-pro.exehttps://www.videoconverterfactory.com/download/hd-video-converter-pro.exe
The excellent video editing software DaVinci Resolve (the latest 18) empowers users to trim videos, add effects and motion graphics, make color corrections, add subtitles, and more. It offers two methods to add captions to a video. One is to type in your own words, and the other is to import an existing SRT subtitle file. The following part demonstrates how to add subtitles to a video in DaVinci Resolve step by step. Navigate to the method you want to learn.
Warm tips: DaVinci Resolve is a professional video editor with a lot of features and buttons, making its interface complex. Beginners may encounter a steep learning curve in this software. To avoid hassles, we recommend you use the entry-level subtitle adder – WonderFox HD Video Converter Factory Pro. Directly jump into the simple workflow in Part 3 >
Step 1. Install and run DaVinci Resolve 18 on your desktop.
Step 2. Click “File” > “Import” > “Media” at the upper left side of the interface. Locate the video you want to add subtitles to and click Open to load it into the software. Then, choose “change” or “don’t change” the project frame rate.

Step 3. Go to the “Edit” tab and drag the source file onto the timeline. The video (and audio) track will display separately.
Step 4. Click on the empty track above “Video 1” and select “Add Subtitle Track”.

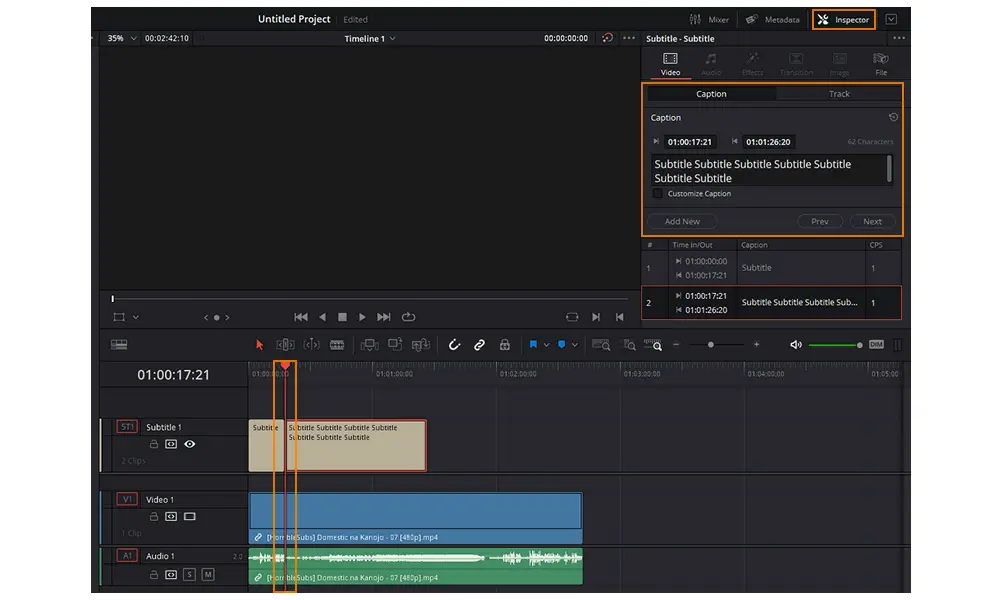
Step 5. Click on the Subtitle track. Go to the “Inspector” in the upper right corner. Under “Video” > “Caption”, press “Create Caption”.
Step 6. Type in your subtitles in the text box. You can also adjust its length based on your needs.
Step 7. Move the playhead on the timeline to the end of subtitle #1. Then, click Add New in the Caption and repeat Step 6 to add subtitles #2, 3, 4, and more.

Step 8. You can set the captions’ style, position, stroke, transform, shadow, background, etc., at will.
Step 9. After adding all subtitles to your video, go to the “Deliver” tab to render and export the final file. See how to make DaVinci Resolve export MP4 here >
Step 1. Launch the DaVinci Resolve software and import the source video through “File” > “Import” > “Media”.
Step 2. Import a local .srt subtitle file into the software via “File” > “Import” > “Subtitle”.
* Have no subtitle files on your computer? Here are the top websites for subtitles free download >
Step 3. Select the video and subtitle file, and drag them onto the timeline in the “Edit” tab.
Step 4. Clicking on the subtitle track, you can adjust the length, font, color, size, opacity, drop shadow, etc., in the “Inspector” tool.

Step 5. Once done, go to the “Deliver” tab to specify an output file format, codec, resolution, name, location, and other settings. Then render your queue and export the video file with new subtitles.

WonderFox HD Video Converter Factory Pro offers a handy way to add subtitles to videos permanently. With a few simple clicks, you can add soft subs or closed captions to your video. It’s easy, fast, and worth a try!
WonderFox HD Video Converter Factory Pro can be a simple video editor on Windows PCs. It is the best solution to add subtitle to videos. With it, you can add subtitles to MKV, MP4, AVI, MOV, and other video files in one step. You can add several soft subtitles or embed subtitle to your video permanently. There are no complicated timelines or terms on the interface, making it easy to operate for every user.
Free downloadFree download the software and have a quick look at how it works.
Step 1. Open HD Video Converter Factory Pro and select “Converter”. Click “Add Files” to import your video into the program. Multiple files are supported.
Step 2. Click the format image to pick an output format. For example, select “Video” > “MP4”.
Tips. If you want to add closed captions (soft subs) to the video, choose the MKV, MP4, or MOV output format. And Graphic subtitles (PGS, VobSub) can be supported in MKV only.
Step 3. The subtitle track is under the source file with a “T” symbol. Click the “+” button beside to add a .srt or .ass subtitle file from your PC. You can hardcode the subtitles by clicking the small “CC” button.
Note: A video can contain multiple soft subtitles, but only one hard subtitle.
Step 4. Hit the bottom inverted triangle button to specify a destination folder. Finally, press “Run” to export the final file.

The above article talked about how to add subtitles in DaVinci Resolve with two different methods. If you find DaVinci Resolve hard to deal with, you can try the simple alternative – HD Video Converter Factory Pro. It’s quite an easy yet efficient subtitle adding toolkit.

1. Extract or remove subtitles from videos;
2. Convert videos to MP4, MKV, MP3, and 500+ formats;
3. Download videos with subtitles from websites;
4. Record screen activities with audio and edit recordings;
5. Make GIFs and ringtones, convert images to video, etc.
6. Support batch mode and GPU acceleration.
Privacy Policy | Copyright © 2009-2025 WonderFox Soft, Inc.All Rights Reserved