Yes. According to Adobe’s official website, Premiere Pro supports importing AVCHD files with .mts or .m2ts file extensions. However, AVCHD is not the most ideal format for smooth editing in Premiere Pro due to its highly compressed nature, which can strain performance during playback and editing. Instead, AVCHD, short for Advanced Video Coding High Definition, is great for digital recording and playback of high-definition video.
If you have a bunch of high-quality AVCHD footage created by Sony or Panasonic camcorders. To make sure you can import AVCHD to Premiere Pro with no obstacles, the best practice is to transcode AVCHD to a more editing-friendly format for Premiere Pro. The most common post codec choices are Apple’s ProRes, Avid’s DNxHD/HR, and GoPro’s Cineform codecs.
To make sure the quality of the footage file is preserved as much as possible, you can convert AVCHD to Apple’s ProRes, DNxHD/HR, or Cineform. Among them, Apple’s ProRes is strongly recommended. The format was created by Apple Inc. for high-quality and high-performance editing tasks. Converting AVCHD to ProRes is the best way to help preserve the original quality.
For a successful AVCHD to ProRes conversion, a proper video converter is a must. WonderFox HD Video Converter Factory Pro can help you get this job done efficiently. It offers all types of ProRes outputs:
Apple ProRes 422 HQ
Apple ProRes 422
Apple ProRes 422 LT
Apple ProRes 422 Proxy
Apple ProRes 4444 XQ
Apple ProRes 4444
Simply click to choose the one that is the best fit for your needs. Aside from changing the codec at will, you are also allowed to modify other parameters like resolution, bitrate, sample rate, aspect ratio, channel, etc., to make sure the output quality.
Free download this professional converter to convert AVCHD or any other unsupported video files to a Premiere-compatible format for editing.
Now, we’ll walk you through how to import AVCHD into Premiere Pro with the help of HD Video Converter Factory Pro.
Step 1. Import AVCHD into Converter
Launch HD Video Converter Factory Pro and open the Converter. Next, click on the button “Add Files” or “Add Video Folder” to import the AVCHD footage into the conversion list. You can also simply perform a drag-and-drop action.

Step 2. Choose a Needed ProRes Type as Output Format
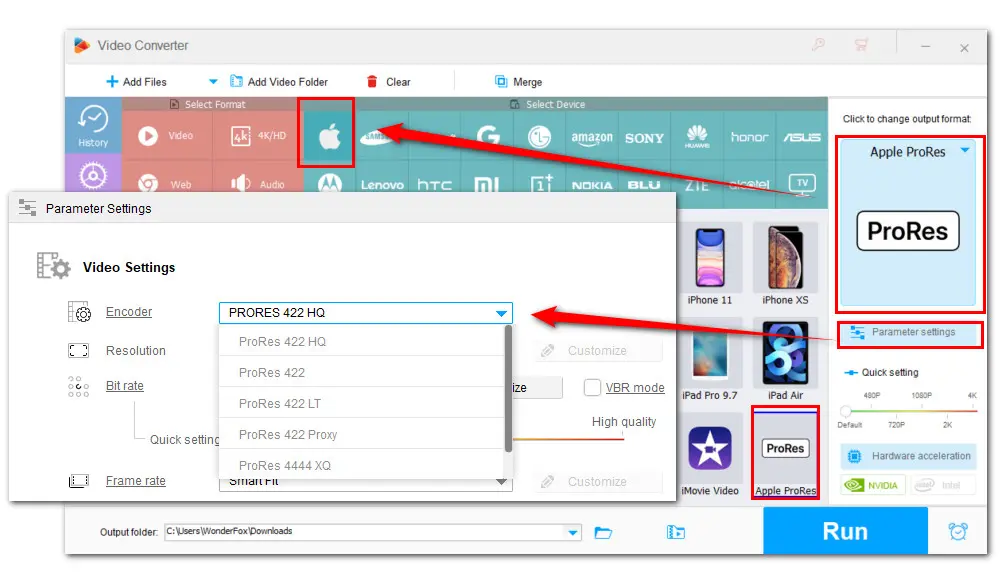
Click on the format image on the right side of the converter interface to expand the output format list. Then go to the Device section and hit the Apple icon. Next, click the ProRes profile at the right-bottom below.
This program will smart fit the codec as ProRes 422 HQ. To use a different ProRes type, navigate to the Parameter settings. In the video section, choose one from the Encoder drop-down list. Then click OK to save the changes.

Step 3. Export Video to ProRes
Click the bottom triangle button to specify an output path or leave it as default. Finally, hit Run to start the conversion.

BTW, the recommended HD Video Converter Factory Pro can also function as a simple editor. If you just want to do simple editing and prefer an all-in-one video creation process, you can give it a shot. This toolkit comes with all basic editing features like trimming, cutting, splitting, merging, rotating, adding effects, attaching subtitles, replacing audio track, and so on. More features are listed below.
That’s all about how to import AVCHD into Premiere Pro with quality preserved. With HD Video Converter Factory Pro, you can fix any incompatible format and codec issues with ease. And editing AVCHD in Premiere or any other editor is possible.
Privacy Policy | Copyright © 2009-2025 WonderFox Soft, Inc.All Rights Reserved