Instagram video blurry after uploading? Read this post to learn why Instagram lowers video quality and how to fix the issue of Instagram video quality loss.
Rezise Video for Uploading to Instagram: No Uploading Errors & High Quality
WonderFox HD Video Converter Factory Pro
"I am uploading a video on Instagram, but after uploading my video, it got blurry. What should I do?" — A question from Quora.com
Instagram is a popular media-sharing site that allows you to share videos and photos. However, sometimes after uploading the video to Instagram, you may find that the quality of the uploaded Instagram video is blurry or too bad. Why is Instagram reducing my video quality? How to fix the poor quality? Read this post to learn the possible reasons and troubleshooting methods!
Before checking the detailed troubleshooting methods, let's first know the possible reasons in the following content.
📝1. Unstable internet connection: If your internet connection is poor, then Instagram will lower the quality for smooth playback.
📝2. Data-saving mode: When using mobile data to play Instagram videos, to save your data, it will reduce the video quality.
📝3. Incorrect video settings: The video being uploaded might not be of the required standard size, thus causing the quality to be blurry.
📝4. HDR content: Instagram's compression algorithms will try to convert HDR videos to SDR but are unsuccessful, resulting in poor quality after uploading.
📝5. App version: If your Instagram application has not been updated for a long time, the old version may play your video in poor quality.
📝6. Sensitive content: Instagram has a policy to block or blur sensitive story content that violates community regulations. If your video contains any sensitive content like nudity, bullying, violence, etc., Instagram will blur it automatically.
📝7. Slow servers: If Instagram's servers are slow or down, it will blur the video.
Below are the available solutions that can help you fix the Instagram video quality problem. Keep reading for more details!
This is the first thing you should do. When your internet connection is unstable or very slow, the uploaded Instagram video may be blurry since it is not fully loaded. Also, Instagram will automatically reduce the quality for better uploading and playback.
To check the Internet connection, you can try to play videos on other sites or open other apps that require Internet connections. If the video plays stutters or the app cannot access the internet, try connecting your device to a stable WIFI or switch to mobile data.
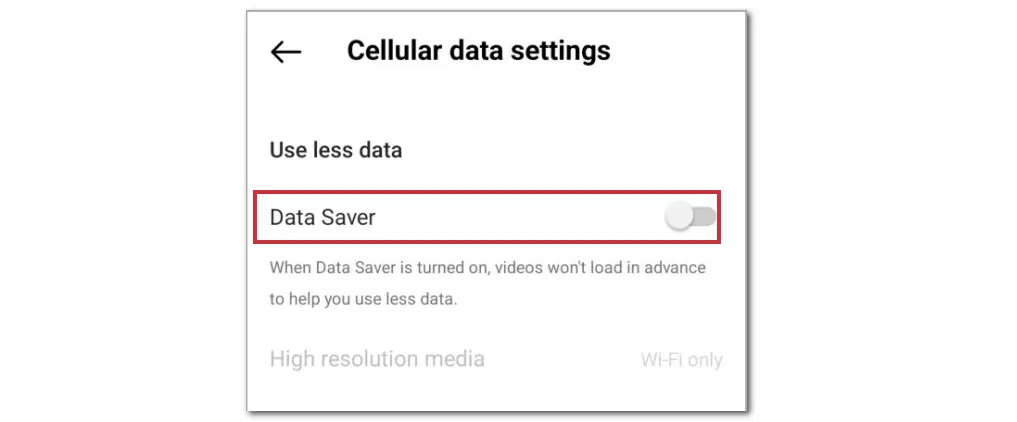
To save your data, Instagram offers a feature called Data Saver. When it’s turned on, Instagram will reduce the video quality to save data. You check if the Data Saver is enabled or not and disable it.
Here are the detailed steps:
Step 1. Firstly, launch Instagram and click on your profile icon.
Step 2. Tap the menu icon on the top-right corner.
Step 3. Select "Settings" > "Account" > "Cellular Data Use".
Step 4. If the "Data Saver" is enabled, toggle it off.
Now, check if your video is played in high quality.
If you find that the blurry videos were shot by the device's default camera app, you can try to record the video again with Instagram’s built-in camera. Instagram will keep the original quality of videos recorded by Instagram’s built-in camera.
To record with Instagram's built-in camera, press the "+" icon at the bottom and tap "Video" to start recording a video.
Though Instagram allows you to upload large videos up to 4 GB and doesn't put strict limitations on video uploading, it is recommended to upload a video with the recommended Instagram video specs. Otherwise, it will compress the video size and reduce quality if you upload a video or photo that is too large to speed up the loading process. Then, to keep your video high-quality after uploading to Instagram, you'd better use a video resizer to resize your video for Instagram.
Recommended Video Resizer:
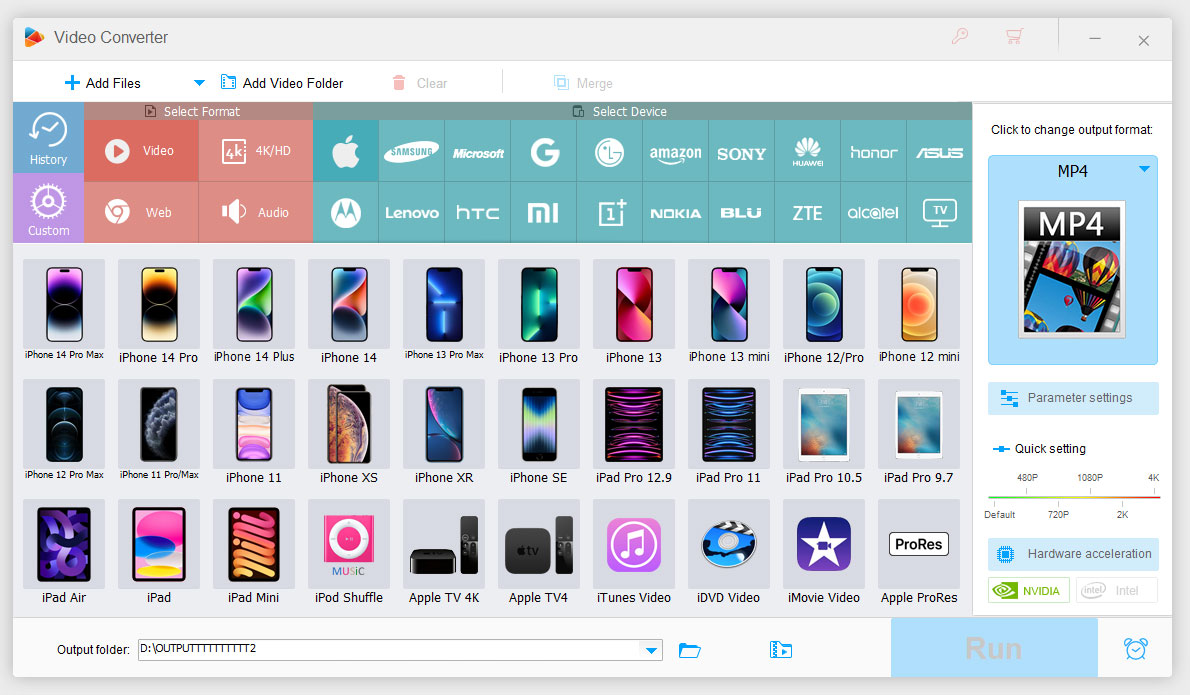
WonderFox HD Video Converter Factory Pro is a handy all-in-one video resizer that can convert, trim, crop, compress videos, and do more. It supports almost all video formats and can convert videos to Instagram, trim, crop, and edit videos without losing quality.
Featured with hardware acceleration and batch conversion, it can export multiple videos quickly at a time.

Tips: Recommendations for Instagram videos's format, size, etc.
Video format: MP4 format with H.264 video codec and AAC audio codec.
Video size: 15 MB.
Bitrate: 3500 kpbs
Frame rate: 30 fps
Video length: 3-60 seconds
Maximum width: 1080 pixels
Maximum height: 1920 pixels
Aspect ratio: 1:1, 4:5, 9:16, 16:9
Here is a simple guide for resizing videos for Instagram with HD Video Converter Factory Pro.
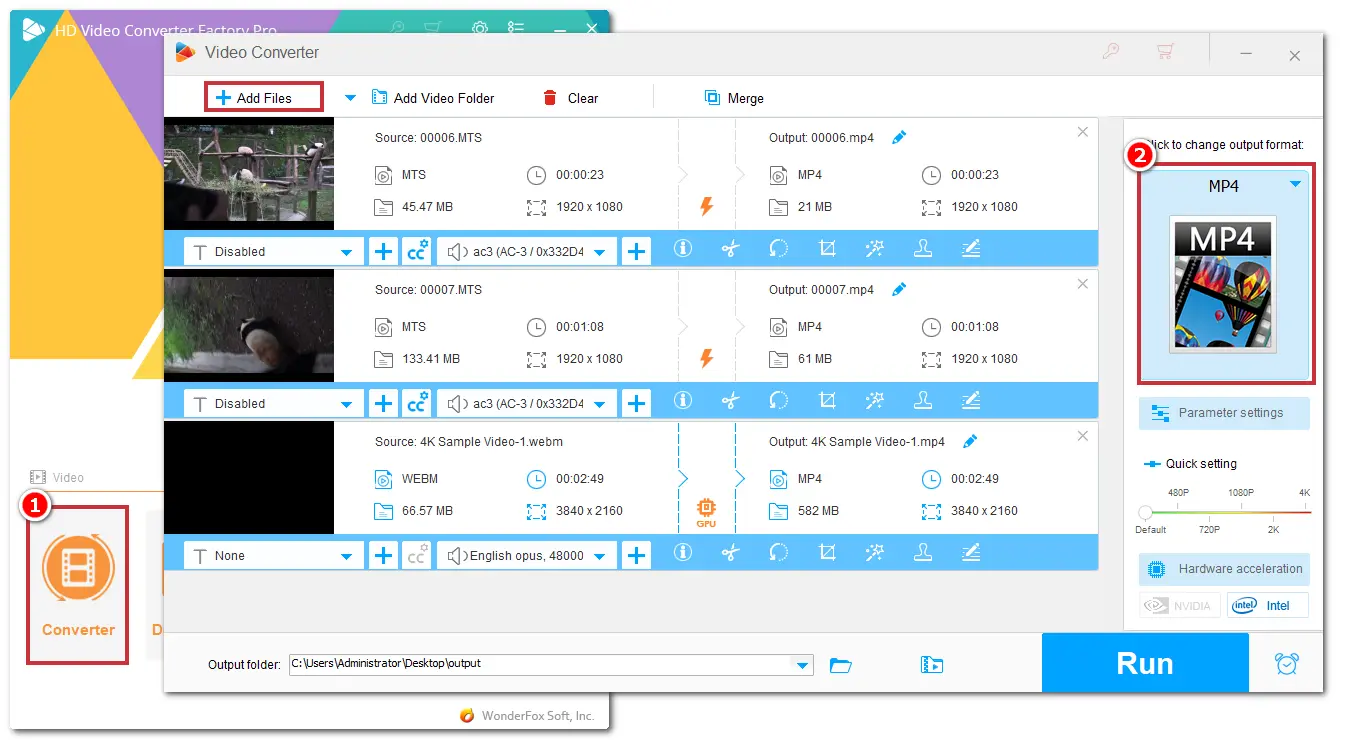
Step 1. Launch HD Video Converter Factory Pro and open the "Converter". Drag and drop the video you want to upload to Instagram to the converter.
Step 2. Press the right-side format image to choose "MP4" or "H.264" under the "Video" tab.
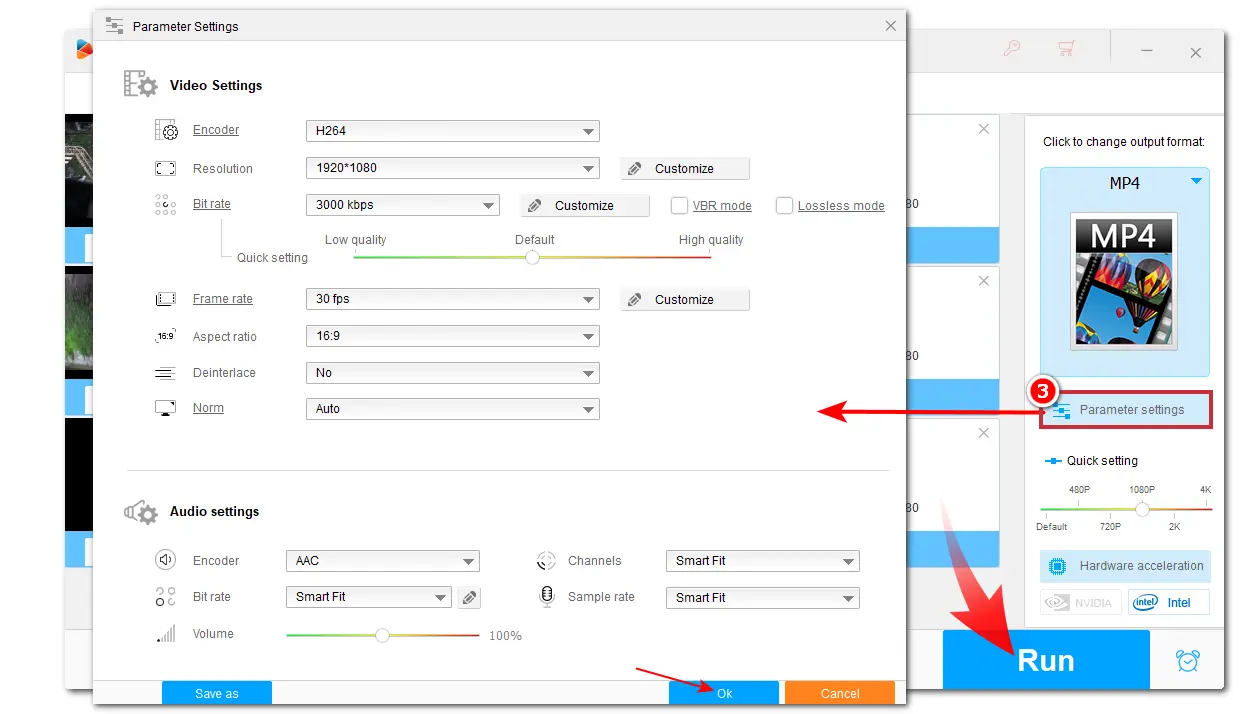
Step 3. Open the "Parameter settings" window. Then, adjust the video encoder, resolution, bitrate, frame rate, aspect ratio, and audio codec. Click "OK" to save your change.
Step 4. If needed, you can trim, crop, or do more edits to your video.
Step 5. Click the bottom ▼ button to specify an output path. Finally, hit the "Run" button to start the conversion.
If your videos are recorded in HDR format, then they may be blurry or not play after uploading to Instagram. In this case, it is recommended to record videos in SDR format or convert recorded HDR videos to SDR.
Here are the steps to adjust HDR to SDR on your iPhone.
Step 1. Open the "Settings" app on your iPhone. Scroll down to find the "Camera" option.
Step 2. Under the "Record Video" section, select "Formats."
Step 3. Then toggle off the "HDR Video" option.
Now, you can record a video in the SDR format.
If you are using an Android phone, you may find the HDR settings in Camera > Video > HDR. Just disable the HDR settings.
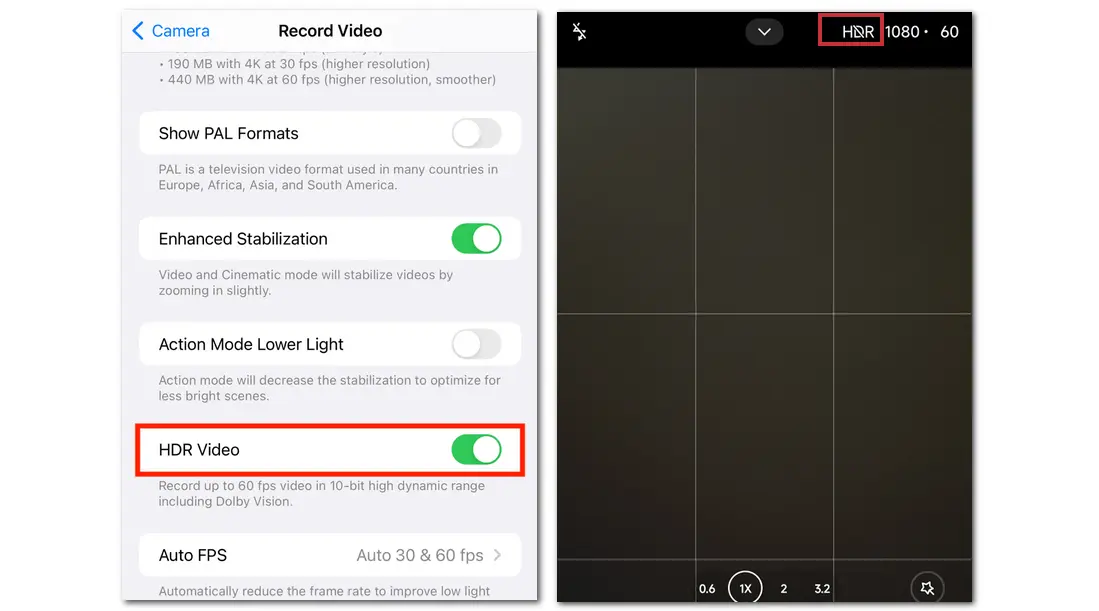
To convert the recorded HDR videos to SDR, you can also use the recommended software - WonderFox HD Video Converter Factory Pro.
When you are using the older version of Instagram, it may reduce your video quality. So, update it to enjoy the video in high quality.
To update the Instagram app, you can go to the Google Play Store or App Store to search for Instagram and click the "Update" button next to it.
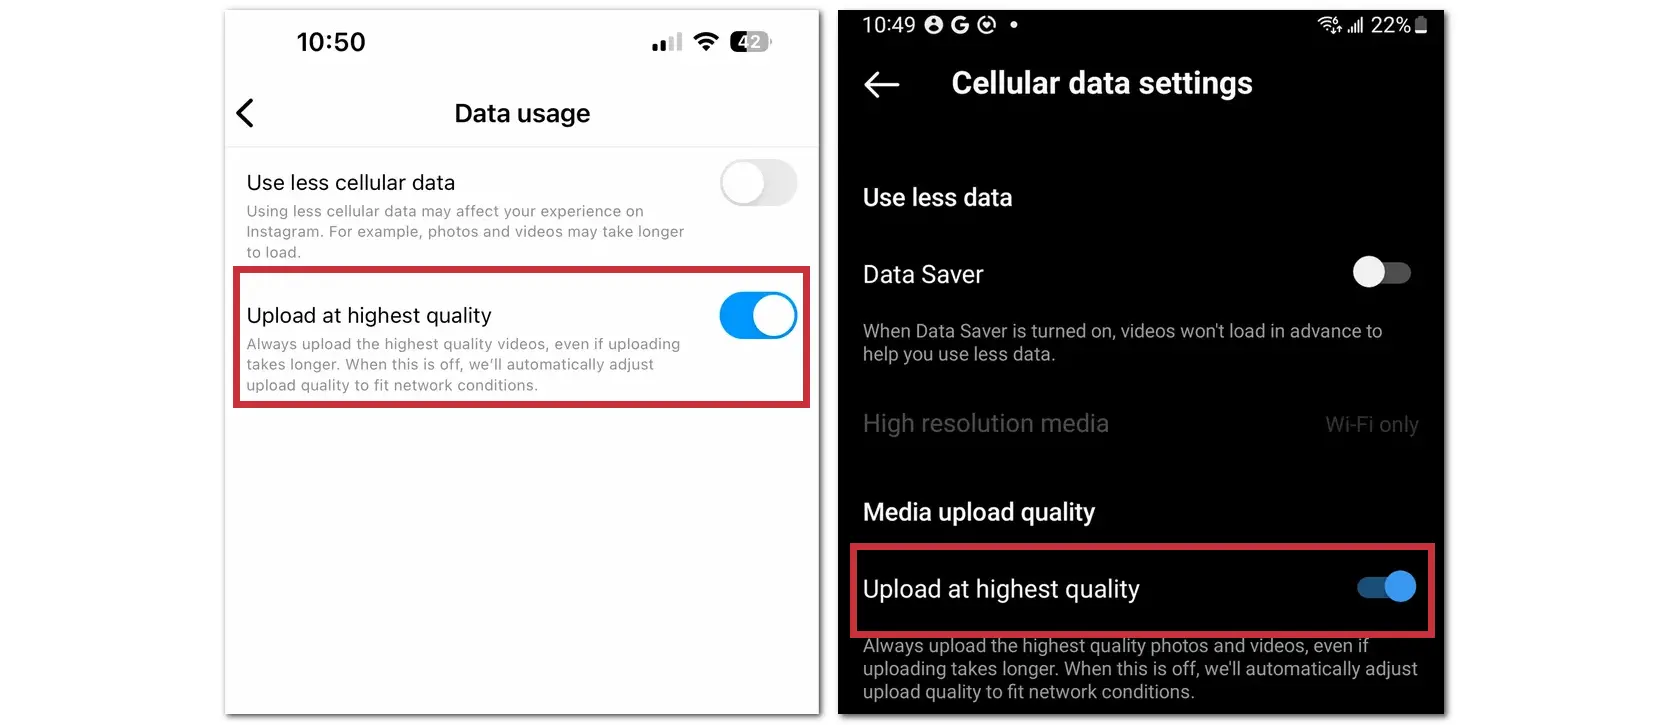
To save mobile data on your smartphone, Instagram offers an option, allowing you to view videos and posts while utilizing minimum mobile data. However, this will inevitably lower your Instagram video quality, causing it to be blurry or pixelated. To fix the issue, follow the steps below to change the setting.
Step 1. Open the Instagram app on your Android device or iPhone. Then click the profile icon at the bottom-right corner to open your Instagram profile.
Step 2. Click the three horizontal lines in the top right corner. Navigate to the "Settings and privacy" option and select "Your app and media".
Step 3. Now, click "Data usage and media quality" and enable the "Upload at highest quality" option.
Note that this will consume a lot of mobile data, especially when you are posting a long video. Moreover, if your network connection is unstable or very slow, the uploading process may take a while.
Instagram will check the video before uploading it to see if it contains any sensitive content that relates to nudity, bullying, violence, killing animals, hate speech, and harassment. If yes, it will blur the video content or even directly block the upload.
It is worth noting that other social media platforms also have similar policies to prevent sensitive content. So, you should check the video content before posting it to Instagram. Also, you can check the Instagram community regulations for more details.
When there is no issue with your network connection, Instagram settings, or video files, the blurry video may be caused by the Instagram server. The server error with Instagram will cause a slow uploading process, bad image or video quality, or other issues.
When this issue occurs, Instagram will post a notification on its official channels. Once the issue is fixed, it will notify you again.
1. Shoot video in high-quality:
To upload a video to Instagram in high quality, you first need to record the video in high quality. You can adjust the camera settings on your iPhone or Android device to record videos in the best quality.
2. Shoot or create videos with the recommended Instagram specs:
You can check the recommended video specs for uploading to Instagram, then shoot or edit the video in the recommended format, resolution, frame rate, etc.
3. Compress videos before uploading:
If your video is shot in 4K or higher quality, when uploading to Instagram, it will automatically reduce the video quality. Using a professional video compressor can help you convert 4K to 1080p while maintaining high video quality.
4. Never Upload Videos Restored from a Backup:
The clarity of videos restored from a backup is usually sacrificed, you'd better check the restored video and upload the original video if possible.
With the solutions for fixing Instagram blurry videos and tips to prevent videos from being blurry, you should be able to enjoy your Instagram videos in high quality!
By the way, WonderFox HD Video Converter Factory Pro can not only resize videos for uploading to Instagram and other media-sharing sites but also download videos from Instagram and other sites. Give it a try now!
WonderFox
HD Video Converter Factory Pro
Terms and Conditions | Privacy Policy | License Agreement | Copyright @ 2009-2025 WonderFox Soft, Inc. All Rights Reserved.