Read this post, and you will learn the complete guide on how to convert audio files in Audacity. If Audacity is a little bit complicated for you, this post also recommends other file converters to convert multiple video/audio files more easily.
Best Batch Video/Audio Converter: HD Video Converter Factory Pro
Audacity is a popular open-source audio editing and recording application that also supports conversion between audio formats. If you have installed Audacity on your computer and are looking for a tutorial on converting audio files in Audacity, this post is for you. In the following content, I will show you how to use Audacity as an audio converter to convert audio files with a step-by-step guide. Just keep reading!
The audio conversion steps in Audacity are simple and only require a few clicks.
Step 1. Launch Audacity.
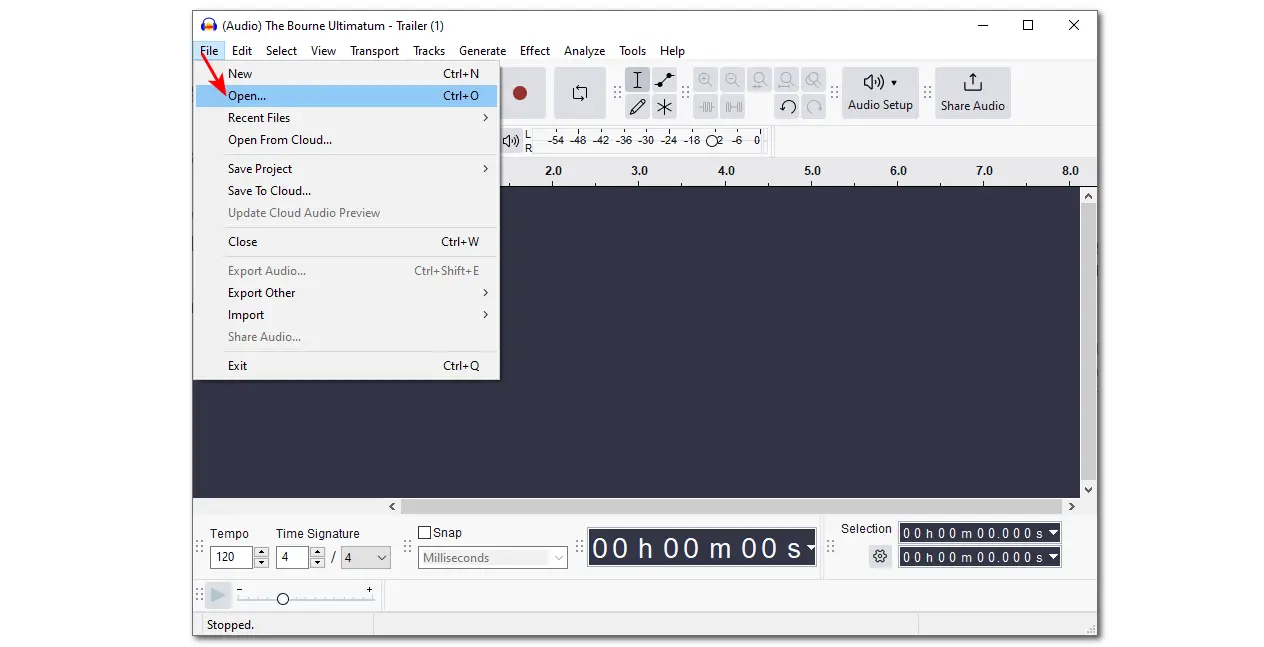
Step 2. Click "File" > "Open" to select the audio file you want to convert, and click "Open" to add the audio to Audacity.
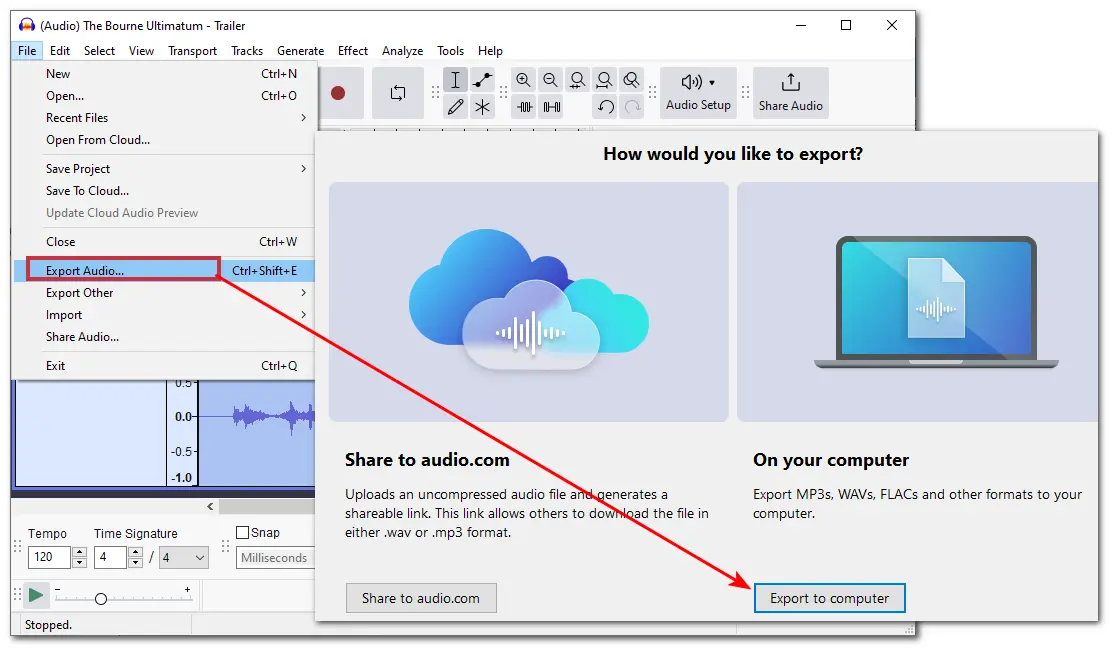
Step 3. Click "File" > "Export Audio" > "Export to computer".
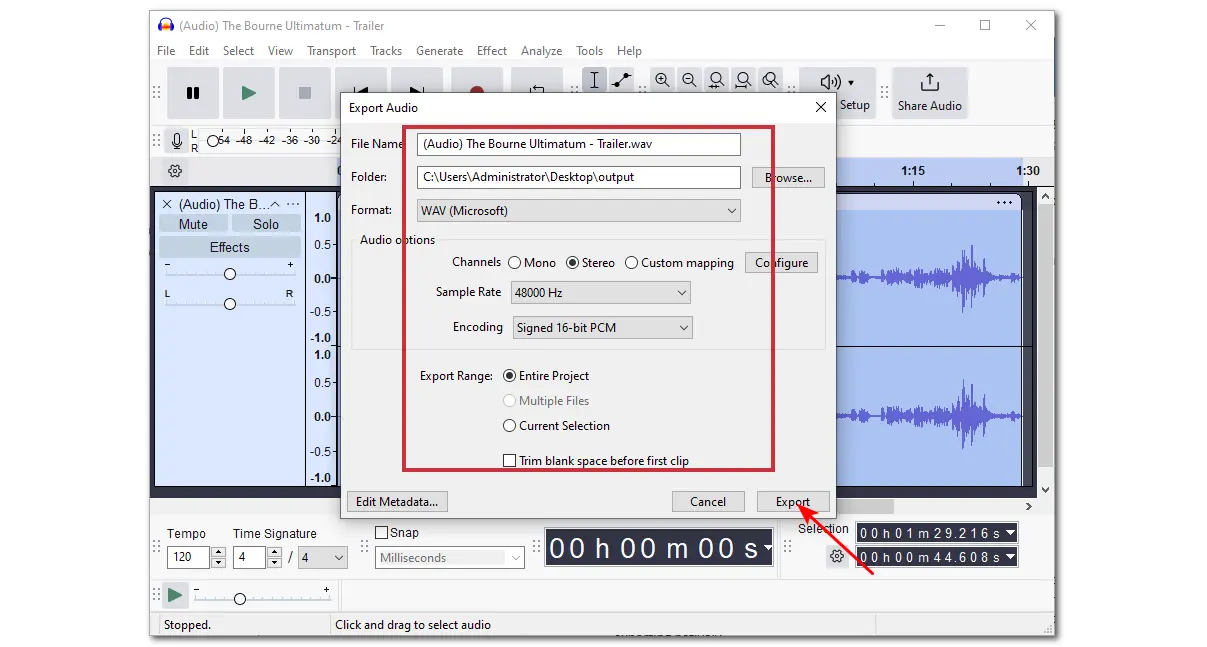
Step 4. Adjust the output file name, folder, format, etc. settings.
Step 5. Click "Export" to start the exporting process.
During the conversion, you may encounter format incompatibility issues, causing you to fail to import your audio files or not find the target output format. Actually, from the Audacity support page, we can learn that Audacity only supports the following audio formats for importing and exporting natively.
No worries! Audacity allows you to install the FFmpeg library to get support in more formats.
Note: In the previous version of Audacity, you need to install the LAME library for MP3 export. But now, the LAME library is built into Audacity on Windows and Mac. So, make sure to upgrade your Audacity to the latest version to avoid wasting time and energy to install the LAME library.
With the FFmpeg library installed, you can add and export more audio formats like AC3, M4A, WMA, and the audio from MP4, etc.
Step 1. Open your browser and visit https://lame.buanzo.org/ffmpeg.php.
Step 2. Scroll down to the FFmpeg Installer for Audacity section. Here, you will see 3 download options. Click one to download the FFmpeg installer. (For most PCs, the 64-bit is the correct version. You can check your Windows version from "Settings" > "System" > "Device Specifications" > "System type".)
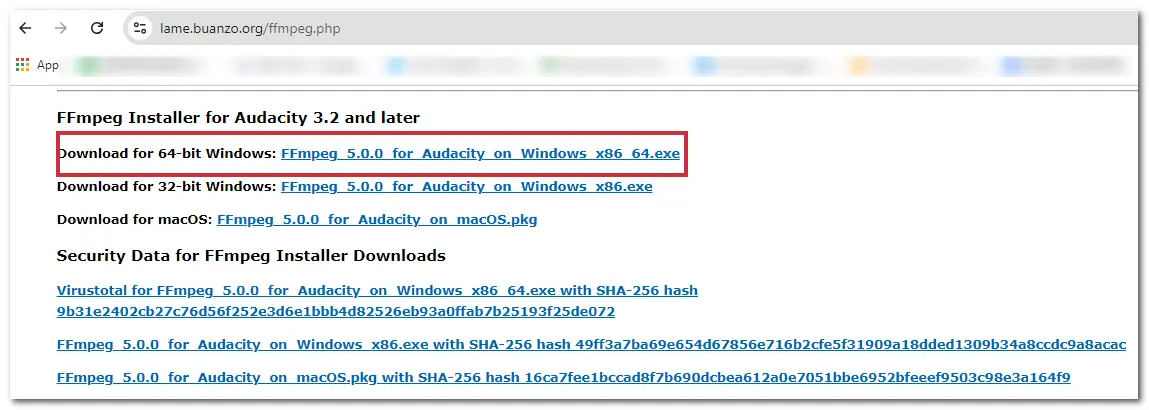
Step 3. Click to open the downloaded FFmpeg file, accept the agreement, and keep the default save path. Click "Next" > "Install" to complete the installation.
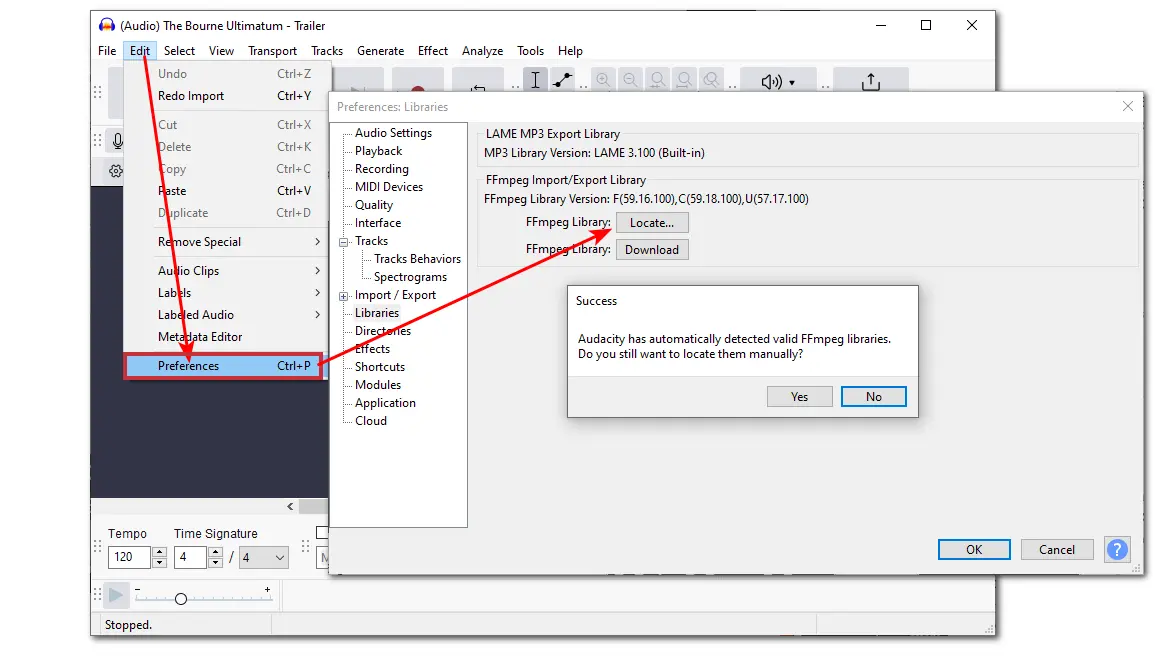
Step 4. Launch the Audacity app. Go to "Edit" > "Preferences" > "Libraries" and click "Locate" beside the "FFmpeg Library" option. If it shows you that Audacity has detected the valid FFmpeg libraries, you can click "No"; otherwise, you should click "Yes" to locate the FFmpeg library manually. Click "OK" to save the change.
Specific Guides: Audacity convert MP4 to MP3 | Audacity Convert M4A to WAV | Convert Audacity Files to MP3
Tips. You can find more information and other FFmpeg builds at https://support.audacityteam.org/basics/installing-ffmpeg.
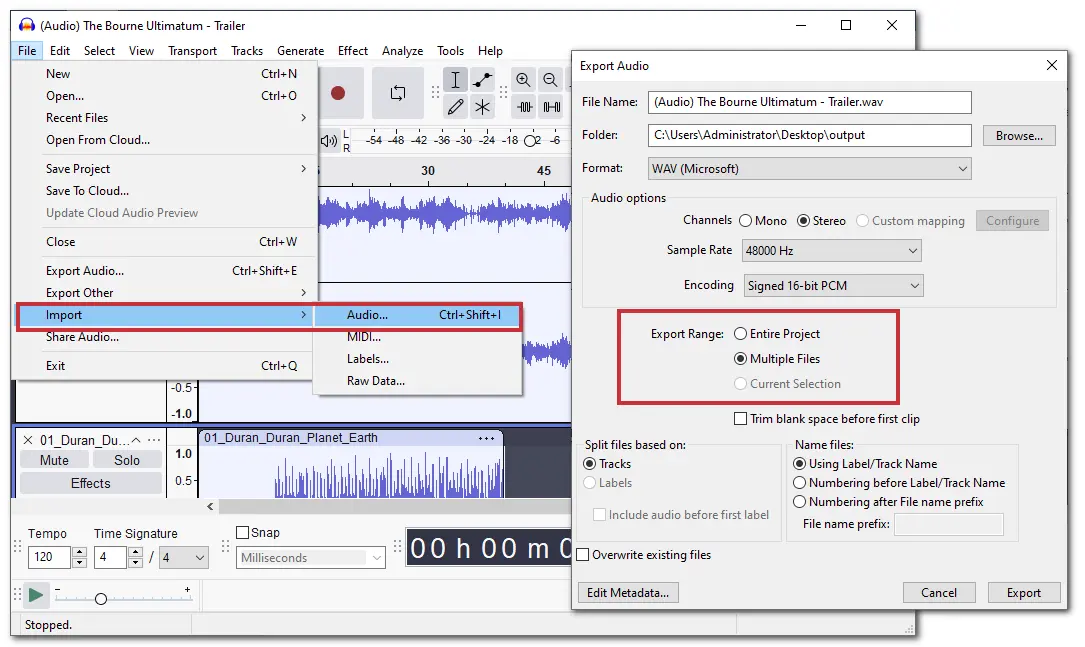
If you need to convert multiple audio files in Audacity, you can click "File" > "Import" > "Audio..." to import your audio files to Audacity as separate tracks. When exporting, remember to select the "Multiple Files" option under the "Export Range" tab for converting to multiple files, instead of an entire project.
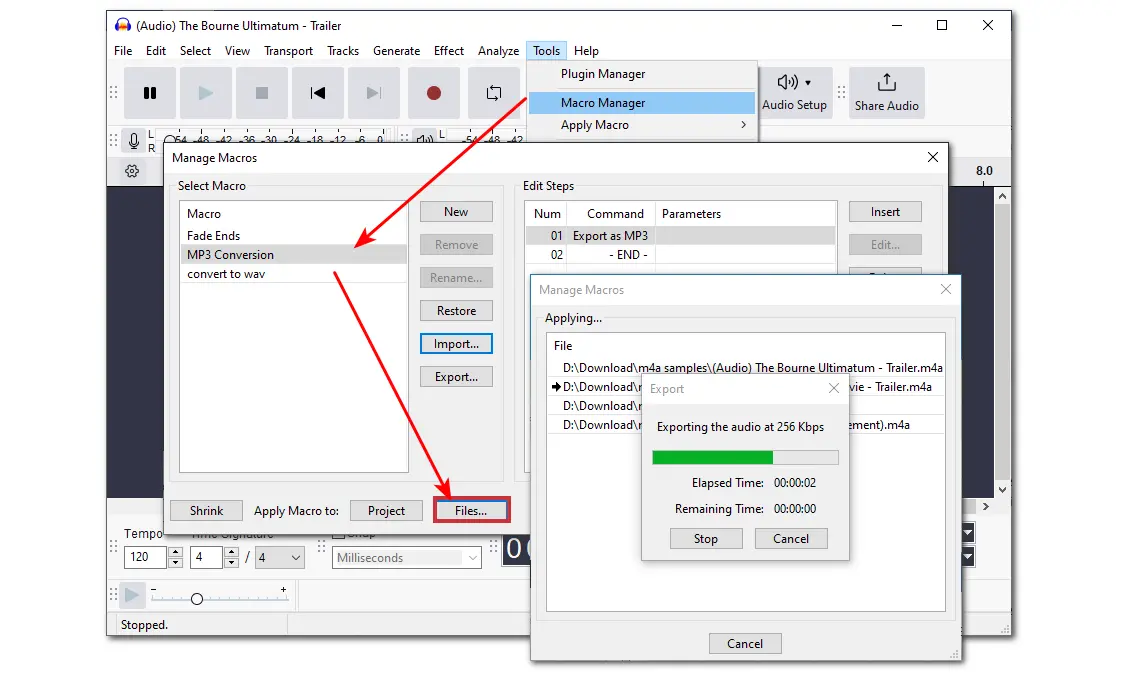
Additionally, Audacity also offers the macro feature that allows you to add or use ready-made conversion macros to batch convert audio files to MP3, WAV, and more formats. The following are the detailed steps.
Step 1. Open Audacity and click "Tools" > "Macro Manager" from the top menu bar.
Step 2. To convert multiple audio files to MP3 in Audacity, select "MP3 Conversion" and choose "Apply Macro to: Files...". Then select all the audio files in a folder you want to convert and click "Open".
Then, it will automatically start the conversions one by one.
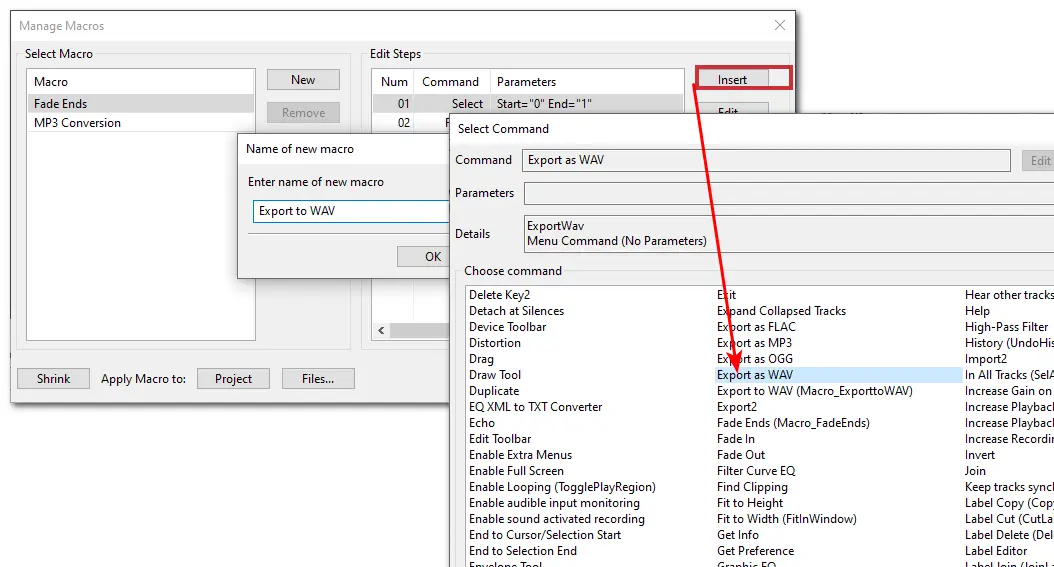
If you want to convert audio files to other formats, click "New" to create a new macro. Then, select the created macro and click "Insert", find "Export as [target format]", and click "OK".
Save the changes and click "Files" to add your files and for batch conversion.
Tips. The converted files will be saved to the “macro-output” folder in C:\Users\[your username]\Documents\Audacity on Windows and /Users/[your username]/Documents on Mac.
Is it complicated to install the FFmpeg library for Audacity? Or not satisfied with the Audacity batch conversion workflow and speed?
We also offer two Audacity alternative programs that can convert audio files more easily and quickly on Windows and Mac.
WonderFox HD Video Converter Factory Pro is a professional video/audio conversion tool that supports converting various video/audio files to 600+ presets. Its batch conversion mode allows you to convert multiple files simultaneously and quickly. With it, you can quickly convert video/audio files to MP3, WAV, AAC, M4A, FLAC, ALAC, OGG, AIFF, and more audio formats without installing any plug-ins.
It also offers many additional features, like file compression, editing, screen recording, downloading, etc.
The simple conversion steps are:
Step 1. Download, install, and launch WonderFox HD Video Converter Factory Pro on your computer.
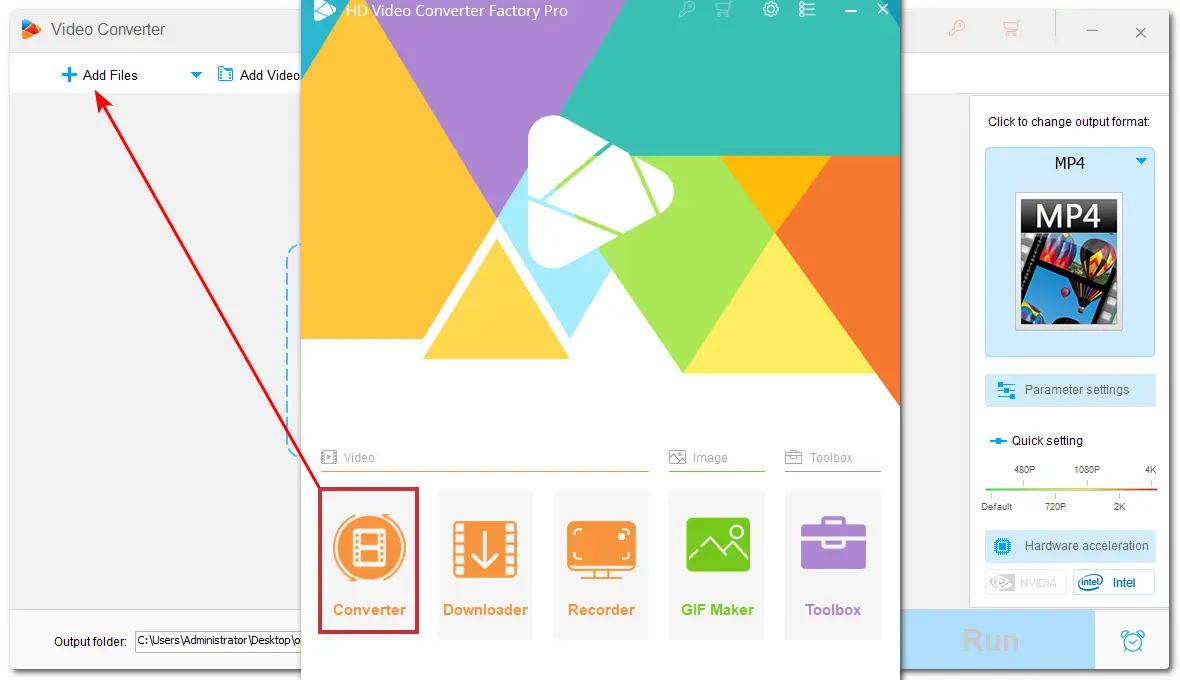
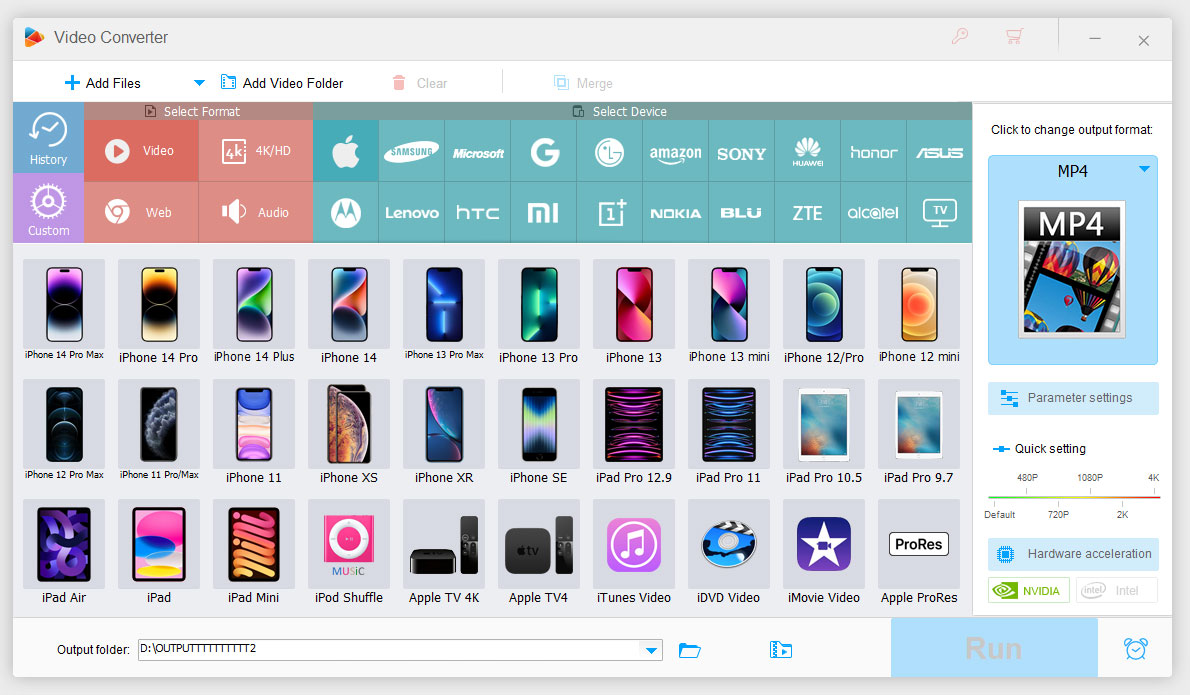
Step 2. Open the "Converter" module and click "Add Files" to import the files you want to convert.
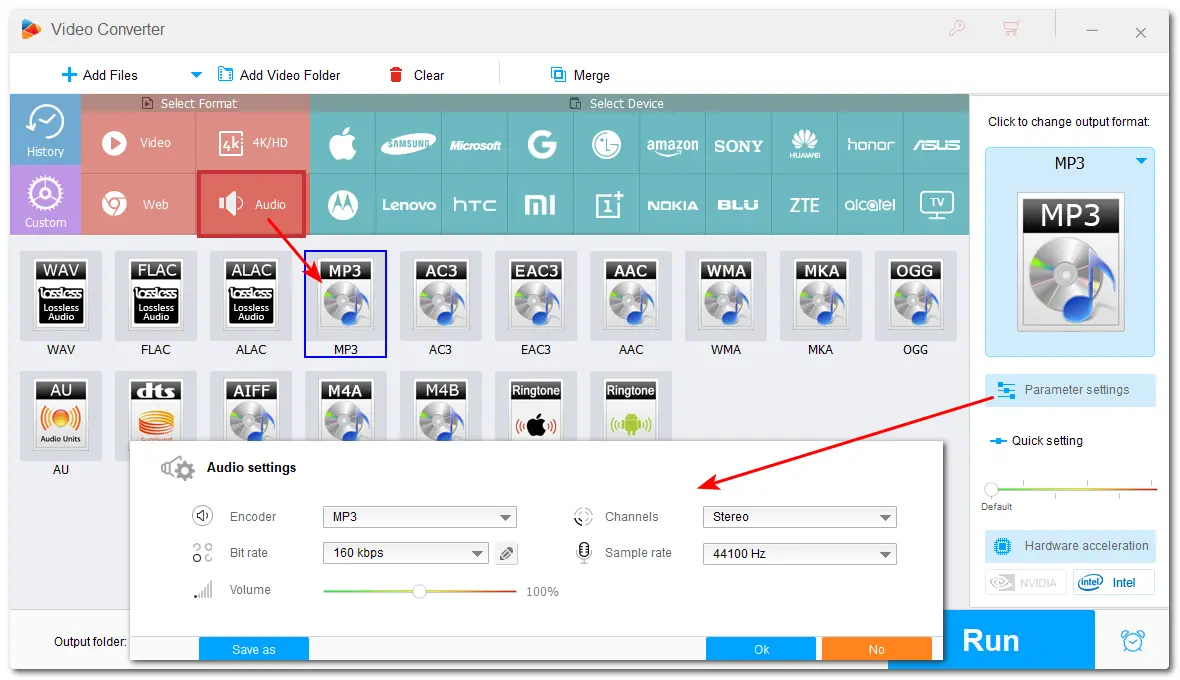
Step 3. Click the right-side format image to open the output format list. Go to the "Audio" tab to select a desired output audio format.
Step 4 (Optional). Open the "Parameter settings" window to modify the audio bitrate, channel, and other settings.
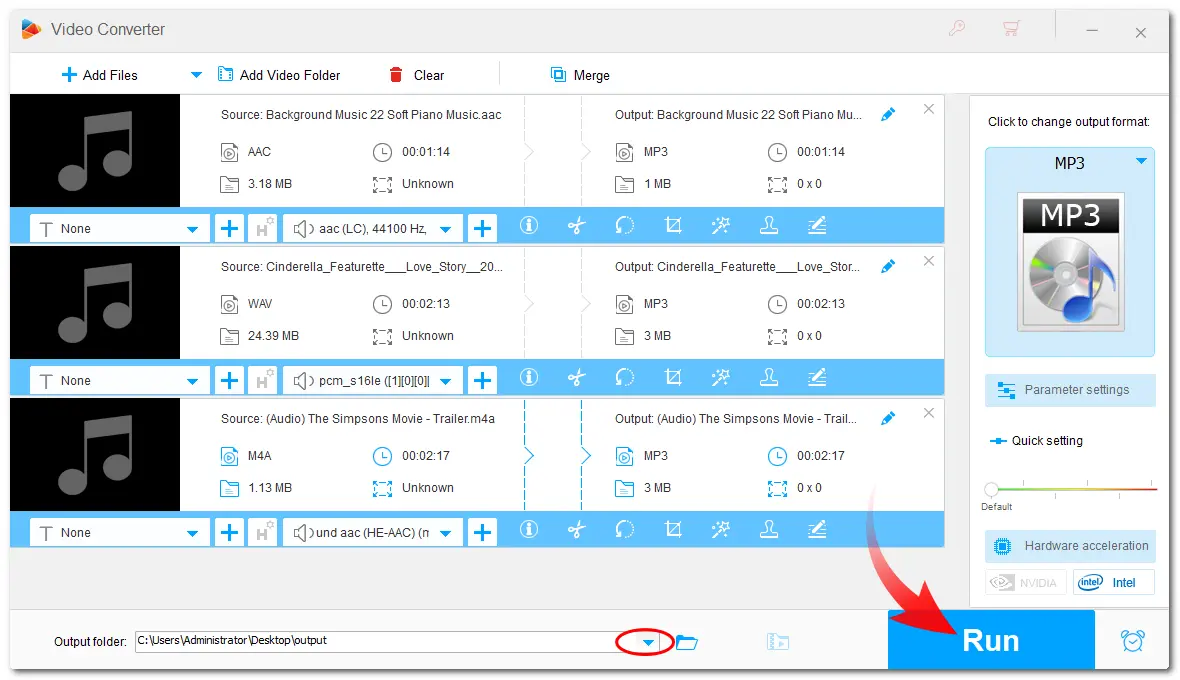
Step 5. Specify an output path at the bottom of the interface. Click "Run" to start the conversion.
For Mac users who want to convert audio files more easily, try the Music app. It's the replacement for iTunes, which can store, play, and convert audio files on a Mac. With it, you can import and convert an audio file to AAC, AIFF, Apple Lossless, MP3, and WAV formats. This app is pre-installed on your Mac computer so that you can start conversion instantly and directly.
Check the conversion steps below:
Step 1. Open the Music app on your Mac.
Step 2. Go to "Music" > "Preferences" and click "Files".
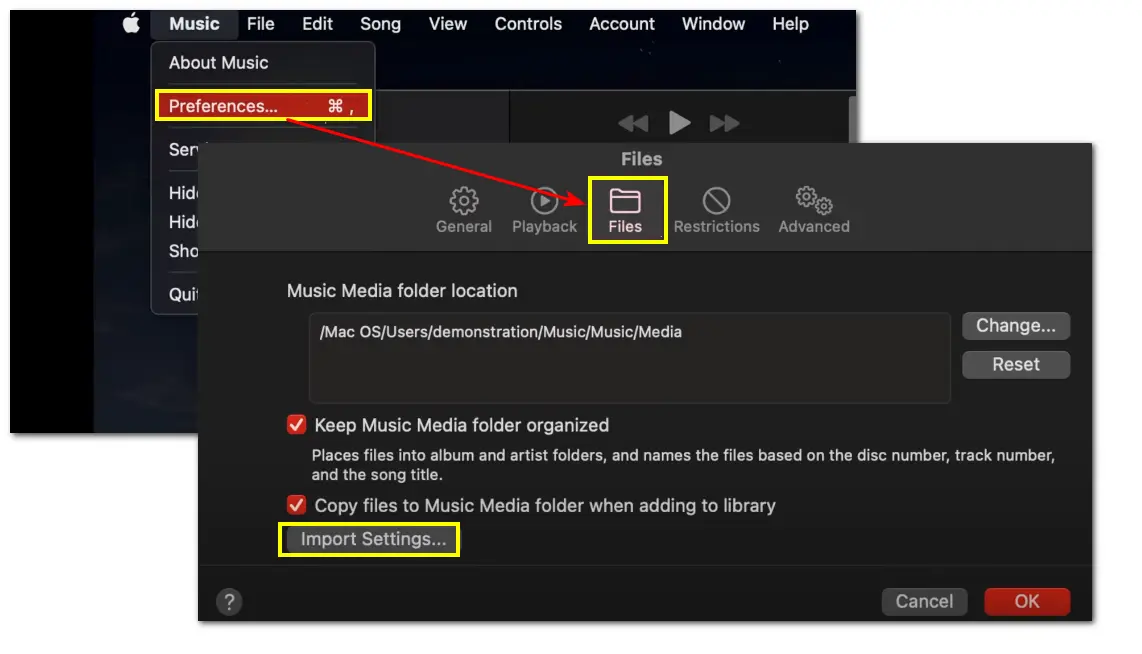
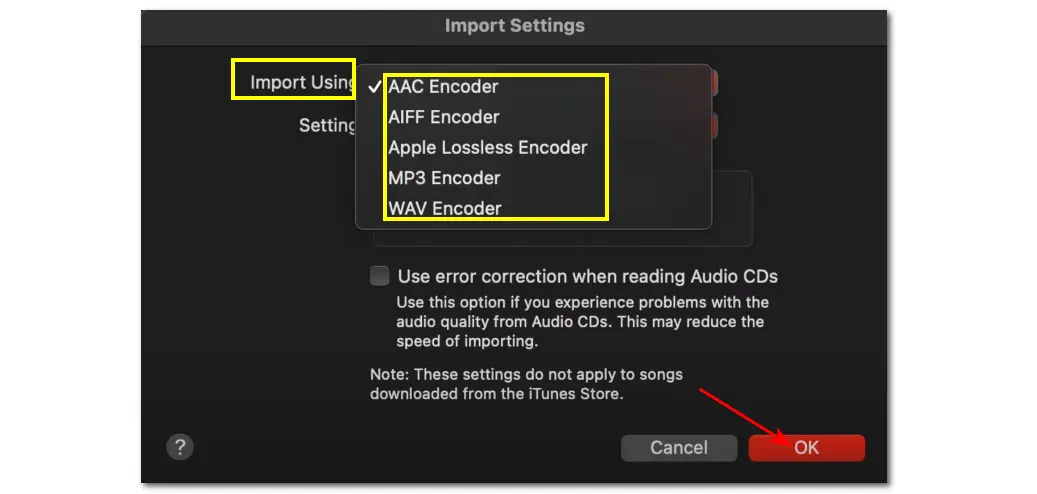
Step 3. Choose "Import Settings". Select the format you want to convert your audio files to from the "Import Using" drop-down menu and adjust the setting. Then click "OK" to save the change.
Step 4. Now, select one or more songs in the library. Click "File" > "Convert" > "Create [target format] Version".
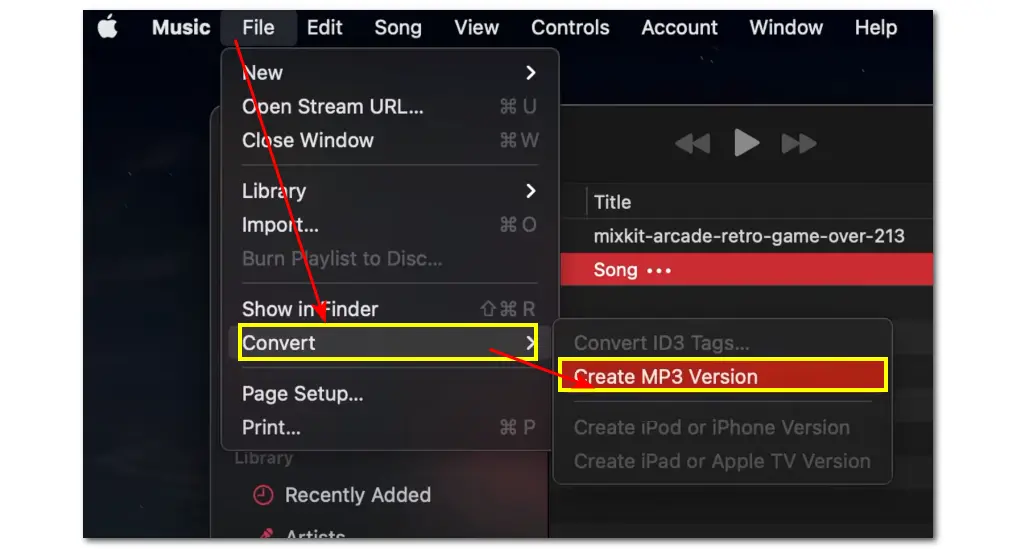
After the conversion, the converted file will be placed under the original file. If you cannot identify the converted and original files, you can drag the files to the desktop to see the file extension.
That's all we want to share with you about how to convert audio files in Audacity. After reading this post, you should be able to convert one or more audio files in Audacity without issue. Additionally, the recommended tools can help you convert audio files more efficiently if you find Audacity is too complex for you.
Thanks for your reading. Have a nice day!
A: Yes. You can use Audacity to convert audio files between supported formats. If you want more format support, you can install the FFmpeg library.
A: No. Audacity is designed to process audio files only. It only provides output audio formats like MP3, WAV, OGG, FLAC, etc. If you want to convert files to MP4, you can give WonderFox HD Video Converter Factory Pro a try. It supports conversion among almost all video and audio files and offers 600+ output presets.
A: Though Audacity can extract the audio part from a video to convert video to audio, it cannot import the audio from a video by itself. To convert video to audio in Audacity, you need to install the FFmpeg library. Then it can import audio from MP4 and more video files for audio editing and conversion.
WonderFox
HD Video Converter Factory Pro
Terms and Conditions | Privacy Policy | License Agreement | Copyright © 2009-2025 WonderFox Soft, Inc. All Rights Reserved.