Since you have downloaded songs on your computer, it’s time to transfer them to your USB drive.
On Windows:
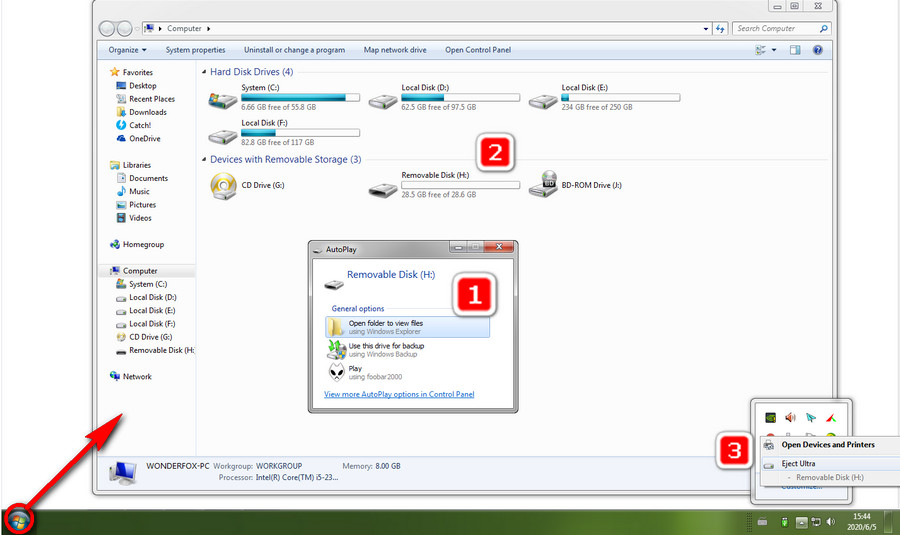
Step 1. Insert the USB drive into one of the USB ports on your computer.
Step 2. If you have connected the USB drive with your computer properly, it will prompt that a USB drive is inserted and an auto-play dialog pops up. Select “Open folder to view files” and open the USB drive. Or you can click on “This PC” or “Computer” on your desktop, then all the drives connecting to your computer will be displayed. Click and open the USB drive folder.
Step 3. Head to the folder containing your downloaded music files. If you have used WonderFox Free HD Video Converter Factory to download online music and doesn’t change the output destination, the default path should be C:\Users\Documents\WonderFox Soft\HD Video Converter Factory\Download. Copy all the music files you want to put into the USB drive.
Step 4. Switch to the USB drive folder, right click, select Paste or press Ctrl+ V to transfer the files.
Step 5. It may take a while before the transfer process. When it ends, right click the USB icon on the System Tray and select Eject.
On Mac:
Similarly, you can put music on a USB drive as follows:
Step 1. Connect your USB drive with your Mac.
Step 2. Open Finder, click the USB drive’s name and the USB drive window will be opened.
Step 3. Open the folder saving music files, click and drag the files into the USB drive window.
Step 4. When the transfer is complete, click on the drive icon on the desktop and select “Eject”.


 How to & Tips
 Convert Video
