
Sometimes, when uploading or sharing videos online, you may get a failure message because the videos are too long or too large to exceed the upload (sharing) requirements. Then you need to resize the video to meet the platform requirements. So this post is here to explain how to resize videos with HandBrake, an open-source video transcoder that can easily resize your videos.
Preparation: Download or update HandBrake to the newest version from its official site: https://handbrake.fr/. Then launch it and click the “Folder” or “File” button to import a video folder or a single video file.
HandBrake offers you two ways to resize video. The Preset allows you to quickly select a pre-designed option and you can also choose to resize the video manually.

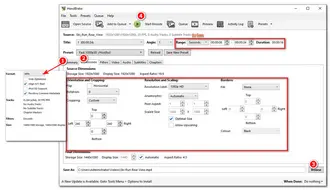
Step 1. Select a preset from the drop-down list. It offers a wide array of presets including web, devices, Matroska, etc.
Step 2. Click “Browse” to specify an output folder for the resized video and rename the file.
Step 3. Press the green “Start Encode” button at the top of the interface to initiate the resizing and exporting process.


By choosing a HandBrake preset, you can resize the video resolution and size quickly. If the preset drop-down list cannot resize videos to your desired one, you can go to option 2 to resize video manually.
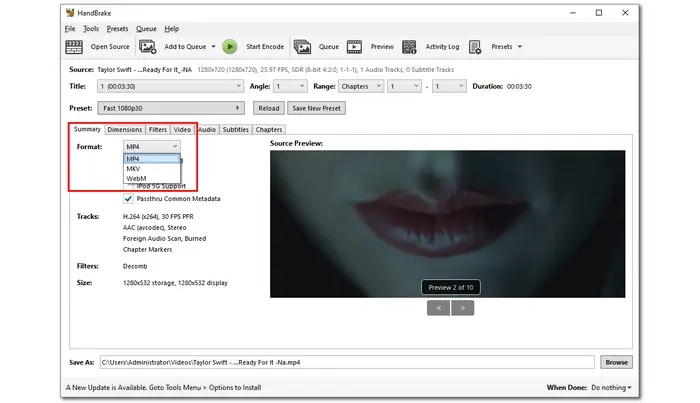
Step 1. Select an output format from the “Summary” > “Format” drop-down list. (MP4, MKV, and WebM).
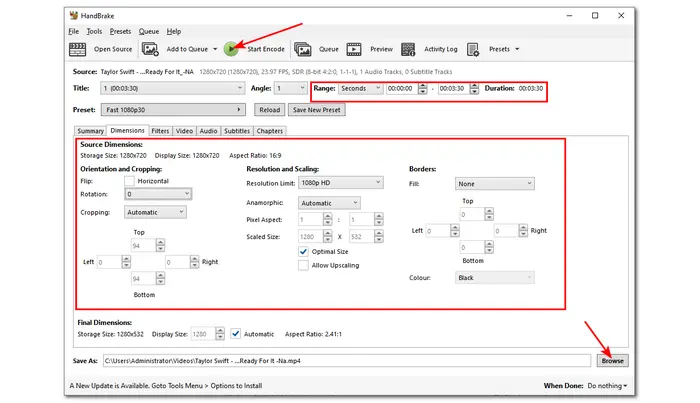
Step 2. Click on the “Dimensions” tab, and it will show you the window to crop, rotate, and change the video resolution. Just select what you want to resize and modify the related values.
For example, to crop videos, you just need to find the “Cropping” tab and select “Custom” from the drop-down list. Then adjust the Top, Left, Right, and Bottom values. You can also modify the resolution.
If you want to trim the video, you can select “Seconds” from the “Range” drop-down list and enter the start and end times.
Step 3. Press the “Browse” button to select an output folder and rename the final file.
Step 4. Hit “Start Encode” at the top of the interface and wait for the exporting process.
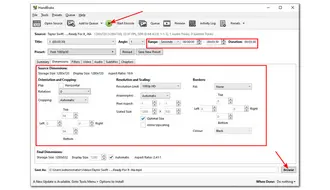
When using HandBrake to resize video, you may find that it does not allow you to view the after-resizing effect in real-time. Moreover, some problems may occur with the files you resized in HandBrake. And it will lose the quality during the process. Hence, if you want to resize the video more easily with high-quality preserved, follow the next part to resize the video in an easier way.
WonderFox Free HD Video Converter Factory, one of the best alternatives to HandBrake, offers the most effective and straightforward way to resize videos. With a well-designed interface, it allows beginners to quickly handle the resizing process. Moreover, it allows you to change the video format among all popular profiles. Whether to crop, compress, trim the video, or do other resizing processes, Free HD Video Converter can easily complete them.
DownloadDownload this application and resize videos with the given tutorial below now!
Launch WonderFox Free HD Video Converter Factory and enter its “Converter” module. Click “+ Add File” button to import the video you want to resize.


Press the format image on the right side of the interface to expand the output format library. Choose a preferred format under the “Video” tab. If you don’t know which format to choose, converting video to MP4 is always the best solution.


If you want to resize the video length and aspect ratio, you can press the scissor-shaped icon or the crop icon on the toolbar below the video conversion list to trim and crop the video.
You can also open the “Parameter settings” window to reduce the video file size by modifying the video codec, bitrate, resolution, and frame rate.


Press the inverted triangle button at the bottom of the interface to set an output folder. Finally, hit “Run” to start exporting the resized videos.


Terms and Conditions | Privacy Policy | License Agreement | Copyright © 2009-2025 WonderFox Soft, Inc.All Rights Reserved