
WebM is an open, royalty-free, media file format designed for the browser or the internet. This format is commonly found on HTML5 sites like YouTube. But it is not supported by many players. In case you want to play your downloaded .webm file on a PC or phone, you’d better convert it to a universally adopted format, such as MP4.
FFmpeg is a powerful multimedia framework that can help convert videos between different formats through commands. In this article, we will discuss how to make FFmpeg convert WebM to MP4 and also provide a bonus tip for an easier yet equally efficient conversion with WonderFox Free HD Video Converter Factory.
FFmpeg is a free command line tool available for Windows, Linux, and Mac. It can be used to make fast audio and video conversions with high quality preserved. Enter the command line to process the format conversion. It seems easy to do but many fail as they often input the wrong command. Don’t worry! To help you convert WebM to MP4 with FFmpeg successfully, we have prepared a guide for you. Follow the steps here:
Step 1. Let’s assume that you have installed FFmpeg on your Windows PC. If not, get the latest FFmpeg here.
Step 2. Press Windows key + R and enter “CMD” in the search box. Hit OK to bring up the Command Prompt.


Step 3. Now, in the CMD window, type the “cd” command to specify the directories for the source .webm file. Simply enter cd, a space, paste the directory name, then press the Enter key. Here is how it looks:
cd “Paste the directory’s name here”
Check the image below:


🔔 Pro-tips: There is a quicker way to open up the CMD window and start the conversion, without using the cd command. Take the steps as follows:
Open the location of your desired .webm file. Then, change the full file path to CMD and press Enter to open the command line tool.
As shown in the picture:
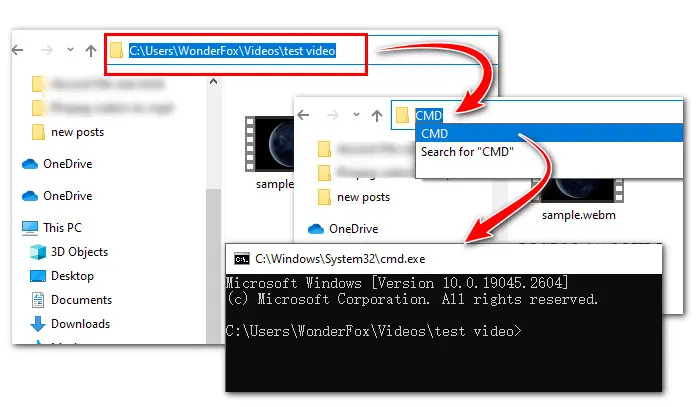
Step 3. Then press Enter. Now, you’re ready to start the conversion. Run this command line to let FFmpeg convert WebM to MP4:
ffmpeg -i file’name.webm file’name.mp4
If you have specific requirements on the export video parameters, such as outputting MP4 with H.264 and MP3 codec, etc. You can use this command (change the value for your actual needs):
ffmpeg -i sample.webm -c:v libx264 -b:v 5000k -vf "scale=1920:1080,fps=24" -c:a libmp3lame output.mp4
This will generate an MP4 with the H.264 video codec and the MP3 audio codec, at a resolution of 1080p, a bitrate of 5000kbps, and a framerate of 24fps.
Here is how it looks in an actual process:
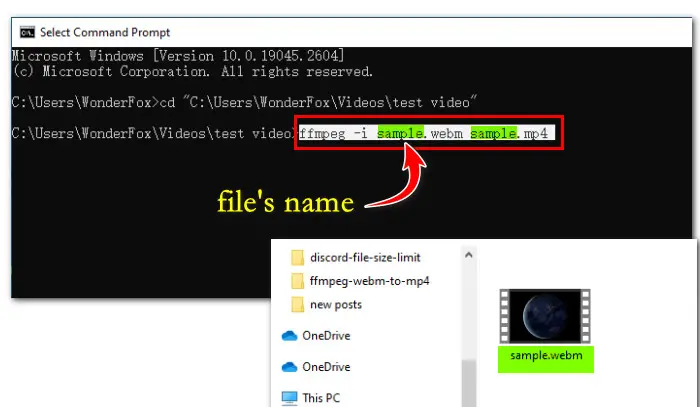

Now, press Enter key to activate the conversion process. Bingo! You get the MP4 video in the same directory as the original one (as shown in the picture).


📍 📍 By using different commands, you can use FFmpeg to extract the audio from the WebM video, reduce its file size, cut it into clips, or modify its resolution.
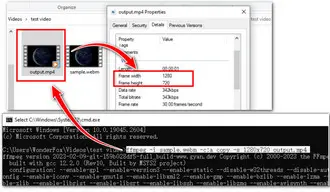
Here is the command line for downscaling its resolution when converted to MP4.
ffmpeg -i sample.webm -c:a copy -s 1280x720 output.mp4
Run it and you will quickly get a 720p MP4 video file.

If you are daunted by its confusing command language and are looking for a simpler FFmpeg alternative to make format conversion, then look no further than WonderFox Free HD Video Converter Factory. This Windows-based video converter supports a wide range of video and audio files and can convert a WebM file to MP4, AVI, MKV, and other 500+ formats with no fuss. Moreover, it provides advanced settings to let you modify its parameters to control the output quality and size. You can also use it to download videos from YouTube, Vimeo, TikTok, and 500+ hot video-sharing sites.
Step 1. Free downloadFree download the reliable video converter to your PC first.
Then open it and enter the Converter module. Press Add Files button to import the source WebM file into the converter. Also, you can drag the video into the conversion list directly.


Step 2. On the right side of the converter, hit on the format image to open the output format list. Head to the Video category and choose the MP4 profile below.

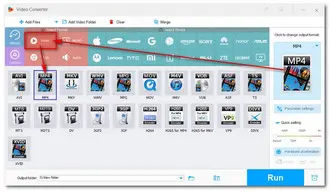
Optional: In the Parameter settings, you can modify the video output settings, including the codec, resolution, bitrate, frame rate, volume, and more.
Also, you can just leave it by default. The Smart-Fit offers the optimal output settings for you.


Step 4. Click the triangle button at the bottom of the program to choose an output folder. Finally, click Run to start conversion immediately.


FFmpeg is an amazing program for audio and video transcoding tasks. But it is not beginner-friendly and has a deep learning curve. Hence, it’s strongly suggested that you use the recommended WonderFox Free HD Video Converter Factory. Thanks to its intuitive interface and glanceable workflow, users at all levels can master it in no time. GETGET the free & professional video converter here to make a/v conversions in clicks.
Terms and Conditions | Privacy Policy | License Agreement | Copyright © 2009-2025 WonderFox Soft, Inc.All Rights Reserved