![]() by Jane
by Jane
Updated on Sep 22, 2023
Have you thought about creating your unique videos? Windows movie maker could do you a favor to embellish the ungroomed original videos or photos into a gorgeous one. Follow this article and you will get the access to how to edit videos on Windows Movie Maker.
Can't import video into Windows Movie Maker, try this video converter to change video formats. It also features a video editing toolkit to be a Windows Movie Maker alternative!
Windows Movie Maker, developed by Windows Live, is a piece of movie editing software that enables you to create, edit, and share family movies, and also allows you to add music, narration, special effects, etc. Thanks to its easy operation and functional characteristics, it is popular among moviemakers, especially the novices. In the following article, you will learn how to use Windows Movie Maker editing videos in details.
Before we start the process of editing tutorial, please download and install Windows Movie Maker for video editing. However, as we know, it was officially discontinued since January 10th, 2017. Therefore, here comes the question where shall we get to download it? Don’t worry, you can find the best answer in Windows Movie Maker for windows 10 or select the Windows Movie Maker alternatives.

After downloading and launching the video editor Windows Movie Maker, click the related icon at the upper left corner or click any point in the box on the right side to choose your video or photo files from the folder to add them to the software as marked in the screenshot.
(Tips: Speaking of uploading import files, Windows Movie Maker allows you to capture your videos or photos from computers or smartphones, DVDs, camcorders and even other portable equipment.)
Regarding the video editing features of Windows Movie Maker, I would pick up some keystones to elaborate.

Part1: Split or Trim Videos
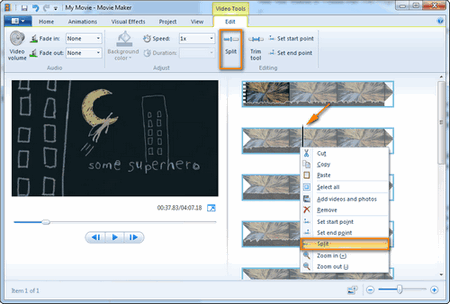
Split into Different Part Ones: After adding the video file, you can drag the vertical bar on the storyboard to the point where you want to make a cut, then right-click and choose “Split” tab or press the same bottom in the menu bar. The video has been delivered into two sections.
Trim the unwanted ones: double click the “Trim” icon close to the “Split” entering the cut plate. You can accurately fill the precise time in the “Start point” and “End point” box or move both rectangle sliders to save your desired segment.

Part2: Add Audio or Music to Your Video
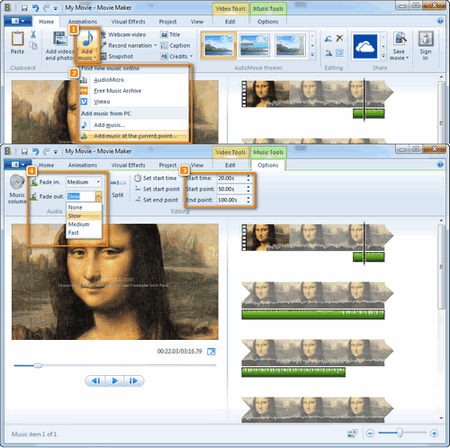
There are two methods for you to choose music or audio for the video, one of which is to find the music online like Audio Micro, Free Audio Archive, Vimeo; another of which is to upload your music from the local folder.
(Tips: you can add a segment of music to match a part of the video via “Add the music at the current point”, then head to the “Music Tools”, editing the “Start Time”, which you want the music start from, and adjust the “Start point” and “End point” of the music length. In addition, it also allows changing the speed of “Fade in/out” as you can see on the left upper corner.)

Part3: Record Narration:
Like the documentary, if you want to make narration for your video using your own words, you can make it come true through “Record Narration” part, then press the “Record”, and move the threadlike tab by using the mouse to match your narration. It enables you to directly add sound saved in PC as well.

Part4: Add Transitions to the Clips
It would be more vivid and natural for the whole visual experience if you create some transitions between clips or photos. Windows Movie Maker provides Diagonals, Dissolves, Patterns and Shapes, Reveals, Shatters and more transition effects for enriching. Choose the clip or photo where you want to make a transition, select “Animations in the toolbar, below which you can choose the desired transition effect. On the very close right side, transition duration from 0.25s to 2s is available to adjust.

Part5: Add Text to the Movie
As we can see from a film where there are opening and curtain call, you can be a film-maker for your video, too. Windows Movie Maker offers adding Title, Caption and Credit to make your video more integrated. Additionally, subtitles for most of us are also an essential part, so you can also add subtitles to your videos correspondingly.
When all the edited operation you want is finished, you could save your video via hitting the “Save movie” button on the right side in the toolbar at the top. You can upload video to YouTube, Vimeo, Facebook to more people or save to your PC or other portable devices such as smartphone, iPad and burn into DVD for collection.
Final words...
Of course, learning video editing with Windows Movie Maker in the tutorial is just the first step. The more for you to do is using Windows Movie Maker to edit video on your own and explore more functions so as to get to the point where practice makes perfect. At last, if this article is helpful to you, please share it with more folks who need help. You are welcome to put forward your proposal to us if you have better suggestions.
Back-Up Your DVDs into Virtual Duplicate

WonderFox DVD Ripper Pro
If you want to preserve your DVD discs into digital backup in case of damaged or scratched from uncomfortable protection or any other uncontrolled elements, I recommend you have WonderFox DVD Ripper Pro for a try, which is professional in DVD copy without quality lossless and you can also burn your videos into DVDs. Besides the DVD copy feature, you can also save your digital files in different output formats if you like.