Q: How can I export in 1080p 60fps in H264 from Premiere Pro?
While getting the most out of editing tools in Premiere Pro seems a bit complicated for the masses, nonetheless it is easy even for beginners to master how to export Premiere Pro videos with desired qualities. Because Premiere Pro offers plenty of export presets available for different uses right at your fingertips. All you need is to simply select the preset that you want to use. Therefore, the process of exporting Adobe Premiere 1080p 60fps videos is not as hard as you think. Next, we’ll detail how to let Adobe Premiere export 60fps 1080p video.
Now, follow the steps below to export Premiere Pro video in 1080p 60fps:
Step 1. Once the editing process is done, switch to the Export window.
Step 2. First, create a File Name and choose an export Location for your Adobe Premiere 1080p 60fps video.
Step 3. Then, expand the Preset menu and choose High Quality 1080p HD. Below set the Format to H.264.
Step 4. In the Basic Video Settings, you can unfold the VIDEO options to customize the Frame Size to 1080p and change the Frame Rate to 60fps.
Step 5. You can go further with other export settings to adjust video aspect ratio, audio codec, sample rate, bitrate, etc. Check the output info in the Preview window. When all settings are ready, hit the bottom-right Export button to save the 1080p 60fps video.

It is worth noting that if your source video is shot at 24fps or 30fps, converting it to 60fps won’t improve the quality greatly as it doesn’t introduce any new information to your footage but simply duplicates every frame. But if you shoot at 4K 120fps, editing and then exporting it with Premiere Pro in 1080p 60fps is a good choice for smooth uploading and sharing.
If you prefer a more lightweight and simpler program to change video settings with much ease, we would sincerely recommend WonderFox HD Video Converter Factory Pro. Learn more details in the following part.
Want to edit video to post on YouTube, Facebook, Vimeo, etc., or to play on Samsung TV, Xbox, iPad, Kindle Fire, or any platform/device smoothly? With WonderFox HD Video Converter Factory Pro, it’s a matter of a few clicks!
This one-stop video toolkit both gives users presets for hot websites with compatible settings and offers customizable options to adjust parameters including format, codec, resolution, sample rate, bitrate, aspect ratio, etc. With it, you can convert, edit, and compress any video to meet the video requirements needed for the final use.
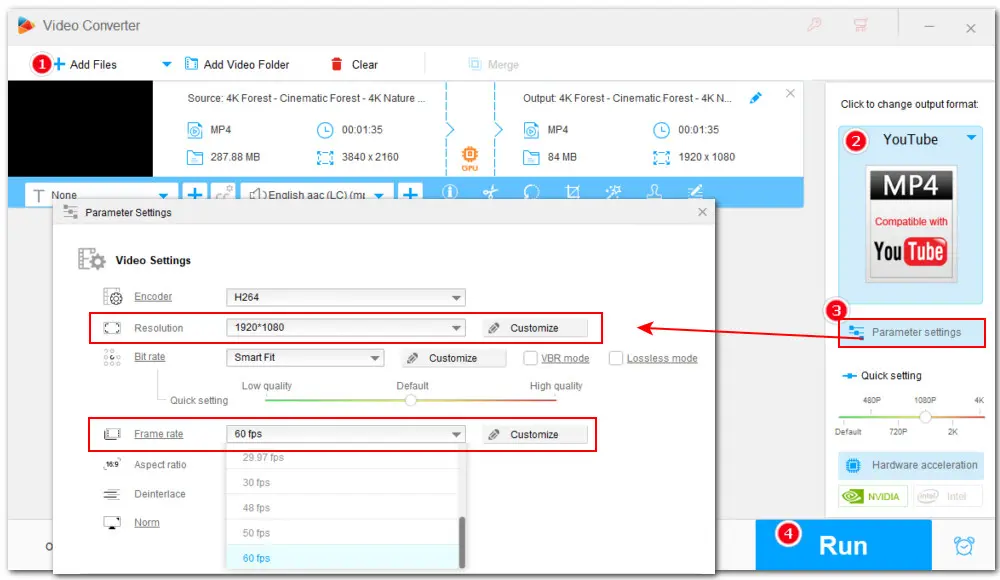
Here is how to let the alternative to Adobe Premiere export for YouTube 1080p 60fps:
Step 1. Download and install this efficient tool on your PC for preparation first.
Step 2. Launch it and go to the “Converter” section. Hit the upper-left “Add Files” or “Add Video Folder” to load videos. Also, you can directly drag and drop them into the app. Batch support is supported, so you can process multiple videos at once.
Step 3. For uploading a video to YouTube, enter the right-side format library and navigate to Web > YouTube. Here you can choose WebM for YouTube or MP4 for YouTube.
Step 4. Then open “Parameter settings” below the format image to set the resolution to 1080p and change the frame rate to 60fps.
Step 5. Tap on the ▼ button to specify an output path or leave it as default. At last, hit “Run” to export the video.

Hot Search: Convert 120fps to 24fps | Export MOV in Premiere Pro | Pr Only Import Audio
That’s all about how to export video in 1080p 60fps from Premiere Pro and its alternative. You can also follow the steps above to create a video with other favored settings as you wish. Thanks for reading till the end. Have a nice day!
Privacy Policy | Copyright © 2009-2025 WonderFox Soft, Inc.All Rights Reserved