Audacity is a popular free & open-source audio editing and recording software. If you want to learn how to use Audacity to record Discord audio, this post shares detailed guides on Windows & Mac. Keep reading!
An Easier Audio Recorder: WonderFox HD Video Converter Factory Pro
Discord is a popular social media platform where many users may have conversations with their game fellows or other people of the same taste. However, when you want to record Discord audio calls, you may find that it doesn't offer a built-in recording feature. No worries. Audacity is a great open-source audio recording application that can help you record Discord audio on Windows and Mac.
Read on and check the detailed steps on how to record Discord audio with Audacity.
Before starting, go to the Audacity official website to download the latest version of Audacity to your Windows or Mac computer. Then, navigate to the relative guide.
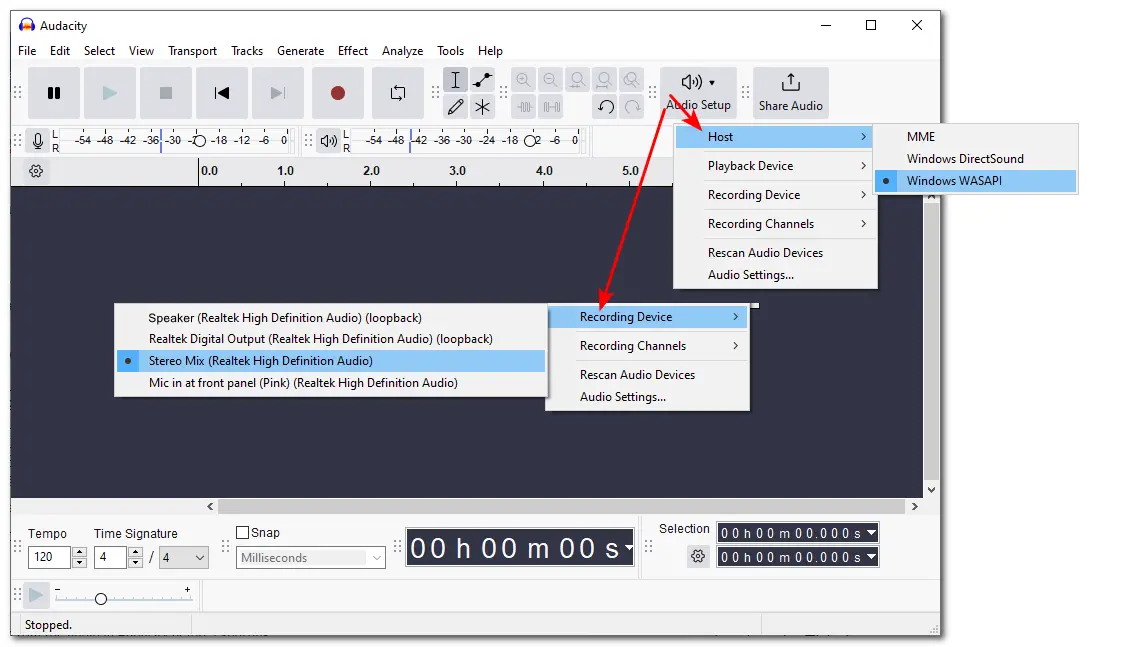
Step 1. Launch Audacity, click "Audio Setup" and set "Host" as "Windows WASAPI" from its drop-down menu.
Step 2. Open the "Audio Setup" again. Choose the "Playback Device" as the “Headphone” or the “Speaker” and open the "Recording Device" menu to select “Speakers” or “Stereo Mix” to record the desktop audio on Discord.

Tips: If you want to capture the system audio and microphone to record Discord audio calls with your friends, you can click the speaker icon on the status bar and choose "Sound". Under the "Recording" tab, right-click on the microphone device and select "Properties" under the "Listen" tab. Check the "Listen to this device" option. Then check if the audio format under the "Advanced" tab is the same as the "Project Rate" in Audacity. Now, select "Stereo Mix" for "Recording Device" to capture your voice and the sound from your computer simultaneously.
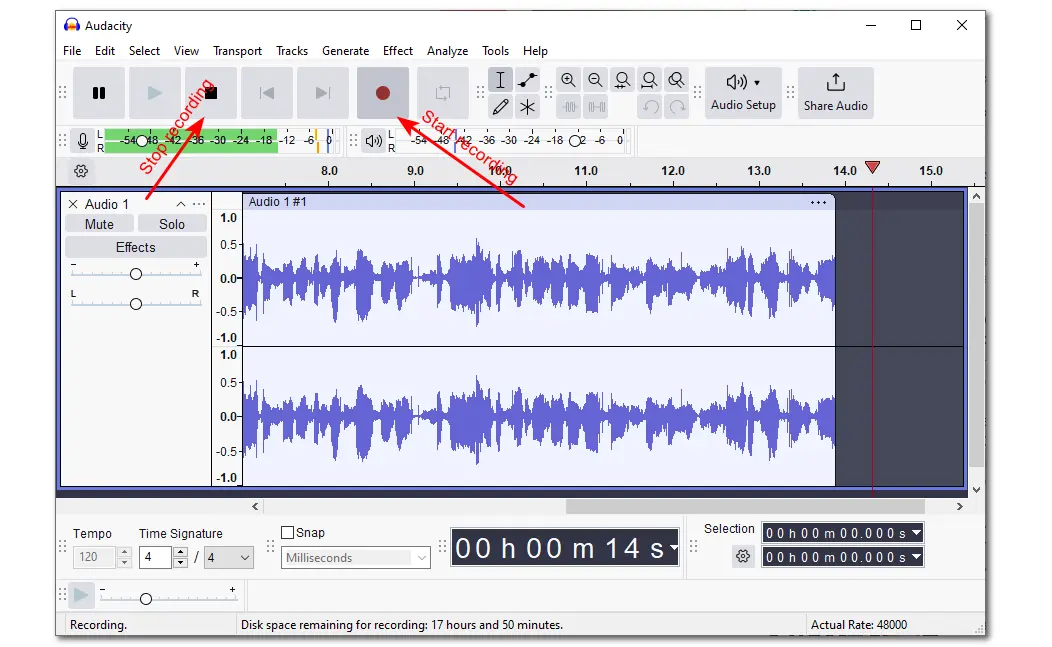
Step 3. Click the red circle record button to start recording.
Step 4. Open the Discord app or online service. Then, host or participate in a voice chat you want to record.
Step 5. When you want to stop the recording, click the square-shaped stop button to finish the recording.
If needed, you can trim the audio in Audacity before exporting.
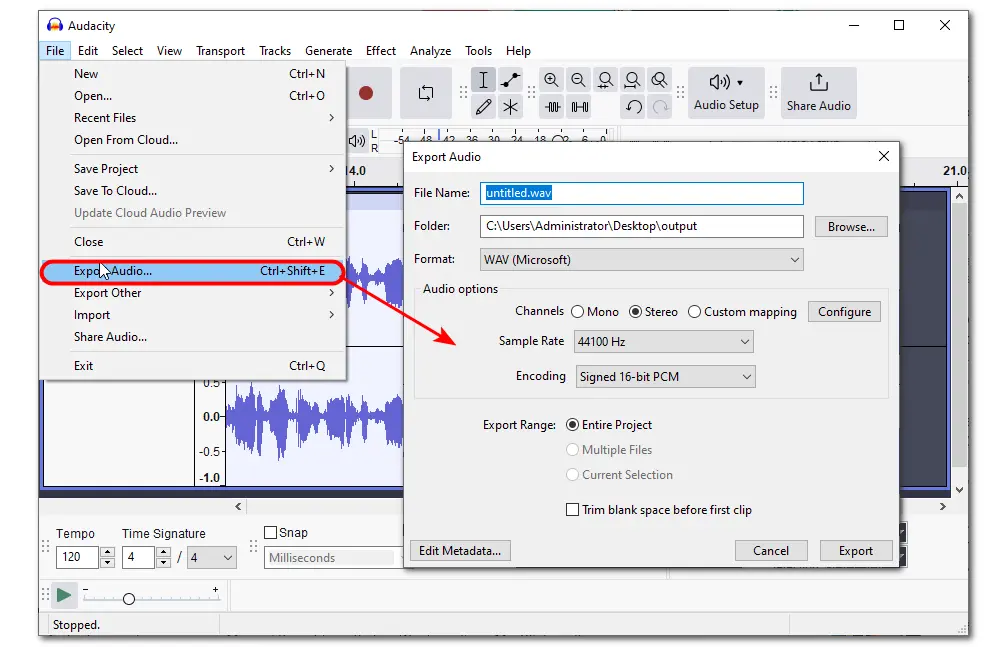
Step 6. To save the recording, click "File" and select “Export Audio” from the drop-down menu. Then, you can choose to share the audio recording online or export it to your computer. If you select "Export to computer", then you can name the file and choose the output path, format, and other advanced audio options, or leave them defaults. Finally, click "Export" to save the recording to your computer immediately.
The Audacity recording process on Mac is different from that on Windows. Since MacOS doesn't have the built-in desktop audio recording capability, you need to download SoundFlower if you want to use Audacity to record the desktop audio. Otherwise, Audacity will only capture your voice from the internal microphone.
If SoundFlower is not compatible with your Mac models, you need to install other audio plugins like BlackHole, etc.
Without further ado, let's check the steps for recording Discord audio with Audacity.
Step 1. Go to https://github.com/mattingalls/Soundflower/releases/ to download Soundflower and follow the instructions to install it on your Mac computer.
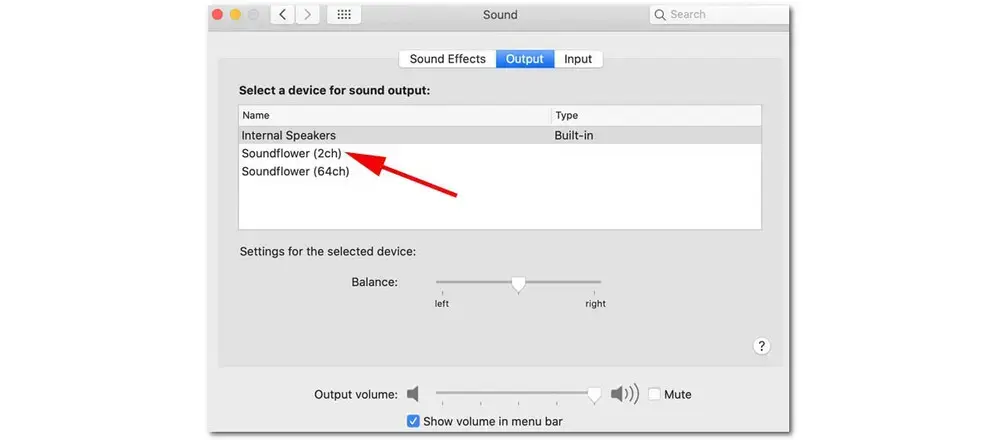
Step 2. Click the Apple logo at the top-left corner of the screen and go to "System Preference" > "Sound" > "Output/Input" to select "SoundFlower (2ch)".
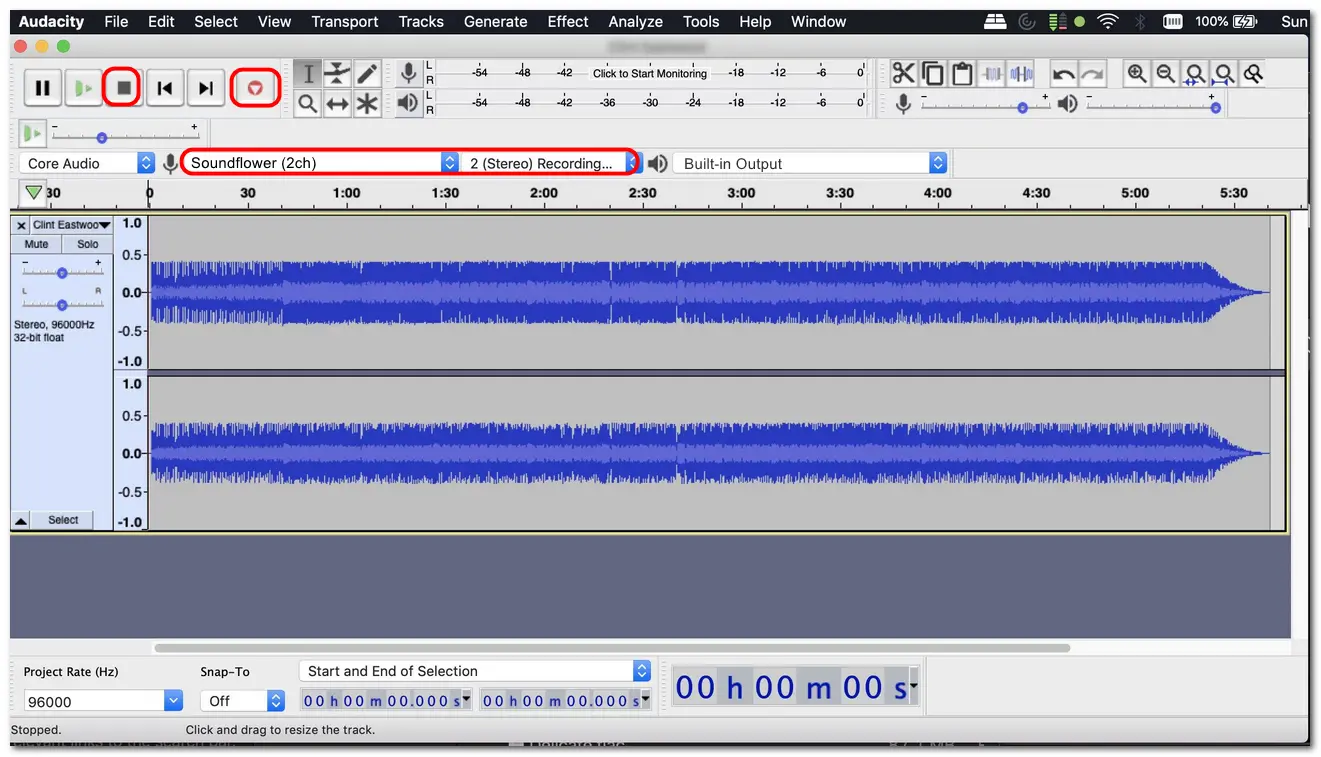
Step 3. Launch Audacity and click "Audio Setup" to select "Built-in Output" for the "Playback Device" and "SoundFlower(2ch)" for the "Recording Device" to capture the Discord audio.
Step 4. Open Audacity and click the red record button to start recording. Then, open the Discord app or online service and start the audio you want to capture.
Step 5. After finishing an audio call or conversation on Discord, click the stop icon on Audacity to stop recording.
Step 6. Go to "File" > "Export Audio..." to customize the output audio settings and click "Export" again to save the recording to your device.
Though Audacity is a qualified open-source audio recorder, the complex interface and recording process may be a little complicated for newbies. In this case, we recommend two alternative tools for Windows and Mac to capture the Discord audio more easily without any issues.
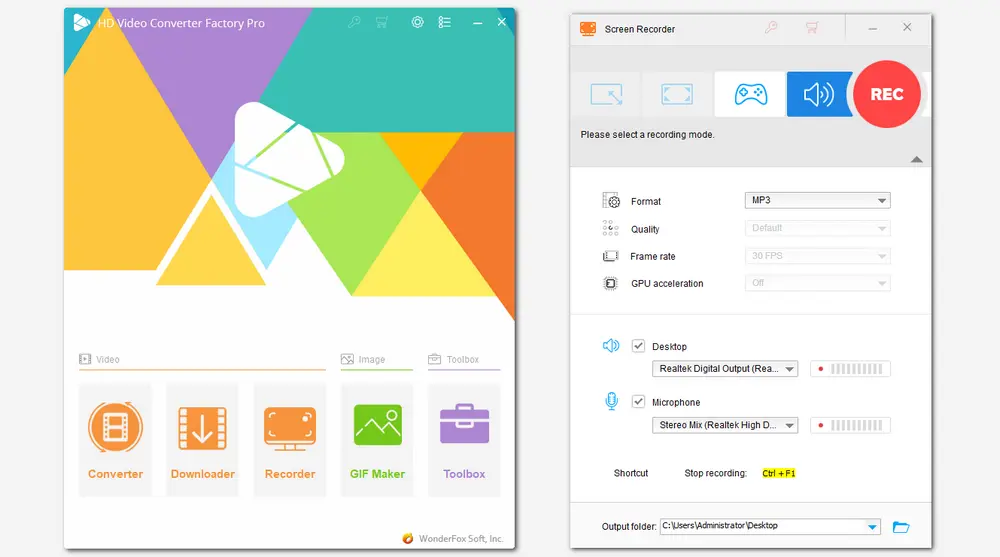
WonderFox HD Video Converter Factory Pro is a powerful all-in-one video/audio processing tool that offers audio recording capability. It allows you to capture audio from your computer and the microphone separately or simultaneously. With it, you can easily capture voice chats, audio calls, streaming audio, your voice, etc. in high quality.
After finishing recording, you can also directly trim, merge, split, convert, or compress the recordings within the app.
The simple interface and intuitive workflow make it suitable for beginners to quickly start recording.
Download this software here and see how to use it to record Discord audio.
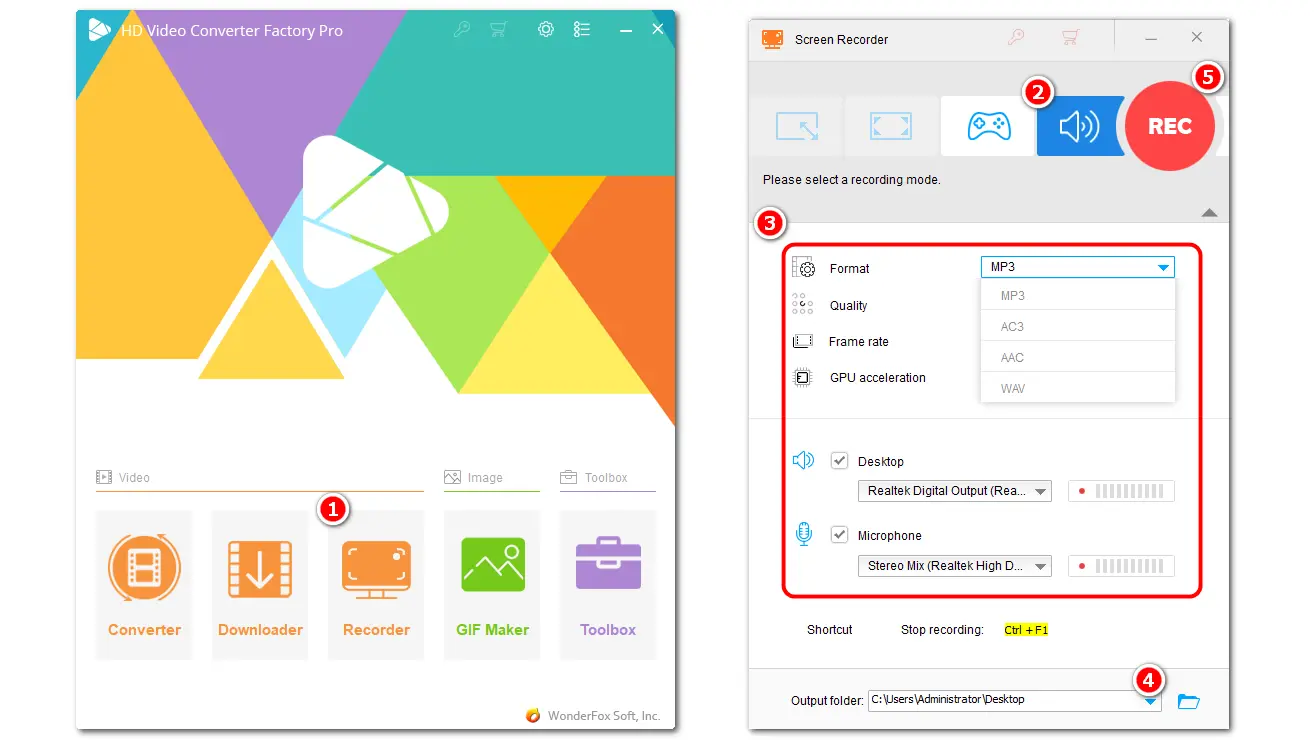
Step 1. Launch WonderFox HD Video Converter Factory Pro and open the "Recorder" module.
Step 2. Select "Audio-only" mode and then choose a desired output audio format.
Step 3. It enabled the "Desktop" (system audio) and "Microphone" by default. You can also manually choose the desired audio source if you don't want to capture the system sound or your mic voice.
Step 4. Click the bottom ▼ button to specify an output path.
Step 5. Click the red "REC" button, and it will start recording after a 5-second countdown. During this, you can open the Discord app/online service to start the audio chat/call you want to record.
Step 6. Press "Ctrl + F1" or click the square-shaped stop icon on the recording bar to stop recording. The recording will be saved in the directory you specified.
For Mac users, you can directly use the built-in tool - QuickTime Player to capture the Discord audio without downloading any software. Though QuickTime Player is designed to play media files on Mac, it also offers a quick solution to record screen and audio. But it also only supports recording the mic voice by default. Therefore, you need to install an audio plugin like SoundFlower, BlackHole, etc. to capture the system audio.
Now, let's see how to use QuickTime Player to capture the Discord audio.
Step 1. Launch QuickTime Player on your Mac.
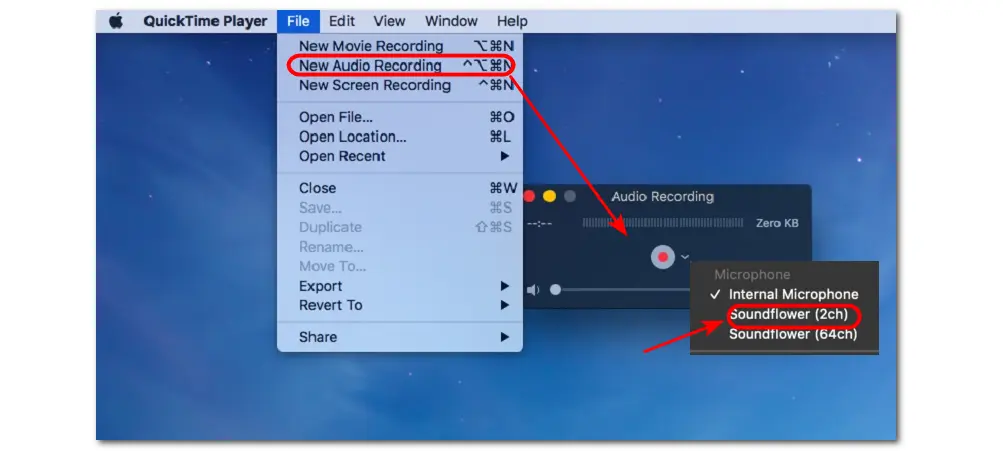
Step 2. Click "File" and select "New Audio Recording" from the drop-down menu.
Step 3. Click the down arrow beside the record button to choose "Soundflower(2ch)" to capture the audio on Discord.
Step 4. Open Discord and start an audio chat you want to record. Then, press the record button to start recording.
Step 5. Press "Control + Command + Esc" or click the stop button on the recording menu bar.
Step 6. It will directly play the recorded audio. You can click the X button on the window, name the recording, and choose an output path to save the recording to your Mac.
The above is all I want to show you about the methods of using Audacity to record Discord audio on Windows and Mac. As you can see, it may be a little overwhelming for beginners to adjust the Audacity settings before recording the Discord audio. Therefore, we offer two alternative tools to help you record Discord audio more easily.
Hope you can successfully record the Discord audio with the above methods. Thanks for reading. Have a nice day!
Yes. Audacity is an open-source audio recorder that can capture any audio from the computer, including the audio on Discord. You just need to set the "Recording Device" to "Speaker" or "Stereo Mix" on Audacity (Windows) or set the "Recording Device" to “SoundFlower (2ch)” on Mac. Then, click the record button to start recording.
Yes. You can use Audacity to record your mic voice. You just need to connect the microphone device to your computer or use the built-in microphones. Then open the "Audio Setup" option to set "Recording Device" as "Microphone". Now, you can click the record button to start recording.
WonderFox HD Video Converter Factory Pro is the best app to record Discord audio. It can capture the Discord audio in high quality and offers many advanced features to polish the recording. All the features are friendly to beginners.
WonderFox
HD Video Converter Factory Pro
Terms and Conditions | Privacy Policy | License Agreement | Copyright © 2009-2024 WonderFox Soft, Inc. All Rights Reserved.