Xbox Series X or S game consoles make it easier than ever to capture and share clips from games with the new Xbox's speedy OS. However, some users may still not know how to start recording or are bothered by the limited recording times. If you are also wondering how to capture your gameplay on Xbox Series X or S game consoles and share the recordings with friends, read this post to learn the detailed guide!
Before recording, you should connect your controller to a PC with a USB-C cable. Then set the remote play option to stream the game from your console to your computer. To set the remote feature on your console:
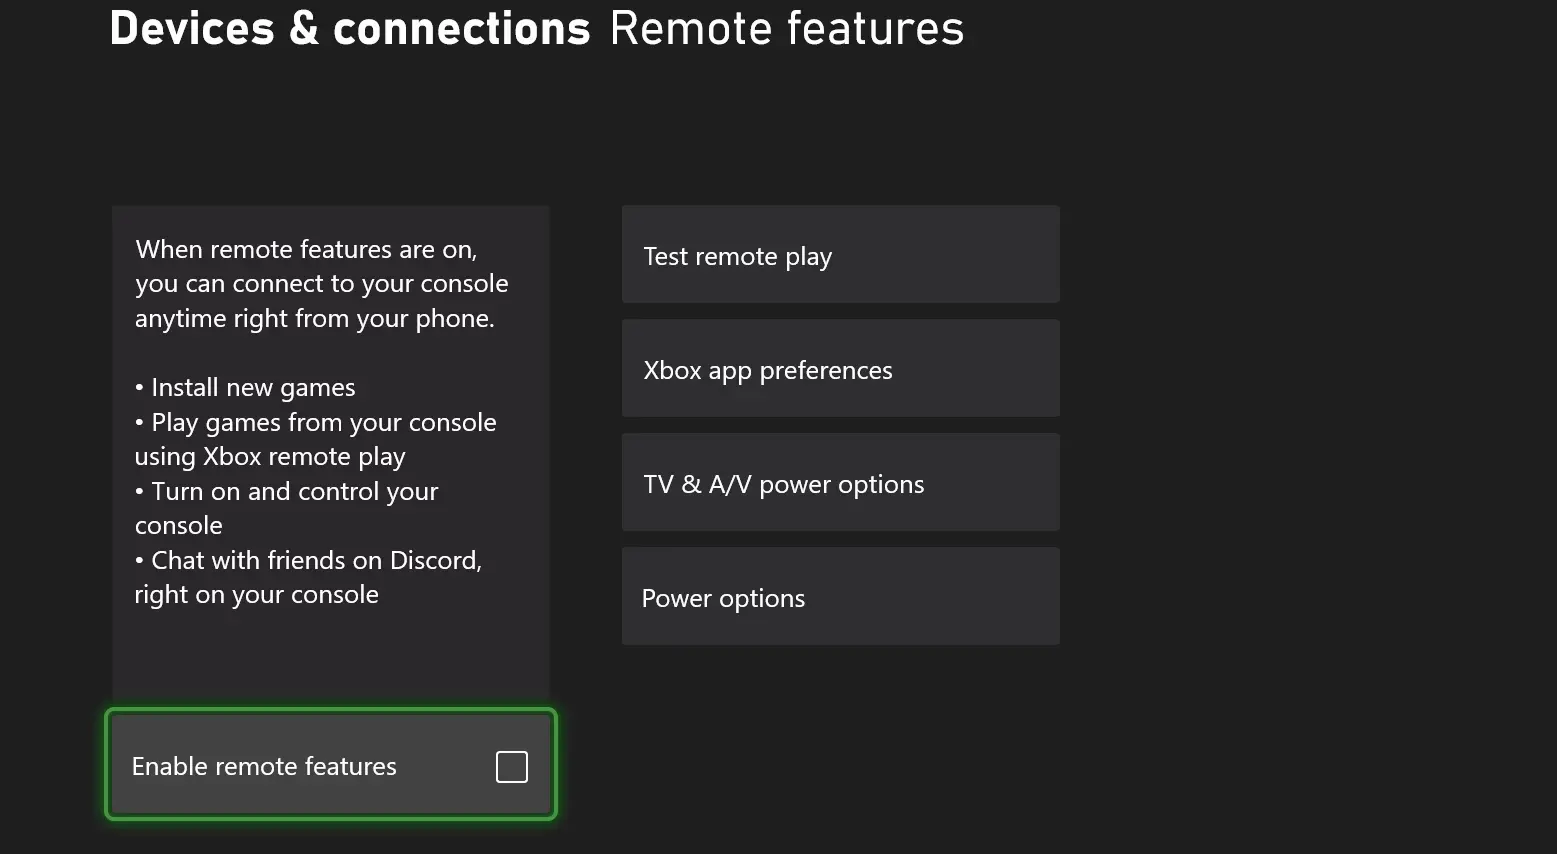
Now, move to your PC and:
Then, you need a third-party screen recorder to record Xbox Series X/S gameplay without any limitations.
WonderFox HD Video Converter Factory Pro is an all-in-one video/audio processing tool that offers a handy screen recorder. With it, you can easily record Xbox Series X/S gameplay with system/microphone sound on your computer without a time limit. You can also use it to capture the Xbox home page and application page to make a tutorial video.
👋 Key Features
Designed as an easy-to-use screen recorder, you can quickly start recording with a few simple clicks.
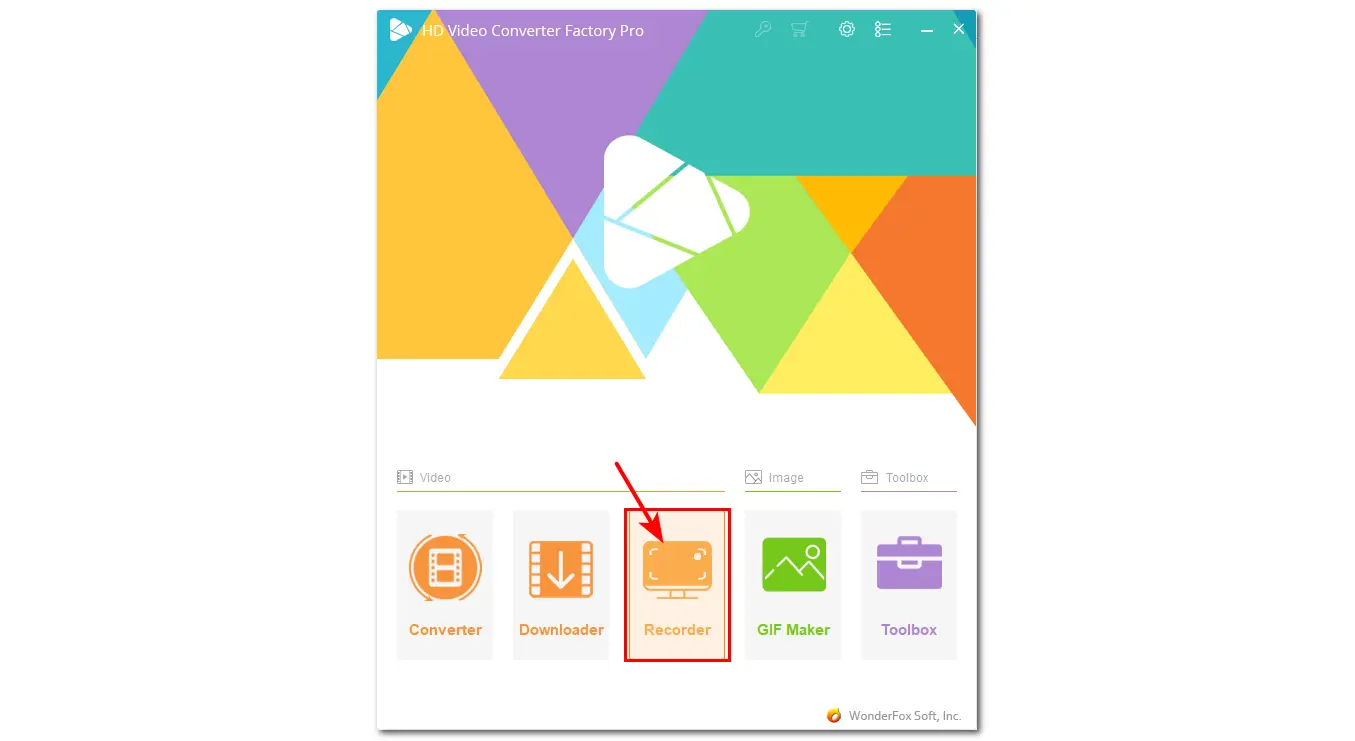
Step 1. Start the gameplay you want to record. Launch WonderFox HD Video Converter Factory Pro and open the "Recorder" module.ecording or are bothered by the limited recording times. If you are also wondering how to capture your gameplay on Xbox Series X or S game consoles and share the recordings with friends, read this post to learn the detailed guide!
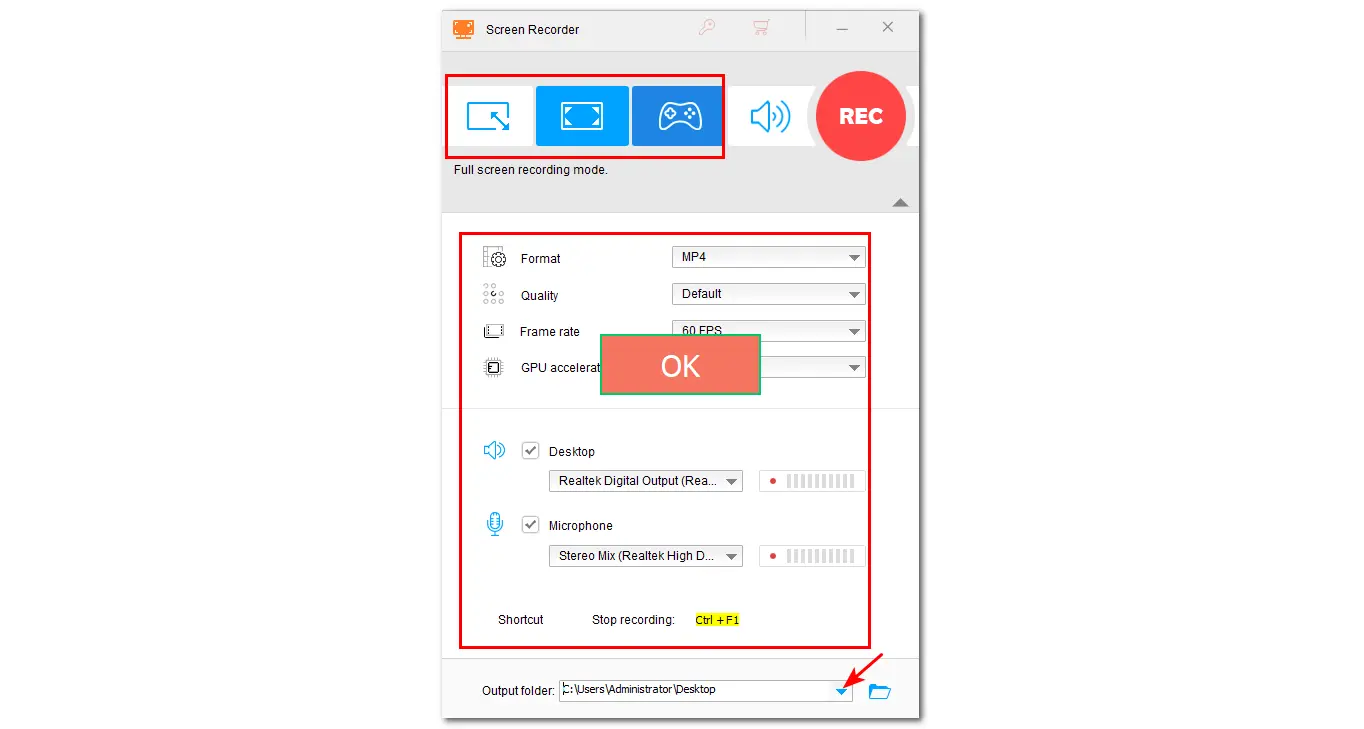
Step 2. Choose the "Game recording mode" and then select the "Custom" or "Full-screen" mode to adjust the recording region. Press "OK" to confirm the recording area.
Step 3. Customize the recording format, quality, frame rate, GPU acceleration mode, and "Desktop" (system sound) and "Microphone" (external sound) sounds according to your own needs. Then tap the bottom ▼ button to specify an output path.
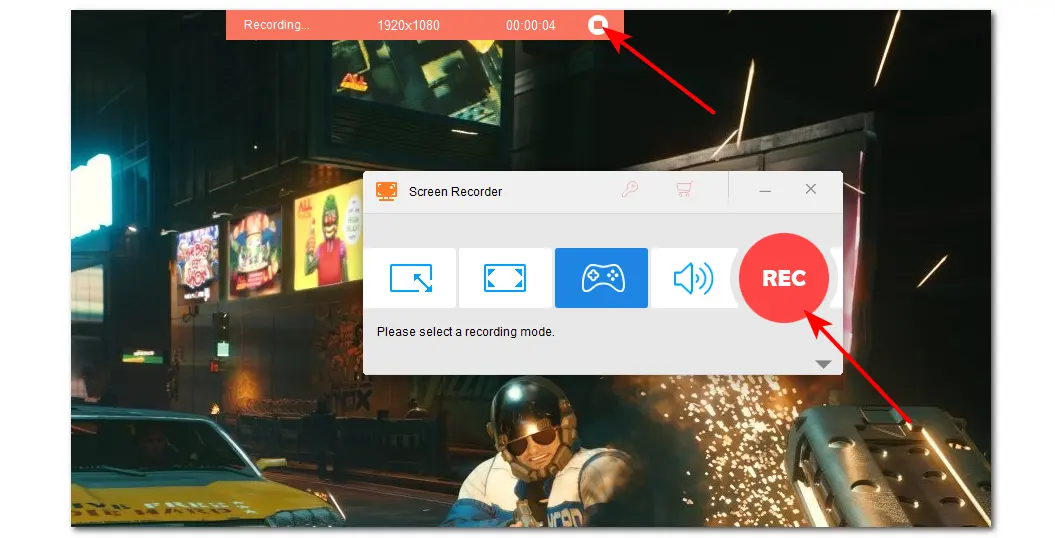
Step 4. Click the "REC" button, and it will start recording after a 5-second countdown. Now, you can play the game on your Xbox Series X/S. Once finished recording, click the square-shaped stop icon on the floating recording bar or press "Ctrl + F1" to stop recording.
To capture game clips on the Xbox Series X/S, you can also directly use the new Share button on the Xbox Wireless Controller. By pressing the share button, you can easily take screenshots of the gameplay or record a video clip from the gameplay. Moreover, Xbox Series X/S offers two modes for capturing gameplay, which will be discussed in the following. Just keep reading!
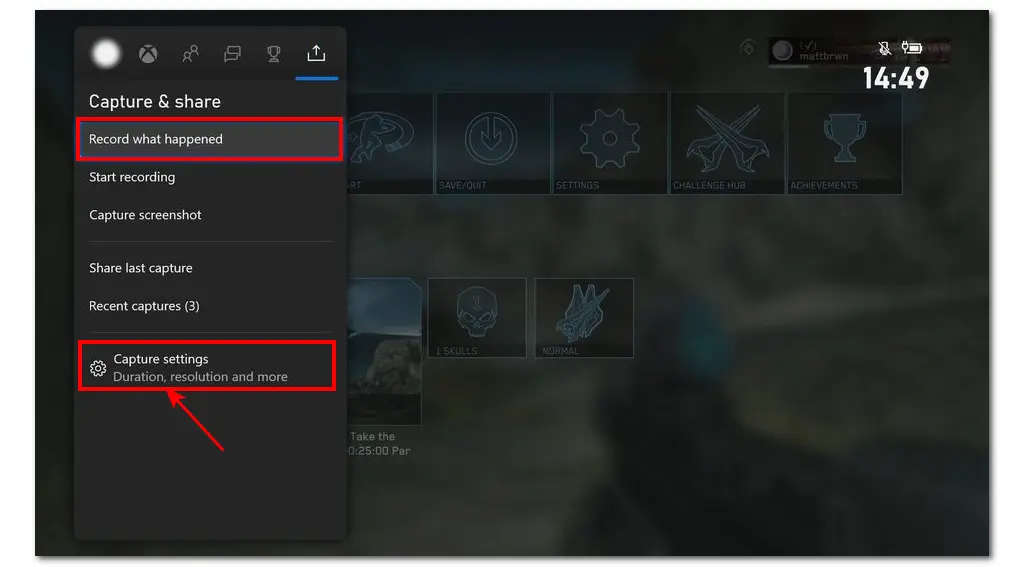
With the "Record what happened" mode, you can capture the gameplay that already happened with different time options (15 seconds, 30 seconds, or 60 seconds). The following are the detailed steps.
Step 1. Open the gameplay you want to capture on the home page of your Xbox Series X/S game console.
Step 2. Press and hold the Xbox button in the middle of the controller to open the Xbox menu.
Step 3. Go to the "Capture & Share" menu and select the "Capture settings" option.
Step 4. Choose "Record what happened" and then select an option for your game recording duration. You can also adjust other settings like resolution, location, etc.
Step 5. Now you can return to the gameplay and play it. Long-press and hold the button with a share icon on the controller to capture a clip from the gameplay that just happened.
Since the "Record what happened" mode only offers a maximum of 1-minute recording time, you need to change the record mode to "Start recording" if you want to capture longer clips on Xbox Series X/S for up to 1 hour (according to the game clip resolution and available storage space). The "Start recording" mode will start capturing the gameplay from now on, instead of recording what has already happened.
Before starting recording, you'd better prepare an extra flash USB or external hard drive if you want to record long gameplay up to 1 hour directly on your Xbox Series S/X. Also, remember to backup data before using it since this way to format the external hard drive.
Let's see how to connect an external hard drive to the Xbox console.
Step 1. Turn on your Xbox Series S/X and connect a USB (or external HDD/SSD) to the USB 3.0 ports.
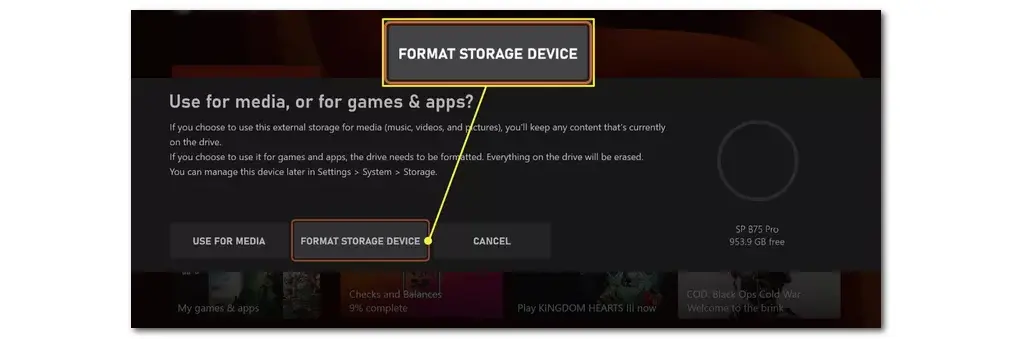
Step 2. In the pop-up window, select "FORMAT STORAGE DEVICE" and name the device.
Step 3. Press the arrow icon and select "KEEP CURRENT LOCATION" > "FORMAT STORAGE DEVICE" again.
Then, restart your Xbox controller and follow the steps below to start recording.
Step 1. Press the "Xbox" button to open the Xbox menu.
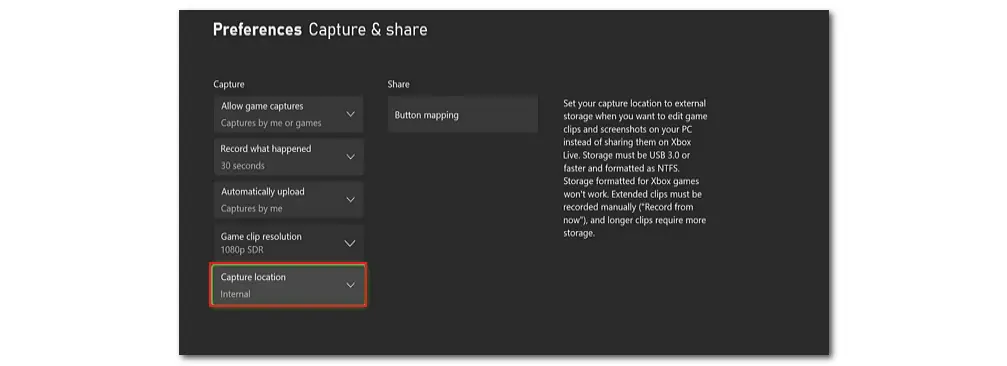
Step 2. Go to the "Capture & share" menu and select "Capture settings".
Step 3. Open the "Capture location" drop-down menu to select the external hard drive for saving the recorded clips.
Step 4. Return to your Xbox home page. Select a game you want to record and enter.
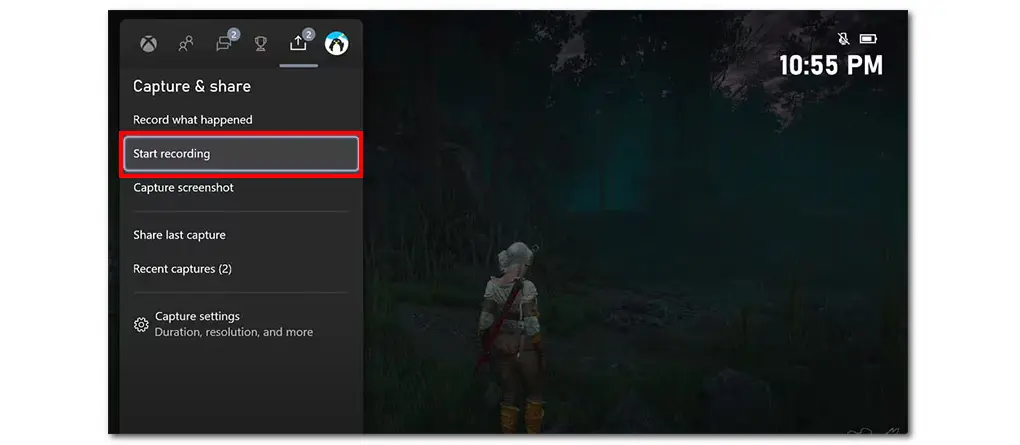
Step 5. Press the "Xbox" button and select "Capture & share" > "Start recording". Tap the "A" button to select this option and it will start recording your gameplay immediately.
Step 6. Once you want to stop the recording, just long-press the "Xbox" button and go to the "Capture & share" tab to select "Stop recording". You can also press the "Share" button on the controller to directly stop recording. Then, you will receive a message of "Gameplay clip recorded".

However, note that the Xbox built-in recorder cannot capture the Xbox Home screen. If you return to the home screen or use the quick resume feature to switch to another game during the recording, it will stop recording automatically.
After capturing the gameplay on the Xbox Series X or S controller, you can go to the "Capture & share" section to view the recorded clips in the "Recent captures" tab. If you want to share the recorded game clips with friends or upload them to YouTube or other platforms read the following content.
Step 1. Press the "Xbox" button and go to the "Capture & share" menu. Select "Recent Captures".
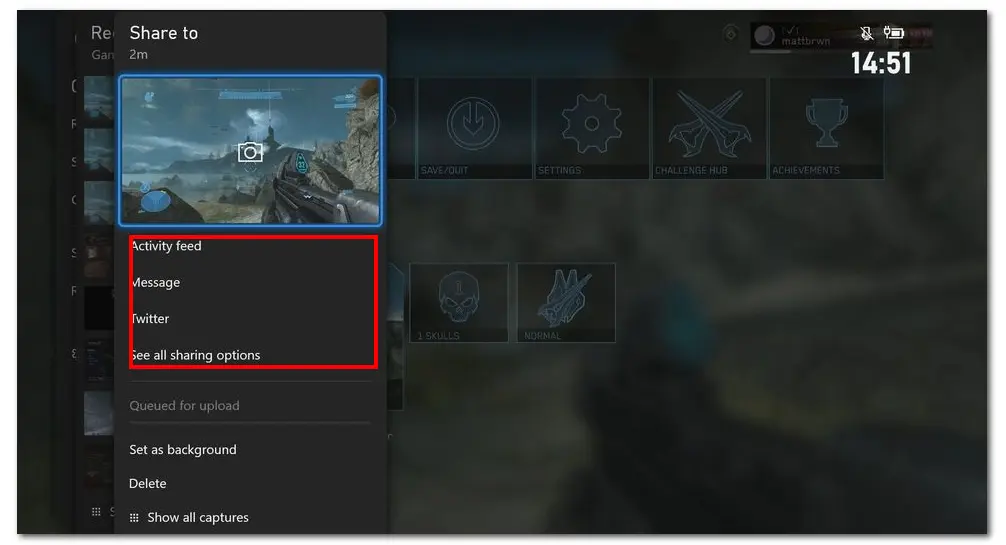
Step 2. Choose a game clip you want to share, then select "See all sharing options" and choose to upload game recordings to OneDrive. You can also select "Upload" to upload the game recordings to Xbox Live.
Then, you can easily view, edit, and share the recordings from OneDrive or use the Xbox mobile app on smartphones.
* You can download the Xbox mobile app from the Apple Store or Google Play Store, then log into the same account you use on the Xbox console.
Now, you can view and share your game captures in the "Library" section.
This article shares three methods to help you record gameplay on Xbox Series X/S. You can just choose one solution according to your actual needs. If you just want to capture the last minute of the gameplay, use the Xbox console directly. For game recording up to 1 hour, you'd better connect an external hard drive to the console. For a longer recording time or to remove other limitations, try WonderFox HD Video Converter Factory Pro.
Above is all I want to share with you. Hope this post can be helpful to you. Thanks for reading till the end. Have a nice day!
To record on Xbox Series X for longer than 10 minutes, you can select "Start recording" from the "Capture & share" section. It supports recording time up to 1 hour. However, according to the recording resolution and available storage space, you'd better use an external storage drive. Also, you can directly use WonderFox HD Video Converter Factory Pro to record gameplay on Xbox Series X without time limitations!
No. As of now, the Xbox Series X cannot record your voice during the gameplay with the console's built-in capture system. If you want to record the gameplay with your voice, you can use a third-party screen recorder, like WonderFox HD Video Converter Factory Pro, to record both gameplay and voice on a PC.
Yes. To record Xbox gameplay with USB, you need to:
Step 1. Plug your USB (with a 3.0 port and NTFS formatted) into the Xbox console. Note that you should move your stuff from the USB before connecting it to the Xbox.
Step 2. Press the "Xbox" button to open the guide, and select "Profile & system" > "Settings" > "Preferences" > "Capture & Share".
Step 3. Select "Capture location" to choose the external hard drive for the game clips and screenshots.
Top Video & Audio Processing Toolkit
Terms and Conditions | Privacy Policy | License Agreement | Copyright © 2009-2025 WonderFox Soft, Inc. All Rights Reserved.