When playing or editing a video, you may encounter the annoying issue that the audio is not synced with the video. Users on various forums stated that there is an audio out-of-sync issue with their MOV files in some media players and editors.
If you encountered this issue as well, then keep reading this post. In the following content, we will show you the possible causes for the audio out-of-sync issue in MOV files and help you fix the issue with some available approaches.
Before diving into the fixes to the MOV out-of-sync issue, let’s first look at the possible reasons:
If you encounter the MOV audio out-of-sync issue with a media player, then you can try to use another media player like VLC first to verify if the issue is caused by the media player you’re using. This can also help you troubleshoot other common playback issues.
Some media players like VLC, Windows Media Player, etc. allow users to resync the video and audio manually by changing some settings. When you find the audio and video not syncing in MOV files issue with them, you can try to resync the video and audio.
Step 1. Launch VLC and open the MOV video in that the audio is not synced.
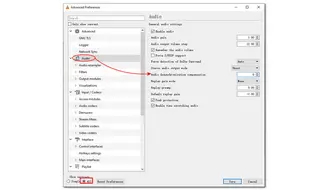
Step 2. Go to “Tools” > “Preferences” and select “All” at the bottom left corner.
Step 3. Scroll and find the “Audio” option at the left sidebar. Click on it.
Step 4. Navigate to the right side of the interface and find “Audio desynchronization compensation”. Set the syncing compensation forward or backward according to how your audio is out of sync with the MOV video.
Step 5. Click “Save” and your MOV video should play without the audio syncing issue.


An easier way: When playback, press “F” on the keyboard to slow audio by 50ms and “G” to speed audio by 50ms.
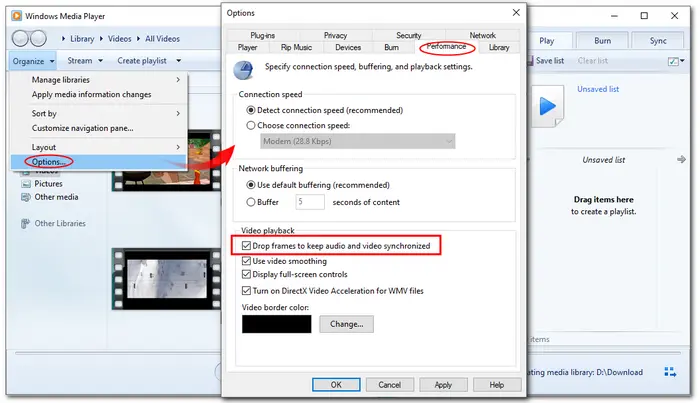
Step 1. Open Windows Media Player and click “Organize”.
Step 2. Select “Options” and then switch to the “Performance” tab.
Step 3. Check the “Drop Frames to Keep Audio and Video Synchronized” checkbox.
Step 4. Click “Apply” and “OK”. Restart Windows Media Player and import your MOV file to play again.


If your MOV videos are shot by iOS devices, then you will encounter the audio out-of-sync issue when viewing the video in video-editing software like Adobe Premiere Pro since the recorded MOV files are encoded with a variable frame rate that is not supported by most editing programs.
In this case, you can use a video converter like WonderFox HD Video Converter Factory Pro to convert the variable frame rate to a constant frame rate. It is a powerful video converter program that can convert VFR to CFR without causing any damage to the video. Batch conversion is available to help you process multiple files simultaneously. You can also use it to convert other files for solving various video/audio importing issues.


Step 1. Launch the converter and open the “Converter” module.
Step 2. Click “+ Add Files” to import your problematic MOV files.
Step 3. Hit the right-side format image to open the output format library. Select a preferred profile or just choose the same format as the original.
Step 4. Open the “Parameter settings” window and choose a constant frame rate from the “Frame rate” drop-down options. You can also customize your preferred frame rate. Click “OK” to save the changes.
Step 5. Specify an output path by clicking the bottom ▼ button. Finally, press “Run” to start the conversion.
Besides the above 3 general ways to solve the MOV audio not synced issue, you can also try the following tips to solve the MOV audio out of sync issue.
1. Update the computer hardware.
2. Keep a stable network connection when downloading or watching an online MOV file.
3. Repair the damaged MOV files with a professional video repair tool.
In this article, I’ve shown you the probable reasons and available solutions to the video audio out-of-sync issue in MOV files. If you encounter the same issue, just follow this post to troubleshoot it. Hope you can find this post helpful.
Thanks for reading. Have a nice day!
Terms and Conditions | Privacy Policy | License Agreement | Copyright © 2009-2025 WonderFox Soft, Inc.All Rights Reserved