Many people like to share videos or photos on Facebook or other social platforms. However, sometimes you may not be able to upload a video to Facebook.
Wondering why Facebook won't let you upload a video and how to solve the uploading problems? You're on the right page. In this post, I'll share the possible reasons for the video not uploading to Facebook and some simple methods to fix the issue.
Before starting, you can download this video converter to adjust your videos to Facebook's best-uploading specs for sharing without issue.
https://www.videoconverterfactory.com/download/hd-video-converter-pro.exe https://www.videoconverterfactory.com/download/hd-video-converter-pro.exe
Before we dive into the solutions for videos not uploading to Facebook, here are the top reasons for this issue. Let’s take a look at this section.
The network connection is essential for uploading a video to Facebook. Without a stable network connection, the video uploading process may take a long time and finally report a failure message.
Not all video formats are supported by Facebook. If you see an error like “The video has failed to process. Please make sure you are uploading a supported file type.”, the cause should be the file format of your video is not compatible with Facebook requirements.
Generally, Facebook recommends using the MP4 or MOV format, but it supports more video formats like MPEG, M2TS, M4V, FLV, AVI, MKV, MOD, TOD, TS, VOB, etc.
Check this Facebook official website to learn the Facebook-supported formats.
Besides the video format, Facebook also restricts other video parameters for uploading. If the resolution, size, length, aspect ratio, frame rate, etc. are incompatible with Facebook, you will also encounter an uploading issue.
Technical specifications for Facebook videos:
Resolution: 1280x720 and lower
File Size: Maximum 10 GB
Video Length: 240 minutes or less
Aspect Ratio: 16:9 or 9:16
Bitrate: 25–60 Mbps
Frame rate: 30 fps or lower
Video format: H.264 video with AAC audio in MOV or MP4 format
Audio: Stereo audio with a sample rate of 44.1 kHz
HD Video Converter Factory Pro is a handy video converter that can convert any video to Facebook-supported formats and adjust the video resolution, size, length, aspect ratio, and more settings for smooth uploading.
Facebook will check the video you want to upload to ensure the video can be playable after being uploaded. If your video is corrupted or damaged, Facebook will not upload it.
If you plan to upload your video to the web version of Facebook, the issue can occur due to an incorrect browser. Your current browser may have bugs or glitches that cause you to fail to upload videos to Facebook. Also, if your web browser has not been updated for a long time, it may cause this problem.
Sometimes, Facebook servers may have errors that prevent you from uploading a video to Facebook. Then you have no choice but to wait until the servers return to normal.
Facebook puts limits on the uploading of videos. If the video you upload contains sensitive or illegal content that is against the Facebook video uploading guidelines, it cannot be uploaded.
Now that we know why videos can’t be uploaded to Facebook, this section will walk you through a few simple fixes to fix the “can’t upload video to Facebook” issue.
You should first check the internet connection when you can’t upload your video to Facebook. You can run a simple speed test using Fast.com to measure your network’s upload and download speed.
If the result shows you the internet connection is slow, try to turn the data traffic back on, connect your device to another Wi-Fi connection, move to a better reception area, reset the network settings, etc.
If the video not uploading to Facebook issue is caused by the unsupported file format, you need to convert the video to a Facebook-supported format. Moreover, you may also need to adjust the video resolution, length, bitrate, frame rate, etc. for better uploading performance.
WonderFox HD Video Converter Factory Pro is a powerful all-in-one video processing tool that can convert various videos to MP4, MOV, and other formats supported by Facebook. You can also adjust the video and audio codecs, resolution, frame rate, bitrate, etc. for better compatibility. It can also trim, split, and crop the video without losing quality.
Here is a simple guide for how to convert videos to Facebook specs.
Step 1. DownloadDownload and launch WonderFox HD Video Converter Factory Pro.
Step 2. Open the “Converter” and click “+ Add Files” to import the video you fail to upload.
Step 3. Press the right-side format image and select “Facebook” under the “Web” category.

Step 4. Open the “Parameter settings” to adjust the video resolution, bitrate, frame rate, and aspect ratio. Then click “OK” to save it.

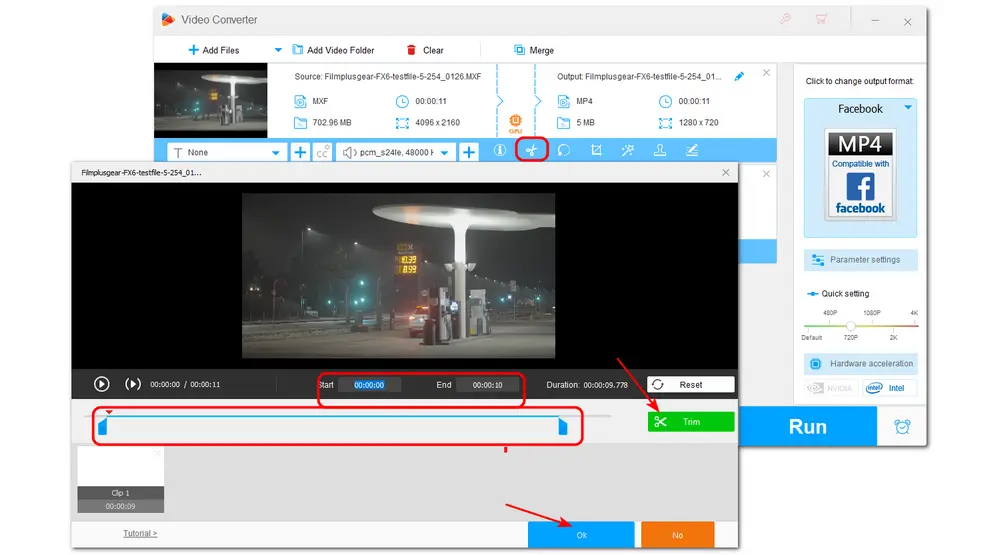
Step 5. If your video is longer than Facebook requires, press the scissors icon to trim the video.

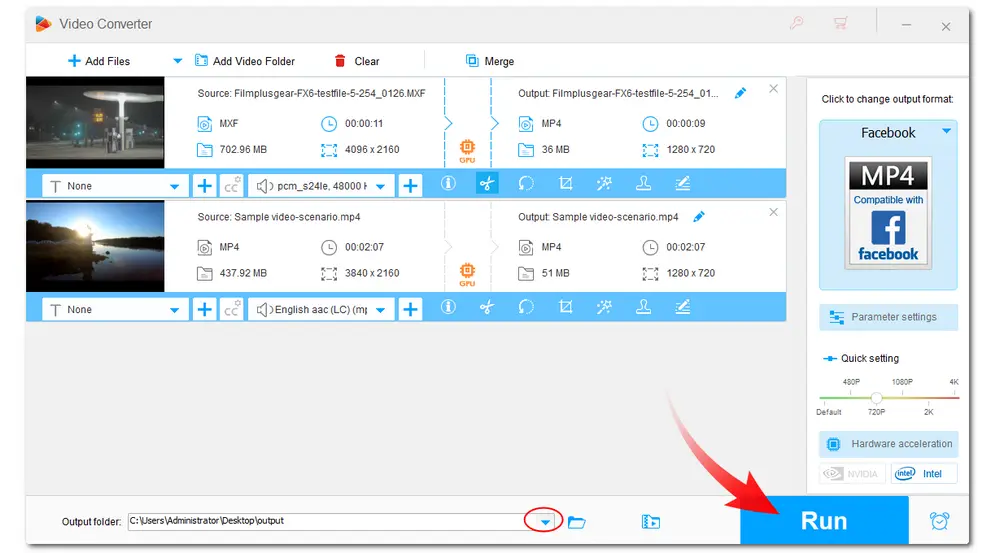
Step 6. Click the bottom ▼ button to specify an output path. Then click “Run” to proceed with the files.

Before uploading a video, you should check if the video is corrupted or not. You can try to open this video with other media players or applications to see if it can work properly. If not, you need to find a data-repairing tool to fix the broken videos.
Signing out of your account and logging back in can help your computer and mobile device reconnect with Facebook’s servers and reload your account data. If you still can’t upload the video to Facebook, try to close the app, re-open it and log in again.
How to log out:
Step 1. Open Facebook.
Step 2. Click on the “Account” button on the top-right corner. (On some computers, it might be a dropdown button on the right side, while some might have a clearly labeled “Account” button.)
*If you are using Facebook on your mobile device, navigate to the “Menu” and click it, then scroll down to find and click the “Log Out” button.
Step 3. Select “Log out”.
Step 4. Enter your account information and press “Log in”.

If the log-out and log-in solution doesn’t work, you can try to uninstall and reinstall the Facebook app on your device to refresh the Facebook data on your device. Also, you can check if there’s any new update available for Facebook and then update it. The outdated version may cause incompatibility and performance issues with your device.
Caches and cookies are temporary files stored on your hard drive to improve the performance of the web browser or the application. However, if there are problems with your cache and cookies, your browser or the Facebook app may not allow you to upload videos. So clear the cache and cookies now.
1. Clear the Cache and Cookies in the Browser (Take Chrome as an example)
Step 1. Click the three-dot icon at the top right corner.
Step 2. Navigate to the “Clear browsing data...” option.
Step 3. Choose a “Time range” ("All time" is recommended)
Step 4. Check “Cookies and other site data”, “Cached images and files”, and any other options you want clear.
Step 5. Press “Clear data” and wait.

2. Clear Facebook Cache
Step 1. Go to “Settings” on your mobile device.
Step 2: On Android, select “Apps” or “Apps and notifications” and find “Facebook”.
Step 3. Select “Storage” or “Storage and cache”.
Step 4. Hit “Clear cache” from the following menu.
(On iPhone, you can go to the settings and find Facebook, click “Delete App” to delete the app and clear all related data. Then go to the App Store to install it again.)

If you’re currently uploading your video to Facebook on your mobile device, you can consider using a computer and opening the web browser to access the Facebook website. Then upload your video again. If the issue still exists, you can check if there is an update with your browser or switch to another web browser.
Recommended web browsers: Chrome, Firefox, Opera, etc.
Sometimes, the browser extensions may interfere with Facebook, causing you to fail to upload videos to Facebook using a browser. You can try to disable or remove the unnecessary extensions installed on your browser and then post your video again.
The following will take Chrome as an example to show you how to disable/remove browser extensions.
Step 1. Click the three-dot icon in the top-right corner.
Step 2. Navigate to the “Extensions” option and select “Manage Extensions”.
Step 3. Turn off or remove the extensions in the list.

VPN service allows you to send and receive data across public or shared networks. However, using a VPN service may cause transmission interruptions and detect another tweaked IP address, thus resulting in an unsuccessful video upload. So you can try to close the VPN and upload your video again.
If your video still cannot be uploaded to Facebook, there’s likely an error on the server side. You can describe your issues to Facebook and ask for help.
Find the “Help Center” on Facebook and search for “fix a problem” to report your problem.
It can be very frustrating when you can't upload videos to Facebook. But don't worry. This article explained why your Facebook video is not uploading and offered some handy solutions to help you resolve the issue. I hope you can fix it and upload your video to Facebook smoothly.
Thanks for reading till the end. Have a good day!
To upload videos to Facebook faster, you should have a good internet connection and optimize your video for Facebook’s requirements.
More methods are discussed in this post: How to Upload Videos to Facebook Faster?
If you can’t see the uploaded video on Facebook, the possible reasons are:
1. Poor internet connection
2. Outdated Facebook app
3. Errors in Facebook servers
4. Old or incompatible browser
5. VPN stayed on
6. Facebook requirements not met
7. Corrupted or broken files
To solve the issue, refer to this post: 9 Methods to Solve "Facebook Videos Not Playing" Issue
The maximum video size for Facebook is 10 GB. Larger file sizes may require longer uploading time or even fail to upload.
Privacy Policy | Copyright © 2009-2026 WonderFox Soft, Inc.All Rights Reserved