Learn how to record audio on Premiere Pro and methods to help you quickly fix various Premiere Pro audio recording issues.
Yes. Premiere Pro is an industry-standard video editing software, which also includes some features for audio recording.
You can either record audio directly onto a track in the timeline by enabling the “Voice-over Record” button on that track, or you can use the “Audio Track Mixer” panel to manage and record audio across multiple tracks.
Now, we’ll walk you through how to record audio in Premiere Pro using these two features step by step.
This Voice-Over Record button offers you a convenient way to capture sound onto an audio track within the Timeline.
Get ready the audio track in the Timeline to which you want to add the voice-over. If you need a new audio track, right-click on the Timeline and select ‘Add Track’.
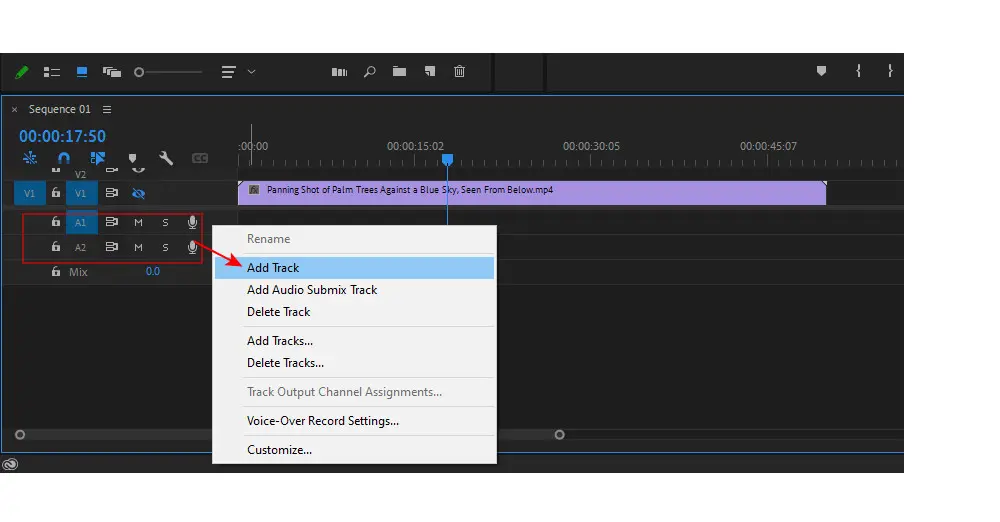
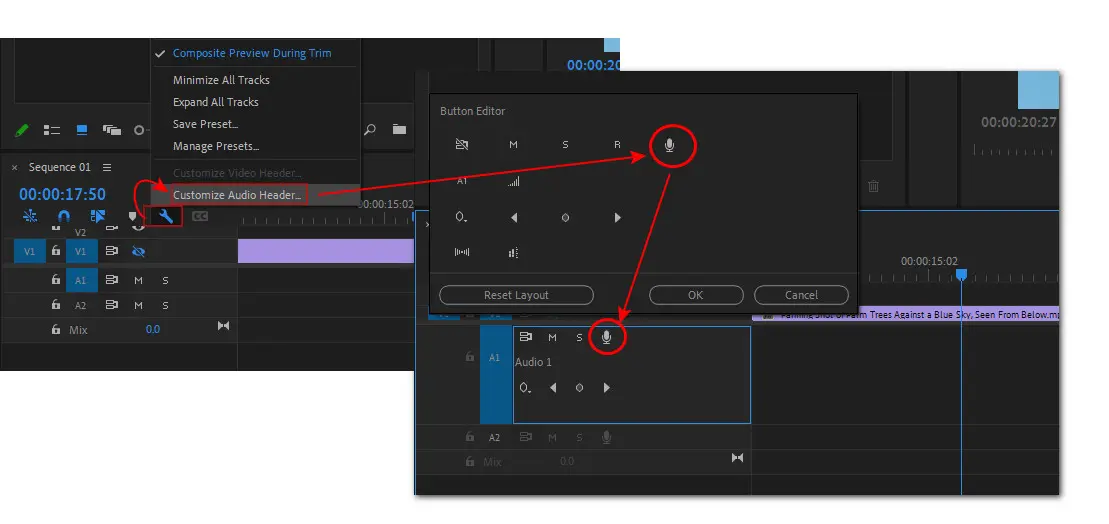
If you don’t see the Voice-over Record button, you need to enable it first.
Click on the wrench icon in the Audio Track Header and select ‘Customize Audio Header…’. Then drag the microphone icon to the target audio track header section.
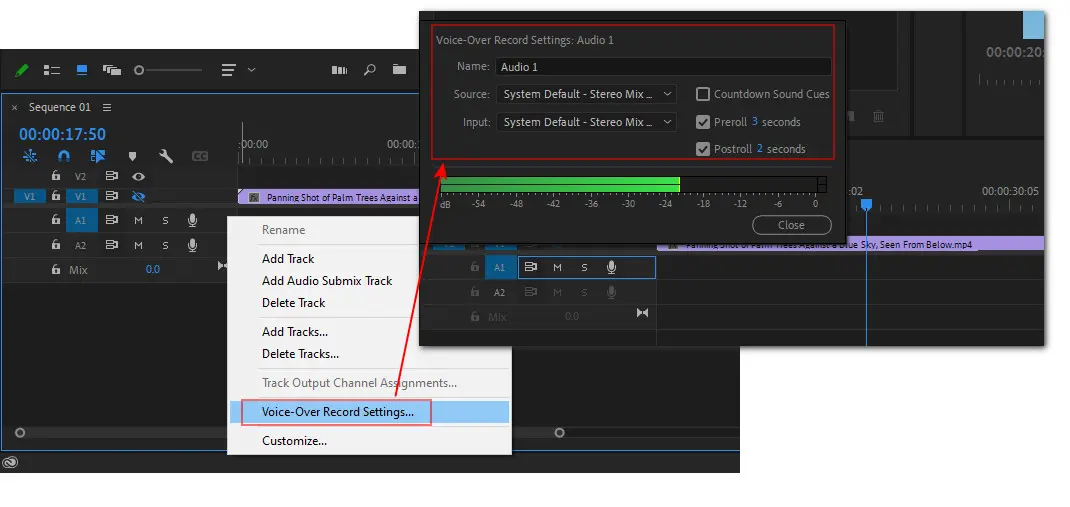
Right-click on the Audio Track Header and select ‘Voice-Over Record Settings’ to select the correct input device.
Here you can also customize the pre-roll and post-troll countdown duration for your voice-over recording workflow. Simply enter your desired countdown duration (e.g., 3 seconds, 5 seconds).
Alternatively, you can head to the menu bar and click ‘Edit’ > ‘Preferences’ > ‘Audio Hardware’ to configure the recording device.
Now, click the Voice-Over Record button and it will start recording after the countdown reaches zero.
You can also see a red status message ‘Recording...’ displayed in the Program Monitor to indicate the voice-over is in progress.
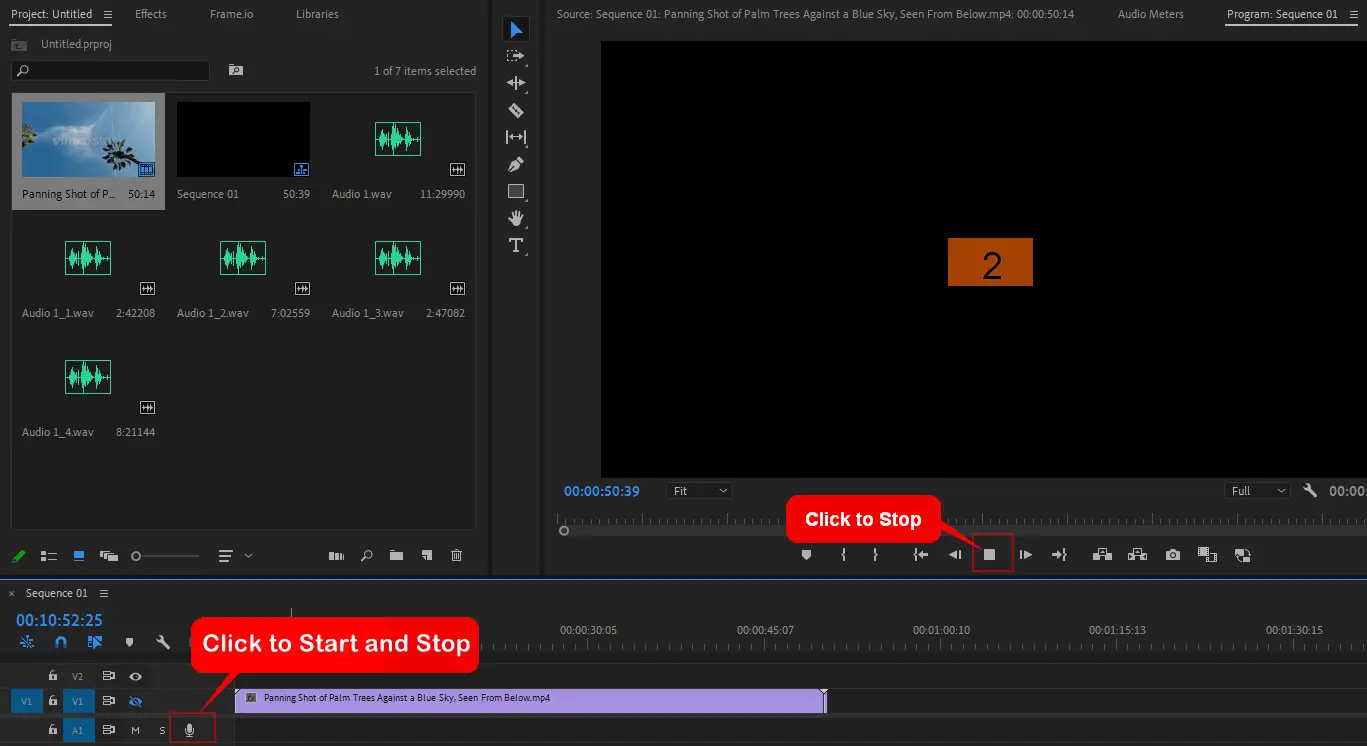
Simply hit the Microphone icon to finish the recording.
You can also end the recording by hitting the ‘Stop’ button in the program preview window.
Audio Track Mixer is a powerful tool for managing and adjusting entire audio tracks. It is great for recording audio to multiple tracks. Follow our instructions to see how to record audio directly into a sequence’s tracks using it.
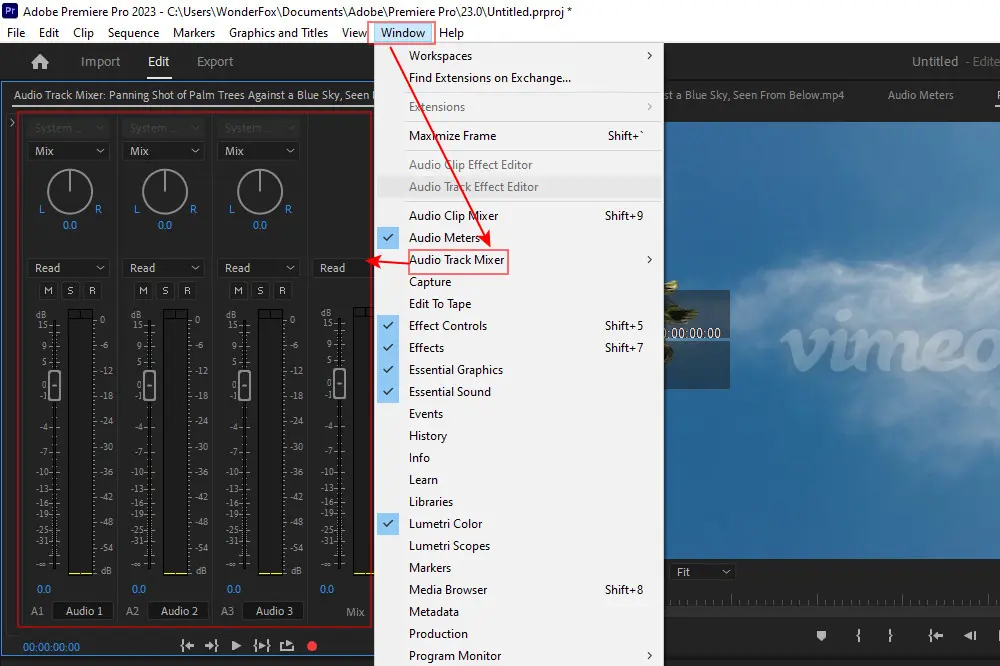
The Audio Track Mixer tool is hidden by default. You need to navigate to the top menu bar and select ‘Window’ > ‘Audio Track Mixer’ to open it.
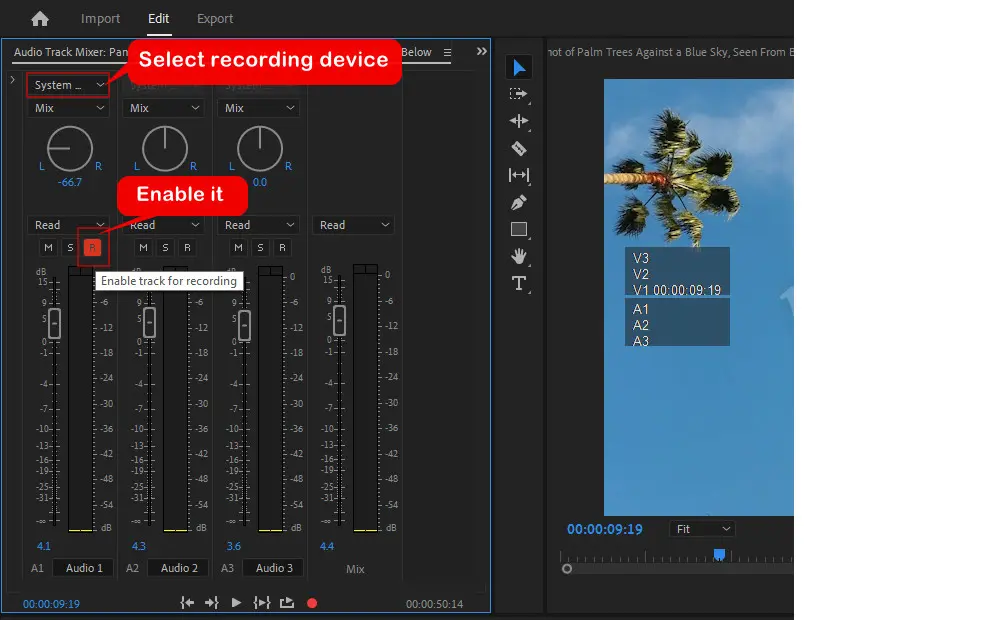
To tell Premiere Pro to record audio to the desired track, you need to click the ‘R’ button (Enable track for recording) in the Audio Track Mixer.
Only after enabling the ‘Record’ option, you can select the input audio device from the top ‘Track Input Channel’ drop-down menu.
To record the audio to all tracks in the same sequence, enable the ‘R’ function of track Audio 1, Audio 2, etc. Then hit the red ‘Record’ icon followed by the ‘Play-Stop Toggle (Space)’ button at the bottom of the Audio Track Mixer panel to start recording at once.
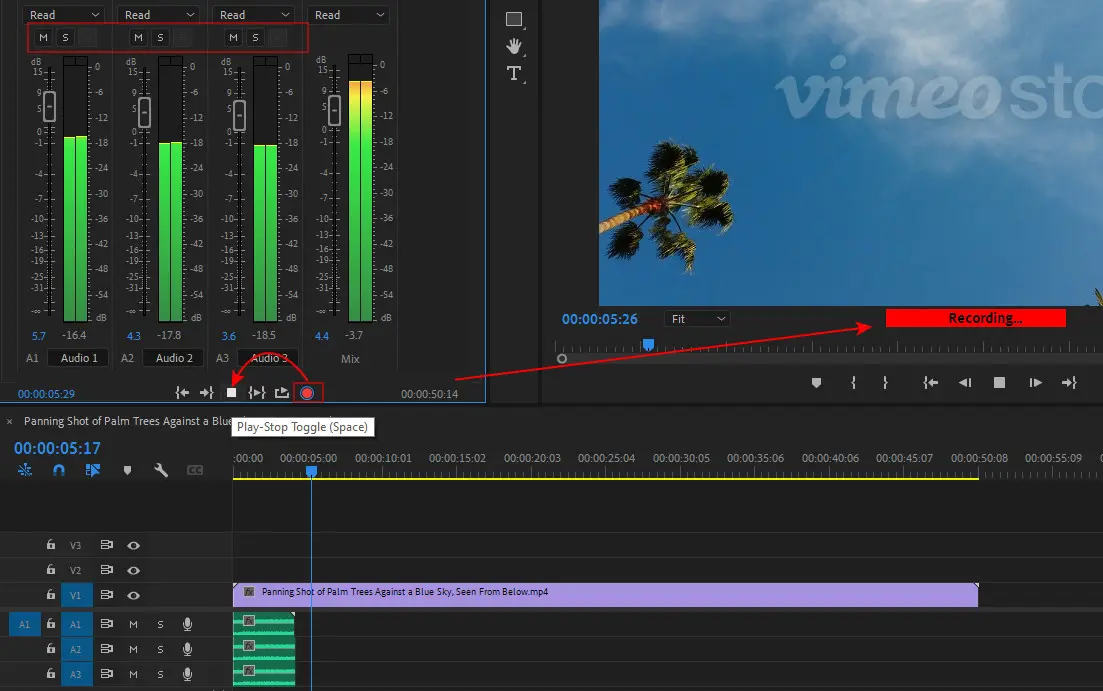
Click the record button again in the Audio Track Mixer or press the Space button to end the recording session.
Premiere Pro not recording audio often results from an incorrect audio input device, deactivated ‘Record’ function, or missing microphone permissions.
Here are the fixes:
🛠️ To select the right input device, go to ‘Edit’ > ‘Preferences > ‘Audio Hardware’ and ensure you’re using the correct microphone as the default input device.
🛠️ When using the Audio Track Mixer to record voiceover directly to an existing sequence, always remember to check the Track name first and then toggle on the ‘Enable track for recording (R)’ option of the desired audio track.
🛠️ To grant microphone permission to record audio in Premiere Pro, head to ‘Settings’ > ‘Privacy’ > ‘Microphone’ and make sure the ‘Allow apps to access your microphone’ option is turned on.
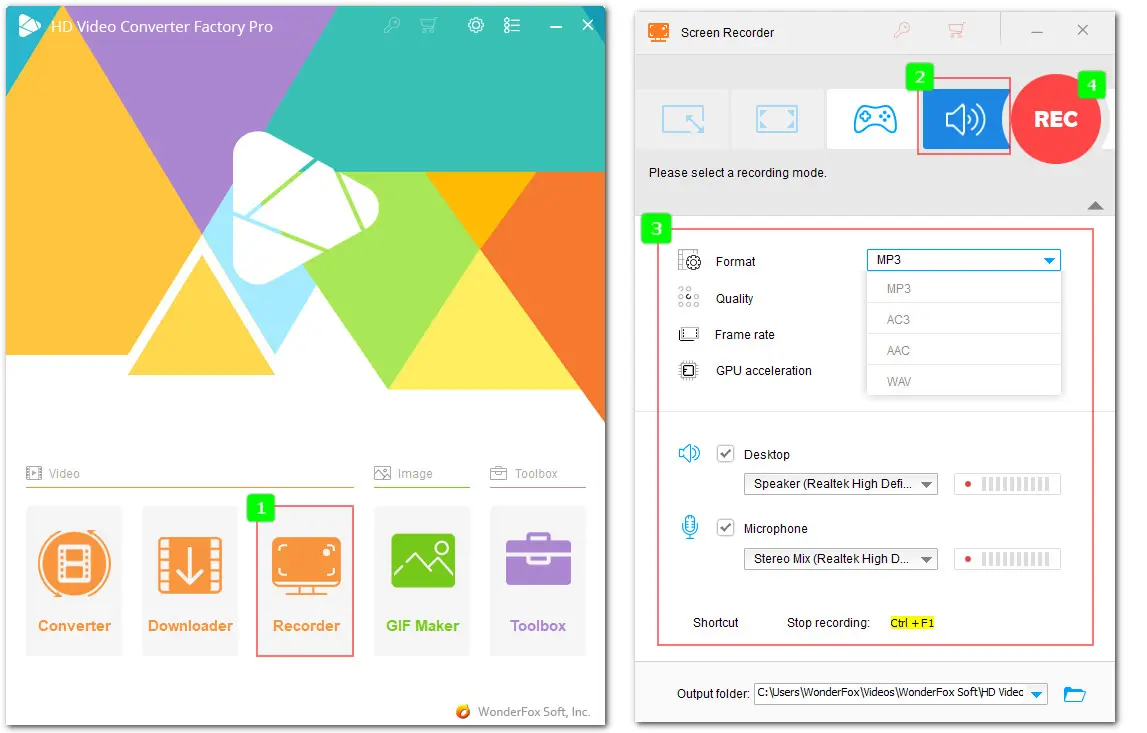
🛠️ Try an audio recorder alternative if all the fixes don’t work. For instance, WonderFox HD Video Converter Factory Pro. It enables you to record system sound, microphone audio, or both simultaneously and save the audio as MP3, WAV, AAC, or AC3 files. Without a complicated interface and setup process, it makes voiceover recording a breeze for everyone.
Recording voiceover in Premiere Pro is generally straightforward, but issues still possibly arise due to inappropriate setup, software glitches, or other causes. That’s why so many turn to forums or YouTube comments for help. To save you time, we’ve rounded up some common questions that are frequently asked and provide effective solutions.
It’s easy. Just place the playhead where the recording ended last time. Then hit the record button to resume recording. The new audio will seamlessly pick up from where it stops.
You can place the playhead at any specific point in the timeline to start recording from that point instead of starting from the beginning.
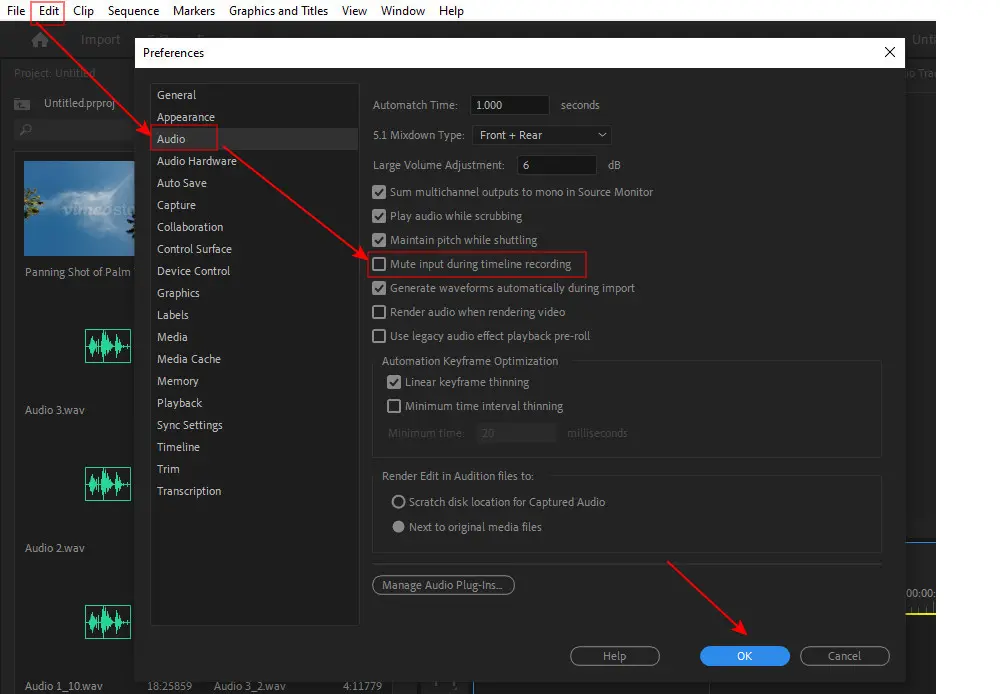
For Premiere Pro users on Mac, they can find the button by clicking ‘Premiere Pro’ > ‘Settings’ > ‘Audio’. Here you can find the ‘Mute input during timeline recording’ option.
For Premiere Pro on Windows, go to the top menu bar and select ‘Edit’. Then down to the ‘Preferences’ option and select ‘Audio’. Voilà! Here is the option.
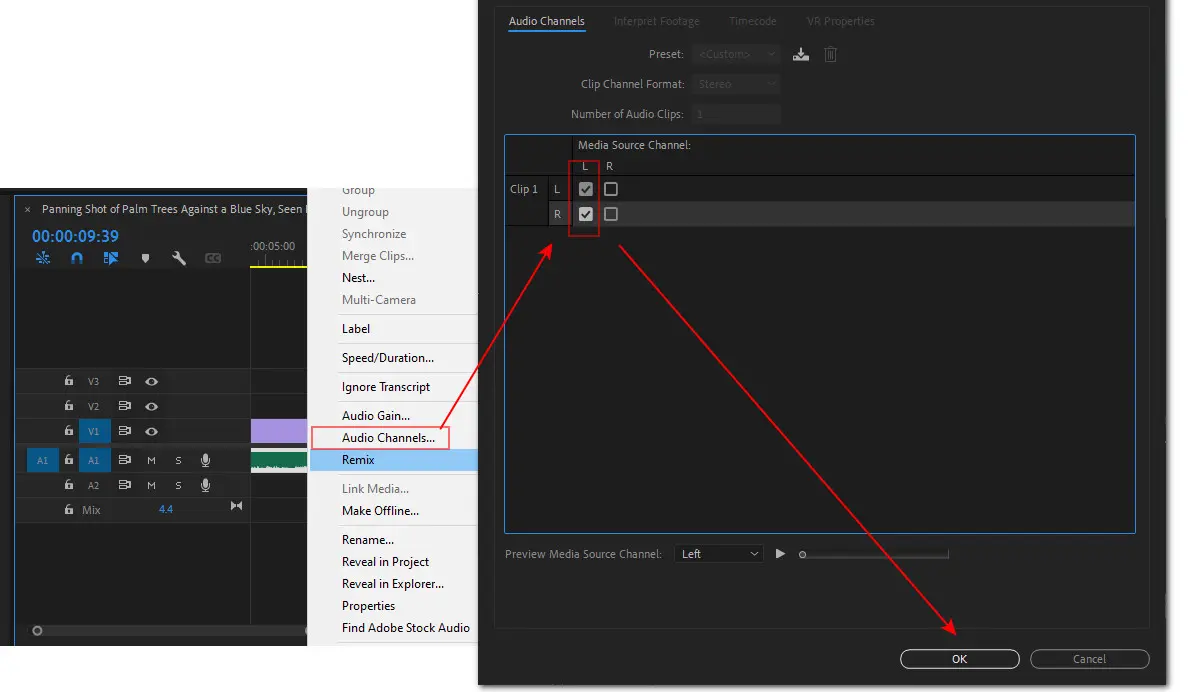
To convert your mono audio to stereo in Premiere Pro, select the desired audio track and right-click on it.
Then from the menu, select ‘Audio Channels’.
Check the both Left and Right boxes of your clip and hit ‘OK’ to confirm the change.
This is often caused by missing input devices. To fix it, right-click on the audio track header and select ‘Voice-Over Record Settings’. In the box, choose the correct audio input device from the ‘Source’ drop-down list.
WonderFox
HD Video Converter Factory Pro
Terms and Conditions | Privacy Policy | License Agreement | Copyright © 2009-2025 WonderFox Soft, Inc. All Rights Reserved.