Step 1. Launch Kodi, click on the cog icon from the upper-left side of the interface to enter System menu.

![]() by Oswald
by Oswald
Updated on July 18, 2023
Using a VPN on Kodi while streaming is a smart idea to protect yourself and access more content. But the lack of proper configuration of proxy settings on Kodi may result in incorrect internet connection issues. On this post, you'll effortlessly learn how to setup proxy settings on Kodi to ensure the Kodi network connection up and running.
This guide will show you how to setup proxy on all Kodi Leia compatible devices including Windows PC, Fire Stick, Fire TV, Android phone, Android boxes, Apple TV, etc.
Kodi media player is a versatile media player app that has been pushed to the utmost by an ocean of Kodi addons that have practically infinite capabilities. With Kodi addons, that are too immature to will its power, you get to enjoy a wealth of movies, TV shows, live streams, live channels, etc. yet might accidentally set foot upon certain content that may not be legal.
In view of this and more, as a wary cord cutter, adopting a VPN for Kodi streaming is a good way to acquire better privacy, lock whomever interested out of your viewing history and steer clear of geo-restrictions for desired alien content.
VPN, at its core, is a service that extends your private network across a public network to disguise your data sending & receiving processes. Whereas without proper configuration on Kodi, a VPN could lead to incorrect internet connection issues on Kodi, such as Could not connect to repository Kodi error, no stream available, addon failed to install, etc.
From the guide in the following, you'll learn how to match the proxy server address and proxy server port of your VPN with Kodi, to enable Kodi to send and receive data from a virtual connection properly.
Skip to Part 2 if you have your proxy info already.
Create a new text document to copy the proxy server address and proxy server port for further use.
 Image: Chris Waite from YouTube
Fire Stick & Fire TV:
Go to Settings > Select My Fire TV > Select About > Select Network
And you can see your IP Address, Gateway, Subnet Mask and DNS listed on the right side.
 Check proxy info on Windows
Windows:
Instruction based on Windows 7 OS, it applies to Windows 10 as well
Search Internet Options from Windows search bar > Select Internet Options from the list of results > Click on Connections tab > Click on Lan Settings
From Proxy server, address string stands for proxy server address and port string stands for proxy server port.
 Image: Noble Samurai from YouTube
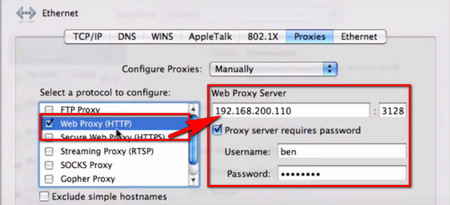
Mac:
Click on the Apple icon at the upper-left corner > System Preferences > Click Network from Internet & Network tab > Advanced > Proxies > Select the protocol of your proxy, usually HTTP.
From Web Proxy Server on the right side, the left string stands for proxy server address and the right one stands for proxy server port.
The username and password of your proxy is shown underneath as well.
Android Box & Android Phone Connected to WiFi:
Go to Settings > Network > Click on the WiFi your device connected to > Proxy Settings
Android Phone on Mobile Data:
Settings > Mobile network > Mobile data > Access Point Names (APNs) > Select the APN you're using
Step 1. Launch Kodi, click on the cog icon from the upper-left side of the interface to enter System menu.

Step 2. From the System menu, click on System button.

Step 3. Hover the cursor over Internet Access tab from the left side. Then, move the cursor to General settings on the right side. Be sure to stay in the Internet Access tab while doing so.
Configure the General menu as follows:
• Use proxy servers: Enable
• Proxy type: This field is HTTP by default as it's the most prevalent transfer protocol these days, switch it to another if the VPN you're adopting uses another file transfer protocol.
• Server: Paste or enter exactly the proxy server address string as we checked in Part 1.
• Port: Paste or enter exactly the proxy server port string as we checked in Part 1.
• Username and password: If there's any username and password of your proxy service, enter it into the blank exactly. Leave these two fields empty otherwise.
• Internet connection bandwidth limitation: We recommend you to keep this field Off (in default) to acquire best stream quality and avoid Kodi buffering.
You can also set a certain bandwidth limitation if you're saving bandwidth occupation for other apps or programs.

Wrap-up.
Reboot Kodi when it's all set, and your Kodi should now be perfectly connected to addons and repositories thru your VPN after that. Trying downloading addons from repo and streaming with addons to see if it does the trick.
Also, we recommend you to use the latest version of Kodi for best performance and to avoid potential issues, check out the guides tagged in underneath to update Kodi to the latest stable release version: Nexus 20.2.
How to Update Kodi on Windows | How to Update Kodi on Fire Stick