Best DVD Ripper for Windows
WonderFox DVD Ripper Pro
√ Rip personal/commercial DVD (disc & ISO & Folder)
√ Remove all sorts of DRM from DVD
√ Make a 1:1 intact digital copy
√ Convert DVD to MP4 & 300+ presets
iMovie is a video editing software developed by Apple for Mac, iPhone, and iPad. However, it has limited support for video formats. If you want to edit a DVD using iMovie, you need to rip the DVD movies off the disc to an iMovie-supported video format first, and then import them into the app to for editing.
To help you easily convert and import DVD to iMovie, we’ll recommend the best DVD to iMovie converter and provide detailed instructions on how to rip and import a DVD into iMovie on both Mac and Windows. Let’s take a look now!
To back up your DVD movies in a format supported by iMovie on Mac, you can use HandBrake. This free DVD ripping tool is open source and can run on various operating systems including Mac, Windows, and Linux.
However, HandBrake’s default settings do not allow it to decrypt copy-protected DVDs. It is commonly used for processing homemade DVDs and digital video files. Nevertheless, you can use a third-party plugin called libdvdcss to bypass this restriction and use it to handle some DRM-DVDs. Before installing the plugin, please ensure that it is legal in your country and do not use the ripped files for commercial purposes.
Next, follow the steps below to install the plugin and learn how to rip and import DVD to iMovie on Mac:
Step 1. Head to its official sites to download and install the latest HandBrake (Version 1.7.3). But make sure you’re running the Mac OS 10.13 or later. For Intel-based Mac, you can install version 1.4.0.
Step 2. There are two common methods to install libdvdcss on MacOS: 1) install it via the Homebrew add-on; 2) manually install it. Here we’ll opt for Option 1 since it is easier to do.
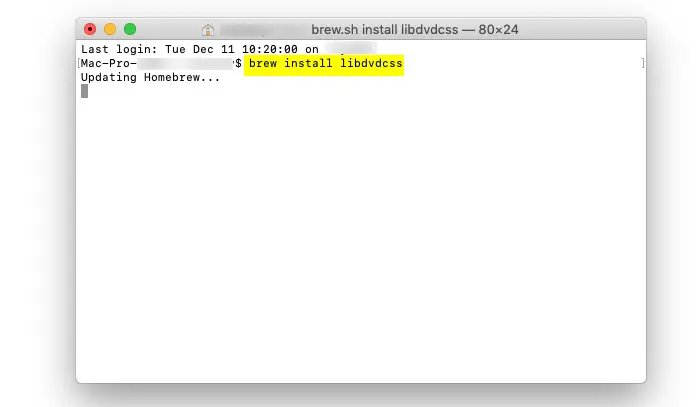
So please make sure you have installed Homebrew already. Open Terminal and enter “brew install livbdvdcss” to download libdvdcss on Mac. Once the downloading is finished, continue to the next move.

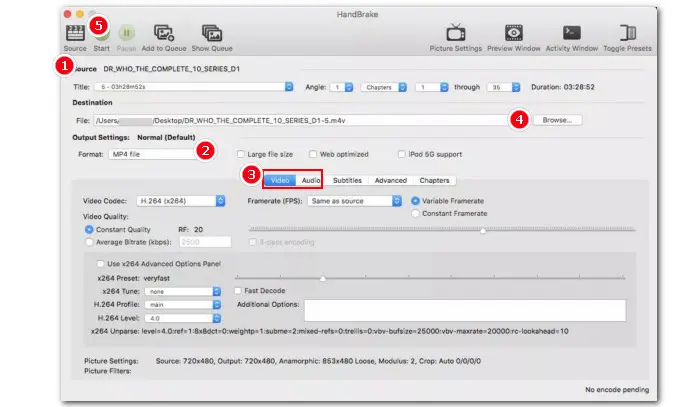
Step 3. The installed libdvdcss library will work in the background to help HandBrake decrypt a protected DVD. You just need to insert the disc into the DVD drive and start HandBrake. Then select a DVD source.
Step 4. Next, select MP4 as the output format from the Format dropdown list.
Step 5. Switch to other tabs to customize the ripping settings. For example, adjust the video and audio codecs to MPEG-4 and AAC so that the output MP4 videos can be more compatible with iMovie.
Step 6. Then click Browse to choose a destination for your ripped DVD movie. Click Start Encode to begin ripping the DVD on Mac.
Step 7. Once the ripping process ends, open iMovie and straightly drag the exported DVD movie into the editor to start editing immediately.
WonderFox DVD Ripper Pro offers the easiest solution to rip DVDs for iMovie on Windows. Powered by professional decryption technology, it can handle various DVDs, whether homemade or store-bought, and convert them to MP4, MOV, AVI, H.264, MPEG-4, or other iMovie-friendly formats. Additionally, you can use it to process other DVD files including DVD ISO Image and VIDEO_TS folder. Its user-friendly interface makes the whole ripping process a breeze.
A simple tutorial for ripping DVD to iMovie with WonderFox DVD Ripper is given below:
Step 1. Download and install this powerful DVD ripper on your PC first.
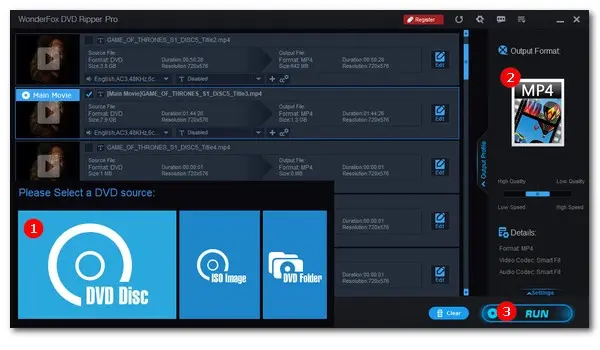
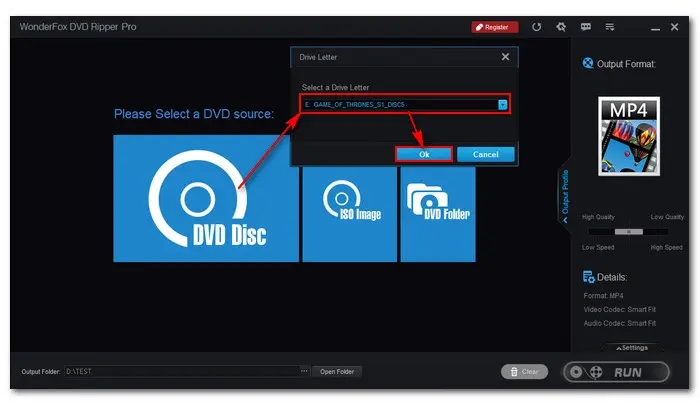
Step 2. Insert your disc into the DVD-ROM drive and then launch this program. Click DVD Disc on the startup interface to select the inserted DVD drive letter.
Then the tool will intelligently decrypt, analyze, and detect the DVD content. When the process is complete, you can see all the included clips, along with the main title automatically marked for you.
Step 3. Then open the right-side format library and head to the Video section to select an iMovie format such as MP4, MOV, or H.264(.mp4).
Step 4. If you have specific needs for the output parameters, you can expand the Settings option to customize the video and audio codecs, resolution, FPS, bitrate, deinterlace, etc.
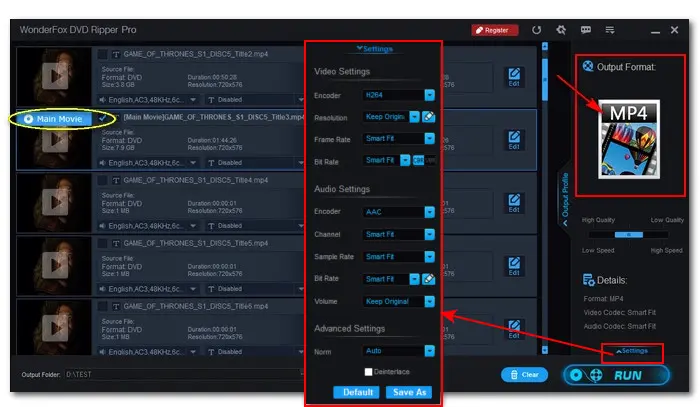

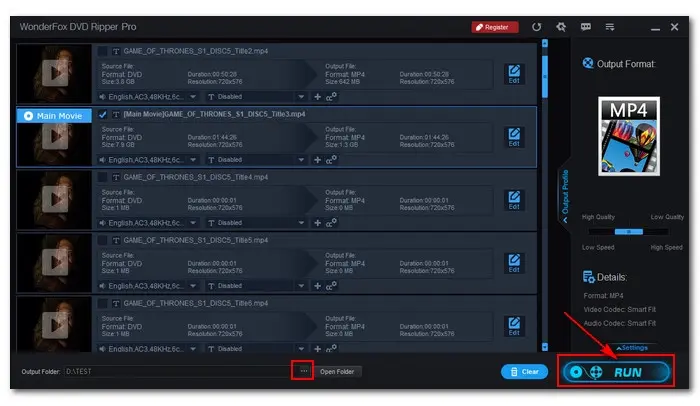
Step 5. When all settings are ready, click the three dots to set an output folder. Finally, hit RUN to start the DVD-to-iMovie conversion process.
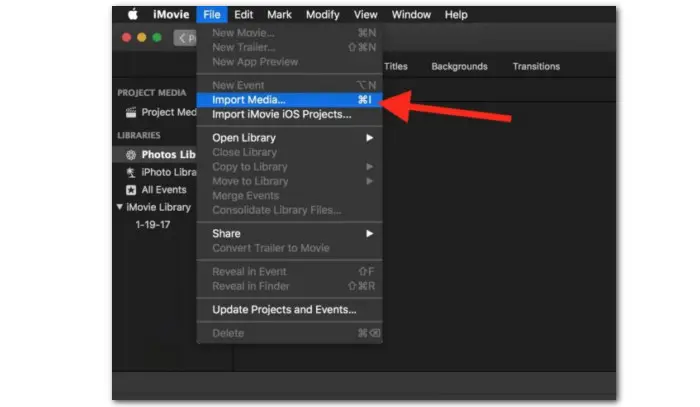
Step 7. Now, launch your iMovie and go to File > Import Media to load the ripped DVD movies for a seamless editing experience.
Disclaimer: WonderFox does not advocate any illegal duplication and distribution of DVDs. Please refer to the DVD copyright laws in your country before you rip any DVDs.
It is impossible to import DVD to iMovie directly on an iPhone or iPad. However, you can still edit DVD movies on your portable iOS device by digitizing them on your computer first to a format like MOV that iMovie accepts. After that, you can transfer the digital video to your iPhone or iPad using a USB cable, cloud storage service, or data transfer app.
No. iMovie itself does not support DVD formats such as VOB, let alone DVD discs.
You can rip the DVD movies to digital files like MP4, MOV, or other video types that iMovie can work with. Besides the mentioned HandBrake and WonderFox DVD Ripper Pro, many other DVD to digital converters such as VLC, DVDFab, MacX DVD Ripper, FFmpeg, etc., also offer a format preset for iMovie, allowing you to convert DVD to iMovie on Windows or Mac with ease.
Terms and Conditions | Privacy Policy | License Agreement | Copyright © 2009-2025 WonderFox Soft, Inc.All Rights Reserved