


In most cases, video trimming affects the output video quality because the video file is re-encoded, which means the video codec, resolution, bitrate or frame rate (factors that determine quality) are changed. However, if the video cutter allows you to keep the encoding settings unchanged to avoid video re-encoding, you can trim video without losing quality or keep the quality loss to a minimum.
In the next part, I will talk about how to cut video without losing quality with a simple lossless video trimmer. Read on for more details.
WonderFox HD Video Converter Factory Pro is the best video cutter without losing quality I’ve used thus far. It can trim any video into shorter files or multiple clips. At the same time, it supports no re-encoding to cut videos without losing quality. Since it can edit videos without re-encoding, it can also losslessly combine videos if the source file types are the same.
The software is easy to use and the whole process takes a few simple clicks. Without further ado, let me show you how to cut video without quality loss using this program. Download Download the lossless video cut software to get started.
WonderFox HD Video Converter Factory Pro offers an easy, quick way to split/trim/cut a video without losing quality. All formats are supported, e.g. MP4, MKV, AVI, MPG, TS, MOV, WebM, etc., and more practical editing features are available. Download it and have a try now!
* The example shows how to trim an MP4 without losing quality.
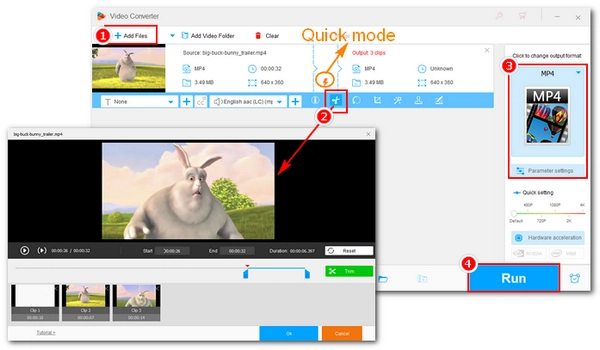
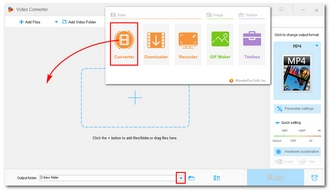
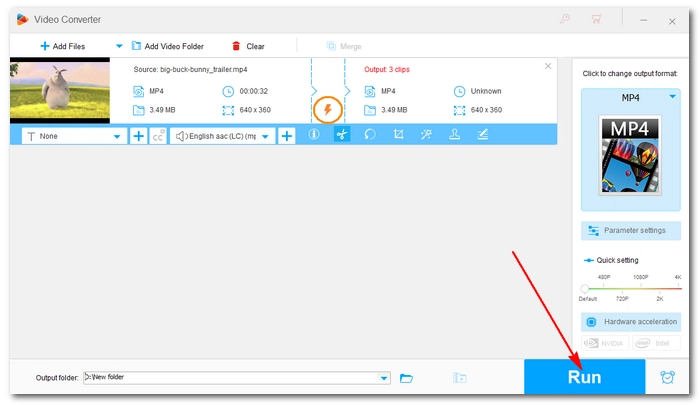
Launch WonderFox HD Video Converter Factory Pro on your PC and open the “Converter.” Next, click the “Add File” or “+” button to import your video into the program. Drag-and-drop is supported as well.
(Optional) Click the bottom ▼ button to set an output folder in advance.

Click the scissor icon to open the Trim window. Drag the two markers on the timeline or input the start time and end time to select the segment you want to keep. Use the “Play” button to preview the selected part, and click “Trim” to cut the clip. You can repeat this step to split the video into multiple parts. After trimming, click “OK” to save the changes.
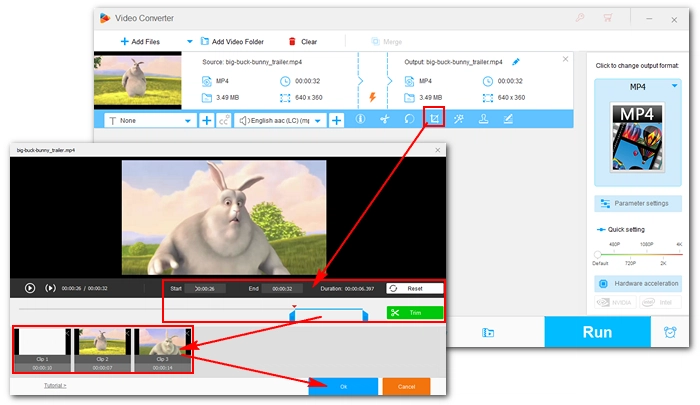

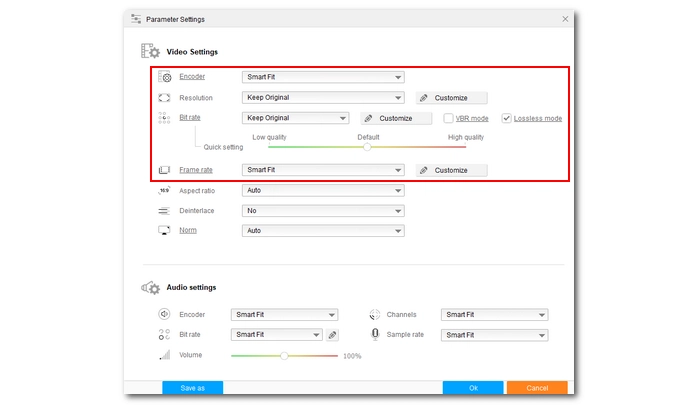
To trim video without losing quality, you are going to keep the codec, resolution, and frame rate unchanged. You can check the detailed info of your video by clicking the ⓘ icon in the tool bar.
Now, you need to choose a video container. Hit the format image on the right to open the output format list. Then head to the “Video” section and select a video format. You are recommended to keep the same video format or choose a format that supports the codec the original file is using.


Next, open “Parameter settings” and keep the Video Settings part unchanged. In the Audio Settings, you need to change the audio encoder, channel, bit rate, and sample rate to the original value. Click the pencil icon after the Bit rate box to type in the exact audio bitrate. Then click "Ok" to return to the main workspace.
Tips. You will see a lightning icon appeared, which indicates that the settings are kept the same as the original. This will trigger a 50x faster conversion and help you trim a video without losing quality.
Finally, click “Run” to finish the video trimming process.
Hot Search: Merge Video No Quality Loss | Remux MKV to MP4 | Change Video Container | Trim Video without Increasing File Size

WonderFox DVD Ripper Pro
WonderFox DVD Ripper Pro is a professional DVD ripping program that can easily rip any DVD, be it homemade or commercial, to all popular formats including MP4, MKV, MP3, WAV, H264, H265, Android, iPhone, etc. without a hitch. It also lets you edit and compress DVD videos at high efficiency. Download it to enjoy fast and trouble-free DVD ripping experience.
Terms and Conditions | Privacy Policy | License Agreement | Copyright © 2009-2024 WonderFox Soft, Inc.All Rights Reserved